How to set the network setup options
[Solution]
To set up the NETWORK setup options, please refer to the following instructions.
1. How to use NETWORK SETUP
To obtain information on the proper settings, check the network settings on your computer or contact your Internet provider. To set the network of your Blu-ray Disc player, follow the steps below.
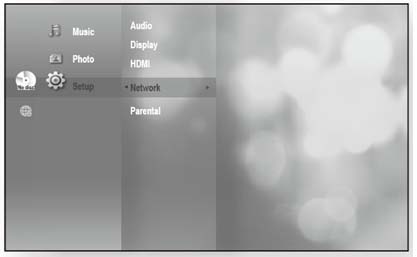
1) With the unit in Stop mode/No Disc mode, press the MENU button.
2) Press the ▲▼ buttons to select Setup, then press the ENTER or ▶ button.
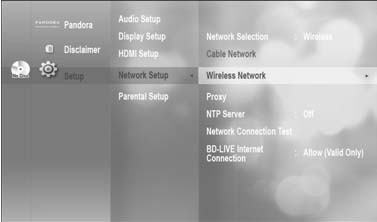
3) Press the ▲▼ buttons to select network Setup, then press the ENTER or ▶ button.
4) Press the ▲▼ buttons to select the desired network option from the options described below, then press the ENTER or ▶ button.
5) Press the ▲▼ buttons to select the desired item, then press the ENTER button. Each network option is described in detail below.
2.
How to choose Network Selection
1) With the unit in Stop mode/No Disc mode, press the MENU button.
2) Press the ▲▼ buttons to select Setup, then press the ENTER or ▶ button.
3) Press the ▲▼ buttons to select network Setup, then press the ENTER or ▶ button.
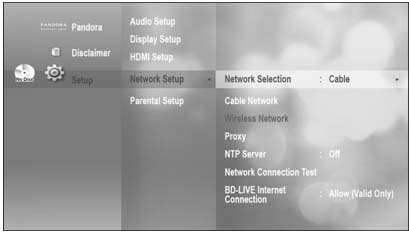
4) Press the ▲▼ buttons to select network Selection, then press the ENTER or ▶ button.
• Cable: Select this to connect to the network using a cable.
• Wireless: Select this to connect to the network wirelessly.
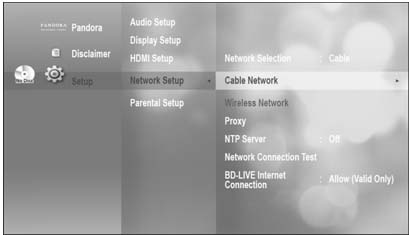
• Cable network
To setup, follow steps.
1) With the unit in Stop mode/No Disc mode, press the MENU button.
2) Press the ▲▼ buttons to select Setup, then press the ENTER or ▶ button.
3) Press the ▲▼ buttons to select network Setup, then press the ENTER or ▶ button.
4) Press the ▲▼ buttons to select Cable network, then press the ENTER or ▶button.
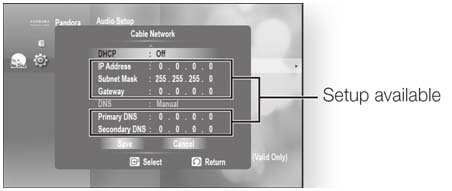
5) Press the ▲▼ buttons to select DHCP, then press the ENTER button.
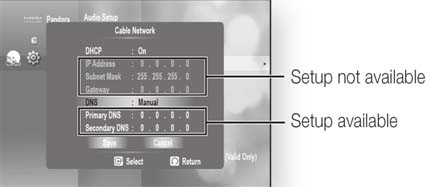
• If DHCP is set to On, you can't select IP Address, Subnet Mask or Gateway.
• If DNS is set to Auto, you can’t select Primary/ Secondary DNS.
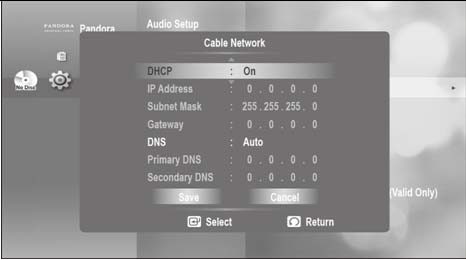
6) Press the ▲▼ buttons to select a desired item, then press the ENTER button.
• If DHCP is set to Off and, DNS to Manual, enter your IP Address, Subnet Mask, Gateway and Primary DNS settings (Secondary DNS is optional).
• If DHCP is set to On and, DNS to Manual, enter your Primary DNS setting (Secondary DNS is optional).
• If DHCP is set to On and, DNS to Auto, you don’t need Further or additional settings.
7) When done, use the ▲▼ buttons to select Save, then press the ENTER button.
8) If you don’t want to save your work, use the ▲▼◀▶ buttons to select Cancel, then press the ENTER button.
(Important: The IP address used in this manual is for illustrative purposes only. You must refer to your network settings for the actual IP address.)
• Wireless Network
To setup, follow steps.
1) With the unit in Stop mode/No Disc mode, press the MENU button.
2) Press the ▲▼ buttons to select Setup, then press the ENTER or ▶ button.
3) Press the ▲▼ buttons to select network Setup, then press the ENTER or ▶ button.
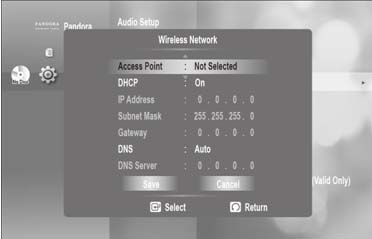
4) Press the ▲▼ buttons to select Wireless network, then press the ENTER or ▶ button.
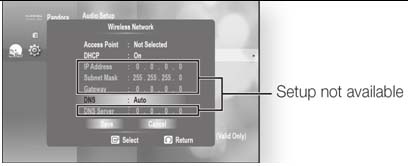
5) Press the ▲▼ buttons to select DHCP, then press the ENTER button
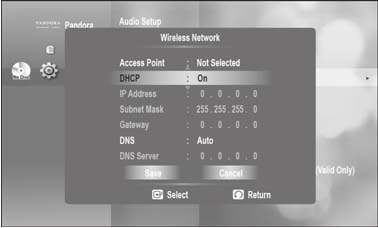
(Important: If DHCP is set to On, you can't select IP Address, Subnet Mask or Gateway. If DNS is set to Auto, you can’t select Primary/ Secondary DNS.)
6) Press the ▲▼ buttons to select a desired item, then press the ENTER button.
• Select an Access Point, and then press the ENTER button to display available list of APs. (It may take several seconds to search.)
• When you select an AP and press the ENTER button, it tries to connect to the designated AP.
• If successful, a notification appears. (If selected AP shows a Lock icon, you may need to provide security authentication.)
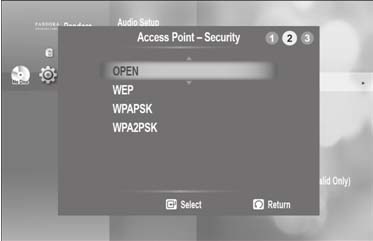
• Select your appropriate Security Access Point if it is known. If it is not, select WEP, WPAPSK or WPA2PSK from the list below and enter in the password. Keep trying each Security Access Point and enter the Password until a connection is made.
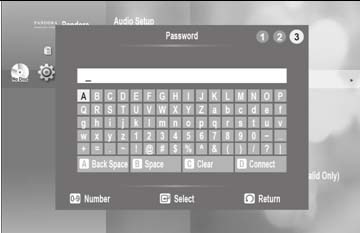
• Enter in the Password then press the BLUE (D) button to connect to your access point (Router). For further details on AP security, refer to the AP’s(Router) user manual.
• If DHCP is set to Off and, DNS to Manual, enter your IP Address, Subnet Mask, Gateway and DNS Server.
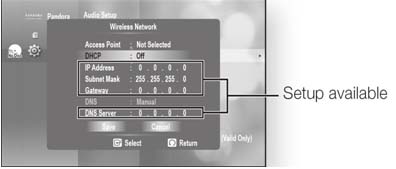
• If DHCP is set to On and, DNS to Manual, enter your DNS Server.
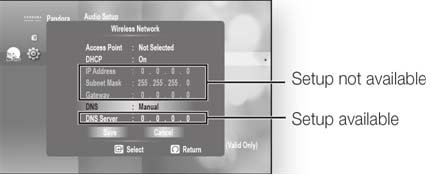
• If DHCP is set to On and, DNS to Auto, you don’t need further or additional settings.
7) When done, use the ▲▼ buttons to select Save, then press the ENTER button.
8) f you don’t want to save your work, use the ▲▼◀▶ buttons to select Cancel, then press the ENTER button.
※Note:
The IP address used in this manual is for illustrative purposes only. You must refer to the your network settings for the actual IP address.
To obtain settings for IP address, Subnet mask, Gateway and DNS Server, check the network settings in your computer or contact your internet service provider.
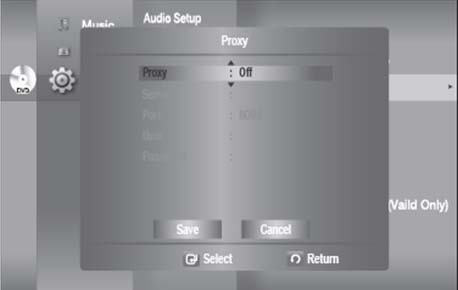
• Proxy Setting
A proxy server services requests by forwarding them to other servers. If you are required to configure the proxy setting, enter the settings specified by the ISP. To setup, follow steps
1) With the unit in Stop mode/No Disc mode, press the MENU button.
2) Press the ▲▼ buttons to select Setup, then press the ENTER or ▶ button.
3) Press the ▲▼ buttons to select network Setup, then press the ENTER or ▶ button.
4) Press the ▲▼ buttons to select Proxy, then press the ENTER or ▶ button.
•
Server
• Port
•
User
• Password
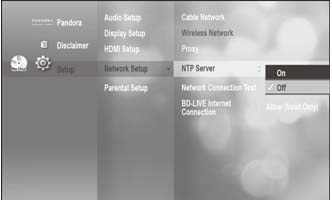
• NTP Server
To setup, follow steps.
1) With the unit in Stop mode/No Disc mode, press the MENU button.
2) Press the ▲▼ buttons to select Setup, then press the ENTER or ▶ button.
3) Press the ▲▼ buttons to select network Setup, then press the ENTER or ▶ button.
4) Press the ▲▼ buttons to select NTP Server, then press the ENTER or ▶ button.
• On: The player automatically connects to the Internet server in order to adjust the time setting.
• Off: The player does not connect to the Internet server to adjust the time setting.
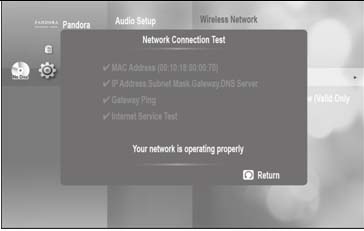
• Network Connection Test
Use this menu to check whether your network connection is working or not. To setup, follow steps
1) With the unit in Stop mode/No Disc mode, press the MENU button.
2) Press the ▲▼ buttons to select Setup, then press the ENTER or ▶ button.
3) Press the ▲▼ buttons to select network Setup, then press the ENTER or ▶ button.
4) Press the ▲▼ buttons to select network Connection Test, then press the ENTER or ▶ button.
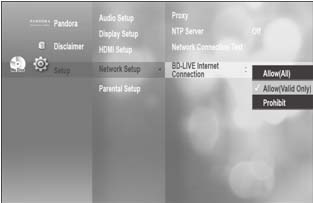
• BD-LIVE Internet Connection
The Blu-ray Disc player supports BD-LIVE which enables you to enjoy a variety of interactive service contents provided by the disc manufacturer through a network connection. To enjoy this feature, you must first perform the LAN connection or Wireless LAN adapter connection to the USB slot.
(Important: You must have a minimum 1 GB USB Memory device inserted in one of the USB slots in order to download content from BD-LIVE. The Internet connection may be restricted while you are using BD-LIVE contents.)
To setup, follow steps.
1) With the unit in Stop mode/No Disc mode, press the MENU button.
2) Press the ▲▼ buttons to select Setup, then press the ENTER or ▶ button.
3) Press the ▲▼ buttons to select network Setup, then press the ENTER or ▶ button.
4) Press the ▲▼ buttons to select BD-LIVE internet Connection, then press the ENTER or ▶ button.
• Allow (All) : The Internet connection will be allowed for all BD-LIVE contents.
• Allow (Valid Only) : The Internet connection will be allowed only for BD-LIVE contents containing a valid certificate.
• Prohibit : No Internet connection will be allowed for any BD-LIVE content.
※Note:
• What is a valid certificate? When the Blu-ray Disc player uses BD-LIVE to send the disc data and request to the server to certify the disc, the server uses the transferred data to check if the disc is valid and sends the certificate back to the player.
• The Internet connection may be restricted while you are using BD-LIVE contents.
Thank you for your feedback!
Please answer all questions.