How can I clean the shelves and bins in my refrigerator?
There are many ways to keep your refrigerator like a new one, but one of the most important things is cleaning the shelves and bins. Cleaning the shelves and bins helps to keep bad odors away and to keep them germ-free. See the cleaning instructions and additional tips below.
Overview of the shelves and bins
There are many different kinds of shelves and bins for usage in the refrigerator that you have.
- Fridge shelf
- Vegetable shelf
- Foldable shelf
- Door bin

Note: The actual image and provided component parts of the refrigerator may differ, depending on the model and country.
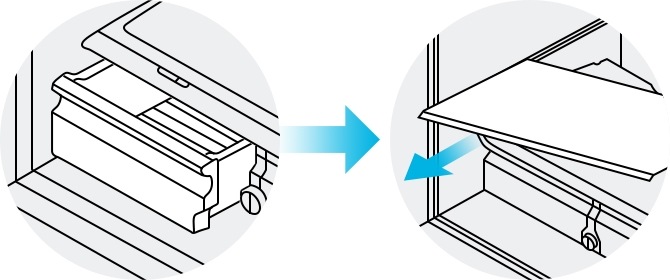
How to remove
Step 1. Make sure to fully open the corresponding door before you remove a shelf.
Step 2. To remove, hold the front part of the shelf and slowly lift it up and slide it out.

Note:
- Do not lift up the shelf fully when removing or reinserting the shelf. Doing so can damage the rear wall of the fridge.
- The tempered glass shelves are heavy. Use caution when removing them.
- Glass containers may damage the surface of glass shelves.
- The actual design of the compartments may differ from your model.
Step 1. Smoothly slide out the left side vegetable shelf.
Step 2. Grab the vegetable shelf with your one hand, and then slide it out with your other hand.
Note: The actual design of the compartments may differ from your model.
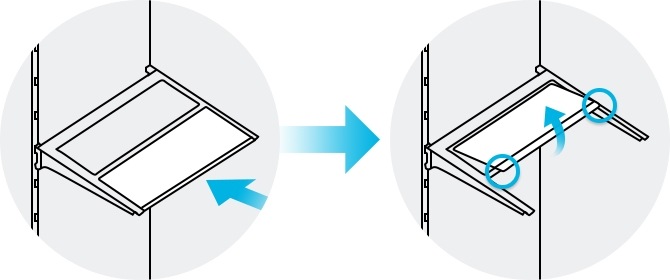
French door fridge
Step 1. Fold up the front part of the shelf.
Step 2. Smoothly lift it up and pull it out to remove.
Bottom mount fridge
Step 1. Lift up the front part of the shelf and then pull it out.
Step 2. Lift one side of the shelf and slide it out.
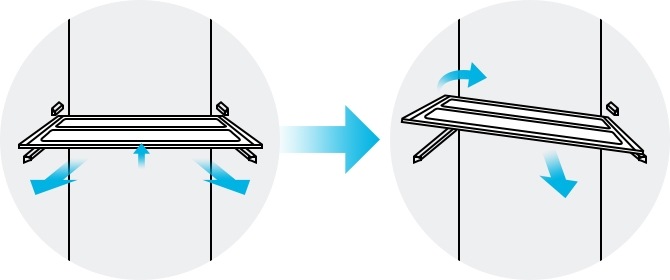
Note: The actual design of the compartments may differ from your model.
Step 1. To remove it, grab the door bin with both hands.
Step 2. Gently lift it up and remove it.
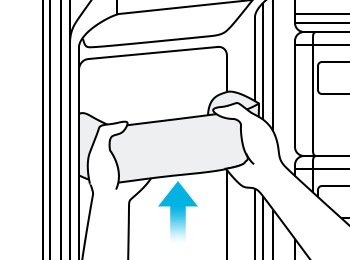
Note: The actual design of the compartments may differ from your model.
When you clean the shelves, you should not miss the plastic trimmings under the shelf. These parts are also removable, so you can clean it up. The way to separate them is as follows.
Step 1. Remove the shelf from the refrigerator, turn it over and find the retainer clips located on the back left and right side corners.
Step 2. Locate the tabs that hold the retainer clips in place, which are also located in the back corners.
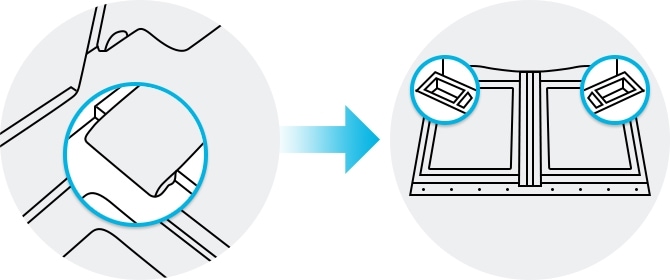
Step 3. Lift the back corners smoothly one by one, and then push the tabs that hold the retainer clips in place.
Step 4. After removing both clips, separate the glass from the plastic trimming by lifting the shelves carefully.
Note:
- When pushing the tabs, push only the side of the tabs closest to the center of the shelf.
- The actual design of the compartments may differ from your model.
Note:
- For normal models, do not change the position of the freezer shelves.
- Freezer shelves have different lengths, and if you change the position, you may damage the product when closing the door.
- Before removing any accessories, make sure that no food is in the way. When possible, remove the food altogether to reduce the risk of accidents.
How to clean
When food is spilled, wiping it off immediately is the best way to prevent odors and bacteria.
It is very important to choose a suitable detergent for this purpose. We recommend using a mild detergent in warm water or a glass cleaner to clean the shelves and bins. In addition, use a clean sponge or soft cloth to avoid scratches.
It is recommended to wipe and dry it with a microfiber cloth after cleaning.
Cautions
- Do not use benzene, thinner, or bleach for cleaning. They may damage the surface of the appliance and may cause a fire.
- Do not use abrasive or harsh cleansers such as window sprays, scouring cleansers, flammable fluids, muriatic acid, cleaning waxes, concentrated detergents, bleaches, or cleansers containing petroleum products on the exterior surfaces (doors and cabinet), plastic parts, door, and interior liners, and gaskets. These can scratch or damage the material.
Note:
- Do not spray water directly on the inside or outside the refrigerator. There is a risk of fire or electric shock.
- Do not use a hairdryer to dry the inside of the refrigerator.
- Do not use a wet or damp cloth when cleaning the plug. Otherwise, there is a risk of fire or electric shock.
- Do not clean the appliance by spraying water directly onto it.
- Never put fingers or other objects into the dispenser hole. It may cause a personal injury or material damage.
- Before cleaning or performing maintenance, unplug the appliance from the wall socket.
- Do not clean glass shelves or covers with warm water when they are cold.
- Glass shelves and covers may break if exposed to sudden temperature changes or impacts such as bumping or dropping.
Cleaning cycle
We recommend cleaning your shelves and bins at least once a year. After cleaning them, do not forget to clean between and behind them as well. Other cleaning and checking cycles are as follows.
- Immediately: After a spill
- Daily: Checking expired items
- Weekly: Unused ice
- Monthly: Checking spills, crumbs, or messes
How to replace the broken shelves or bins
You can purchase extra shelves or bins to replace them when it's broken. Visit Samsung.com/support and go to the Shop category. You will find the available accessories that fit in your refrigerator and can purchase them.
The serial number of your refrigerator can be easily found by opening the upper left door on the front or the lower left side.
Thank you for your feedback!
Please answer all questions.
Sign Language Support
![]()
![]()


Samsung Members
![Samsung Members app icon]()
![Samsung Members app icon]()


Always here for YOU
![Always here for YOU]()
![Always here for YOU]()

