How do I improve the picture quality on my Samsung TV?
When it comes to watching TV, many people have different preferences for their viewing experience. This guide will walk you through various adjustments you can make to enhance the picture quality on your TV.
Configure the screen settings to your taste by adjusting the Picture settings and Picture mode.
1. From the Home screen, press left on the remote.

2. Navigate to and select Settings.
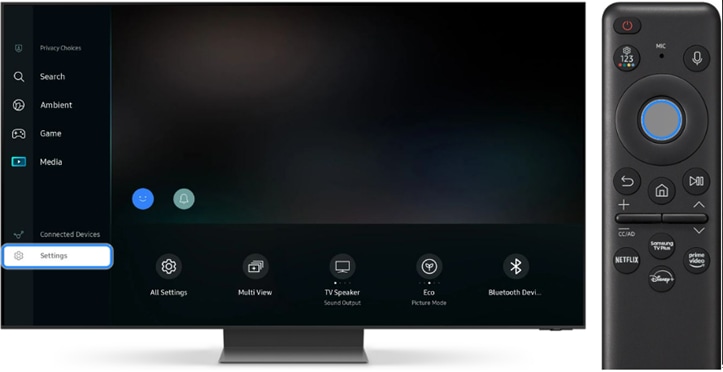
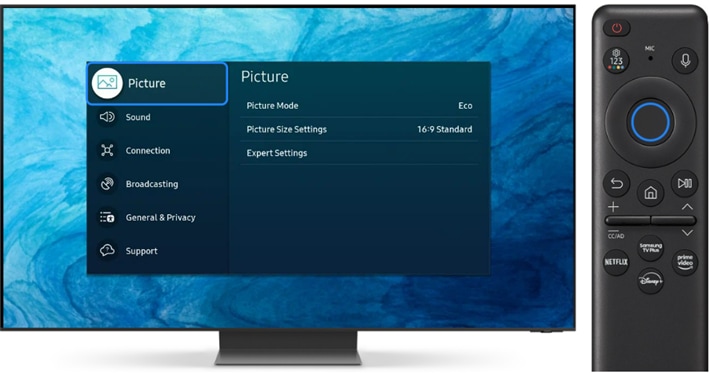
3. Navigate to and select All Settings.

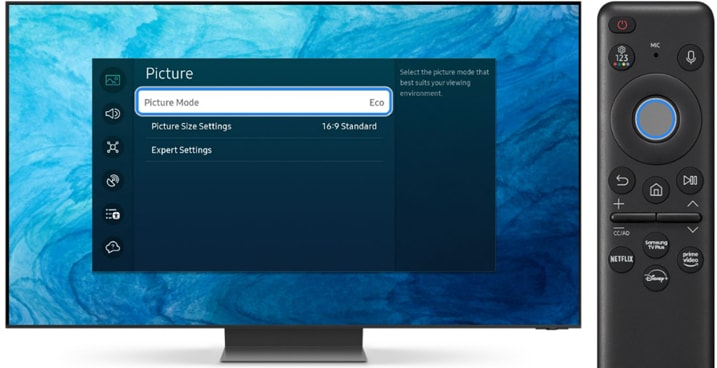
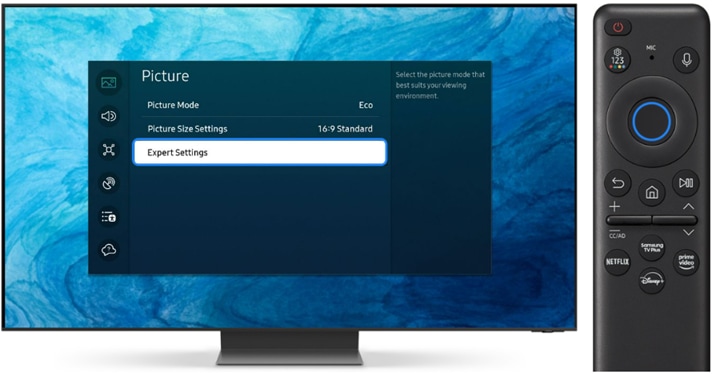
4. Select Picture.
5. Navigate to and select the Picture mode.
6. From here, you can adjust the following Picture mode settings:
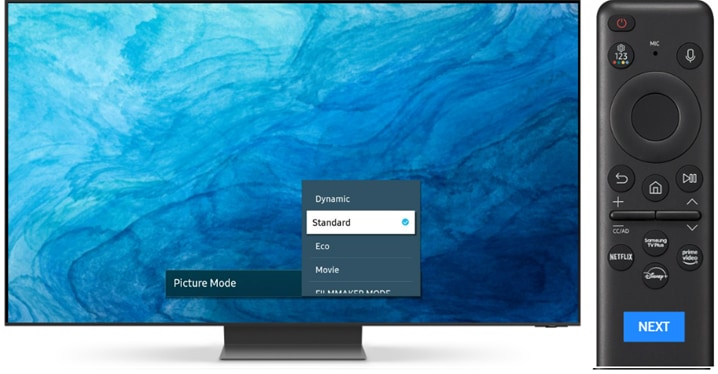
Dynamic: Makes the picture appear brighter and clearer in bright viewing environments.
Standard: This is the default mode that is suitable for most viewing environments.
Eco: This mode will focus on saving energy.
Movie: Suitable for watching TV programs or movies in a dark room.
FILMMAKER MODE: Provides enhanced picture quality certified by the UHD Alliance.
Note: Filmmaker mode may appear darker than other picture modes.
1. From the Home screen, press left on the remote.
2. Navigate to and select Settings.
3. Navigate to and select All Settings.
4. Select Picture.
5. Select Expert Settings.
6. Here are a few options for customization:
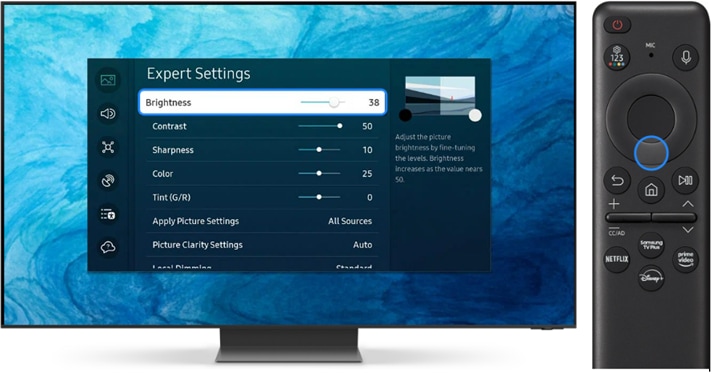
- Brightness: Adjust the overall picture brightness. The closer to 50, the brighter the picture.
- Contrast: Adjust the difference between the darkest and brightest areas between objects and their background. The closer to 50, the larger the difference.
- Sharpness: Adjust the outline sharpness of objects. The closer to 20, the sharper the object outline.
- Color: Adjust the chroma of a video. The closer to 50, the deeper the colors.
- Tint(G/R): Adjust the color tone. The higher the values, the redder or greener the video.
- Apply Picture Settings: Apply the selected picture settings to the current input source or all input sources.
- Picture Clarity Settings: Optimize a video that has many dynamic scenes. When LED Clear Motion or Clear Motion is set to On, the screen appears darker than when it is Off
- Local Dimming: Maximize the contrast ratio by automatically adjusting the brightness for each section of the picture. This function may not be supported depending on the model or geographical area.
- Contrast Enhancer: Automatically adjust the contrast to prevent excessive brightness differences between brighter and darker areas.
- HDR Tone Mapping: Automatically adjusts the brightness with tone mapping processing according to the HDR content information.
- Film Mode: Touch up an old video to improve the picture quality for a better viewing experience. This function is only available when the input signal is TV or HDMI (1080i). The terminals and inputable signals may differ depending on the model.
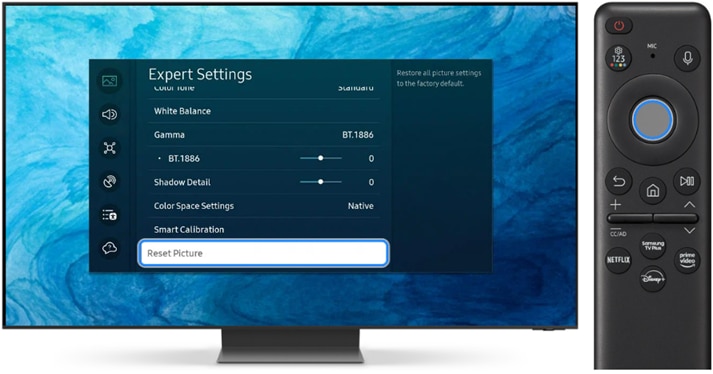
- Color Tone: Select an appropriate color tone, according to the viewing situation.
- White Balance: Adjust the brightness of the colors red, green, and blue so that the brightest area of the picture becomes white.
- Gamma: Adjust the medium brightness of a video.
- Shadow Detail: Adjust the brightness of a dim picture. The closer to 5, the brighter the dim picture.
- Color Space Settings: Select a range of colors that can be expressed in the picture.
- Peak Brightness: Adjust the maximum peak brightness for a brighter screen. This function may not be supported depending on the model or geographical area.
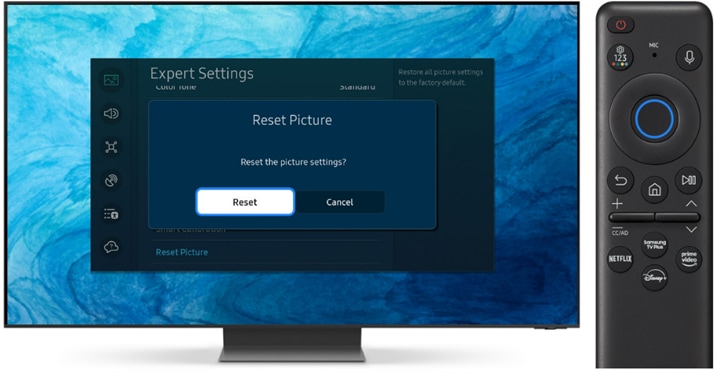
- Reset Picture: Reset the picture settings to the default values.
- Smart Calibration: Automatically adjust the picture quality of a movie to obtain the quality intended by the movie producer. To use this function, use a Smartphone that is compatible with the function. The list of compatible models is shown below.
- Galaxy models: Galaxy S, Galaxy Note, Galaxy Fold, and Galaxy Flip series models that were released after January 2019.
- iPhone models: Models with a Face ID function that were released after January 2019.
Note: This function may not be supported depending on the model or geographical area. Supported models may differ depending on the situation.
Reset the current Picture settings to default settings.
1. From the Home screen, press left on the remote.
2. Navigate to and select Settings.
3. Navigate to and select All Settings.
4. Select Picture.
5. Navigate back to the Picture menu, and then select Expert Settings.
6. Navigate all the way down to the bottom and select Reset Picture.
7. Select Reset on the popup.
Note: Screens and images are simulated. Functions may vary depending on the model and software version.
Thank you for your feedback!
Please answer all questions.
Sign Language Support
![]()
![]()


Samsung Members
![Samsung Members app icon]()
![Samsung Members app icon]()


Always here for YOU
![Always here for YOU]()
![Always here for YOU]()

