[2022] How to use your Samsung Odyssey Ark Gaming Monitor
![[2022] How to use your Samsung Odyssey Ark Gaming Monitor](http://images.samsung.com/is/image/samsung/assets/How-to-use-Odyssey-Ark-Gaming-Monitor-hero.png?$ORIGIN_PNG$)
The Odyssey Ark Gaming Monitor provides a fully immersive gaming experience, thanks to its unique 55”, 1000R curved screen. You can create a personalized gaming environment using the Ark’s various functions.
Note: If you are experiencing issues with your Samsung Odyssey Ark, please check for available software updates. Device screenshots and menus may vary depending on the device model and software version.
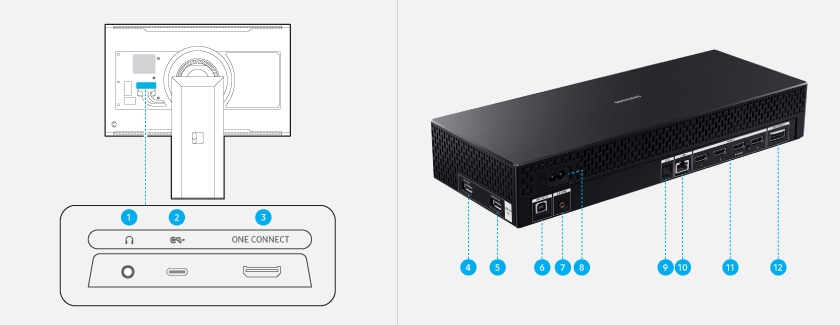
Note: This port does not support media content playback. To play media content, use the USB port on the One Connect box.
Note: This USB port on the product is able to use a maximum constant current of 0.5 A. If the maximum value is exceeded, the USB port may not work.
Note: This USB port on the product is able to use a maximum constant current of 1.0 A. If the maximum value is exceeded, the USB port may not work.
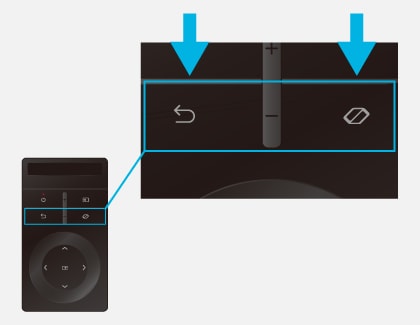
The Ark Dial puts the player in full control of the Odyssey Ark, allowing quick and simple access to a variety of functions. These include Flex Move Screen, Multi View, Quick Settings, and Game Bar.
Connecting the Ark Dial
When you turn on the Odyssey Ark for the first time, the Ark Dial will pair automatically. If a connection is not established, press the following buttons on the Ark Dial for more than 3 seconds: Return and Ark Dial Menu.
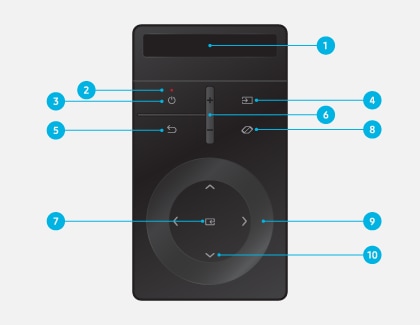
About the Ark Dial
You can use the Ark Dial to change the screen settings, switch the current mode, and access the Ark Dial Menu.
Note: For fast charging, connect the charging cable to the USB-C port on the lower left corner.
Note: This function may not be supported depending on the model or geographical area.
Note: The functionality may differ depending on the apps supported by the Odyssey Ark. On certain screens, the wheel will not work, so please use the directional buttons instead. Use the directional buttons if necessary. There may be a sound from the wheel when in use. The focus moves when the sensor detects turning of the wheel, and the movement may not be simultaneous with the wheel turning sound.
About the Ark Dial Menu
To access the Ark Dial Menu (also called the Ark Dial Guide), press the Down button on the Ark Dial. You can use several useful features from the Ark Dial Menu.
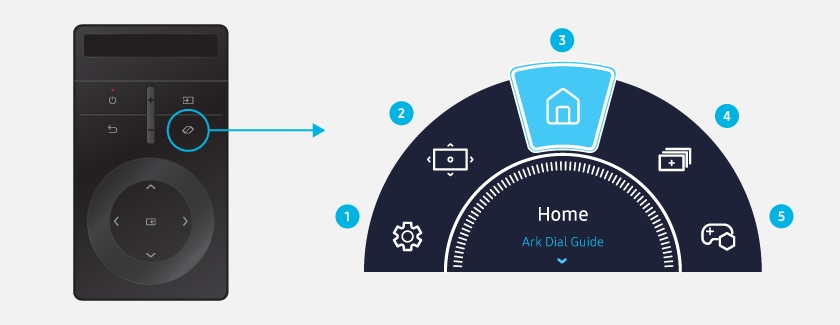
Note: The images, buttons, and functions of the Ark Dial may differ depending on the model or geographical area.
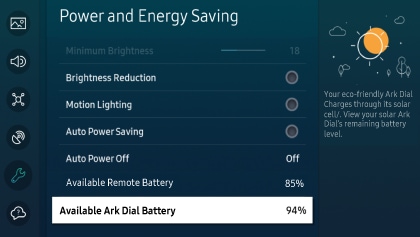
Available Ark Dial Battery
You can check the Ark Dial’s remaining battery. If the Ark Dial does not work properly or its response is very slow, the battery might be low or depleted. To enable fast charging, connect the charging cable to the USB-C port on the lower left corner, or expose the Solar Cell to light when the remote is not in use.
The Odyssey Ark can be turned on by pressing the Power button on the back of the Ark. You can then use the on-screen Control Menu.
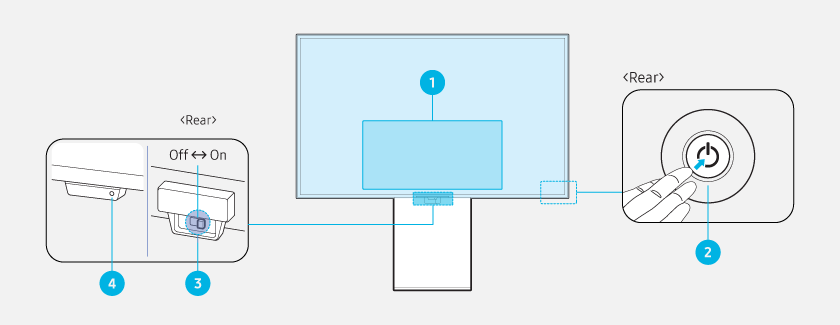
- Home: The Home screen will display.
- Settings: Change your desired monitor settings. When Game Mode is turned on, you can press and hold the Settings button to run the Game Bar.
- Return: Exits the function menu screen.
- Source: You can change the input source. The external input will be displayed on the bottom of the screen.
- Power off: The monitor will turn off.
- Power button: Displays the Control Menu. Select or run a focused item on the menu.
- Up/Down buttons: Moves the cursor up or down, or changes the channels when using broadcast-related app.
- Left/Right buttons: Moves the cursor left or right, or changes the volume.
Note: The buttons may work differently depending on the situation.
- You can enable or disable the microphone by using the switch at the bottom of the Odyssey Ark. If the microphone is turned off, all microphone-related voice and sound features will not be available.
- The position and shape of the microphone switch may differ depending on the model.
- Microphone data will not be saved.
- The LED will turn on when the Odyssey Ark is turned off.
- The LED will blink when the Odyssey Ark enters standby mode.
Note: When 60 seconds elapses with no signal, the Odyssey Ark will enter standby mode. In standby mode, the screen turns on again when any signal is input or any button is pressed on the remote control.
- The color and shape of certain parts may differ from what is shown.
- When using the buttons (excluding the Power button) on the Samsung Smart Remote, the receiver LED will not blink.
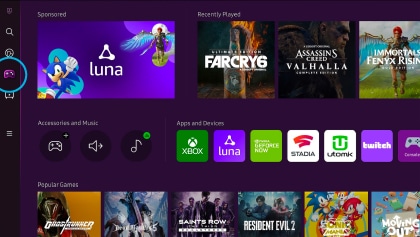
Samsung’s Gaming Hub is a new game streaming platform on select 2022 Samsung Smart TVs and Smart Monitors. The Gaming Hub enables players to instantly access their favorite games from industry-leading content partners. In addition to accessing games, gamers can also look forward to enhanced gameplay with minimized judder and blur, thanks to advanced motion enhancements and latency reducing technology. These features are available across Samsung’s lineup of 2022 Smart TVs and Smart Monitors. You can access the Gaming Hub quickly and easily through the Sidebar menu of Smart Hub.
Note: Select the link for more information on Samsung’s Gaming Hub. The Gaming Hub is available in limited countries, with app availability differing by country. Accessing the Gaming Hub is free of charge. A subscription may be required to access content offered by certain providers on the Gaming Hub platform. A separate controller may be required depending on the specific game you are playing on the Gaming Hub.
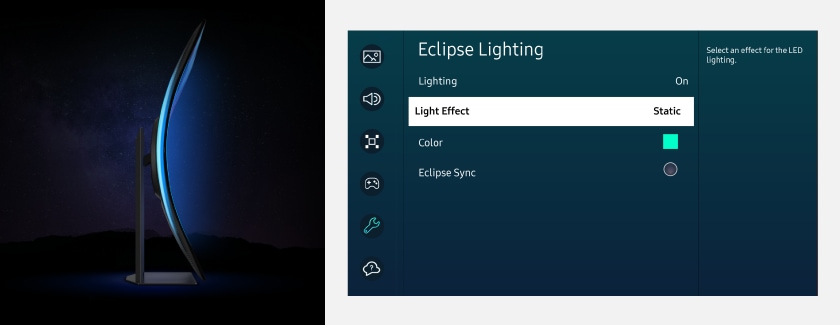
With Eclipse Lighting, you can create your own unique lighting effects while gaming.
Note: This function may not be supported depending on the model or geographical area.
Active Ambient allows you to select a pattern or background for your screen. A variety of choices are available.
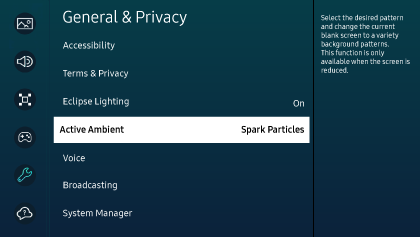
Note: This function can be applied to the blank screen, when the screen is reduced. It works when the image is smaller than the screen and there are blank areas on the left and right of the screen. This function may not be supported depending on the model or apps.
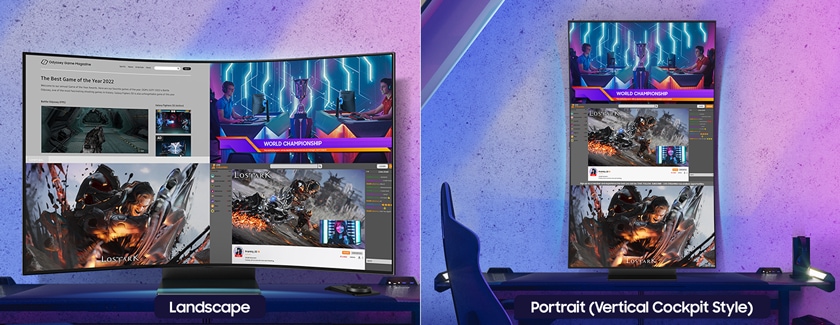
The Multi View feature allows you to display up to 4 screens at once (or 3 screens when in vertical Cockpit Mode). Plus, built-in apps such as YouTube and Samsung TV Plus are compatible with Multi View. This means you can play, stream, browse, and watch content all at the same time. Just press the Multi View button on the remote control or press the Ark Dial Menu button on the Ark Dial, and then select Multi View.
Select the link for more information on using Multi View.
Notes:
• You can display up to 3 screens in vertical Cockpit Mode. The number of displayed screens may vary when rotating the Odyssey Ark while in Cockpit Mode.
• Game Mode, VRR, and Cloud Gaming are not supported while in Multi View mode.
• Only one external input (including HDMI) and one mirrored device screen can be displayed.
• While in Multi View mode, refresh rates of up to 120 Hz are supported for external inputs.
• Some Smart Hub features may not be supported depending on the service provider, language, or geographical area.
• 3840 x 2160 @ 165Hz is not available when connecting to a PC
The optimal and recommended resolutions are 3840 x 2160 @ 165 Hz. If you cannot use 3840x2160@165 Hz resolution, please enable Game Mode. Press the Home button on the remote, then select Menu, and then select Settings. Select All Settings, then select Game, and then select Game Mode.
- Game Mode: ON → Native resolution is 3840 x 2160 @ 165Hz
- Game Mode: OFF, Input Signal Plus: ON → Native resolution is 3840 x 2160 @ 120Hz
- Game Mode: OFF, Input Signal Plus: OFF → Native resolution is 3840 x 2160 @ 30Hz
Make sure that your PC’s graphic card supports 3840 x 2160 @ 165 Hz and the graphic card driver is up to date. Use a certified compatible HDMI cable when connecting.
• The PC screen does not appear or it flickers
When the PC screen does not appear or the PC is not recognized, check the PC’s power supply and then reconnect the HDMI cable. If the symptom persists, check that the PC is not in Sleep mode and then set the Input Signal Plus to ON. Press the Home button on the remote, then select Menu, and then select Settings. Select All Settings, then select Connection, and then select External Device Manager. Select Input Signal Plus.
• The displayed image size does not fit the screen, or the images or text are blurred
To fix this, edit the name of the external device. When connecting to a PC, the name must be edited to “PC.” Press the Home button on the remote, then select Menu, and then select Connected Devices. Select HDMI, and then select Edit to edit the name. You can also try adjusting the screen magnification or text type in the PC operating system (OS).
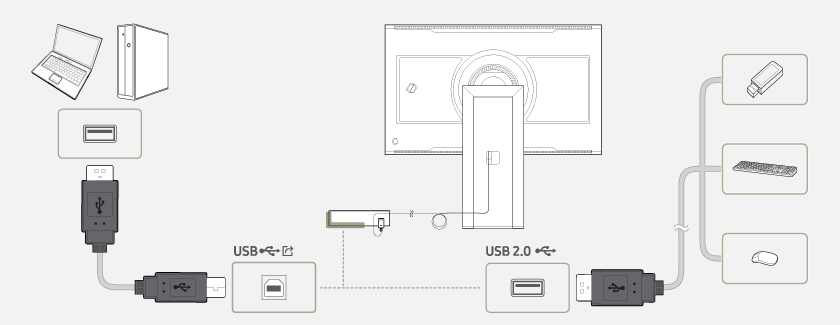
• Connecting the Odyssey Ark to a PC as a USB Hub
You can choose to use USB devices from your monitor or from a source device connected to the USB Hub. Press the Home button on the remote, then select Menu, and then select Settings. Select All Settings, then select Connection, and then select External Device Manager. Select USB Source Setup.
Notes:
• For USB-related problems caused by OS, driver programs, or software, please contact the relevant suppliers.
• We cannot guarantee compatibility with all types of USB devices.
• For an external mass-storage HDD requiring external power supply, be sure to connect it to an external power source.
• USB devices requiring high currents may not be supported. USB 2.0 can support a maximum current of 900 mA.
• The battery can be charged in power saving mode, but it cannot be charged when the product is powered off.
• Charging your USB device is not possible if the power cable is disconnected from the power socket.
• The company is not liable for problems or damages to an external device caused by using an unauthorized cable for the connection.
• USB devices that do not follow the USB standard may cause a malfunction.
Thank you for your feedback!
Please answer all questions.