Edit photos or videos on your Galaxy phone or tablet

Galaxy Phones have excellent cameras with multiple shooting options you can use to get amazing shots, but when that's not enough, they also have several editing tools to help you get your photos just right. Whether the lighting isn't cooperating, or you're going for an artsy, filtered look, you can make it happen right from the phone. With Face effects, Style, Spot color, Object eraser, Portrait mode filters, and more, Samsung phones have everything you need to get creative with your photography skills.
Face effects
Note: The Face effects option will only appear when editing pictures of people or selfies.
Have a selfie that needs a little more TLC? You can use the Face effects options to remove red-eye, brighten your skin tone, and even enlarge your eyes.
Navigate to and open the Gallery app, and then select the picture you want to edit.
Tap the Edit icon, then tap the AI tools icon (Three lines with 2 stars), and then tap Face effects.
You can select from a variety of editing options, such as Smoothness, Tone, and Red-eye fix.
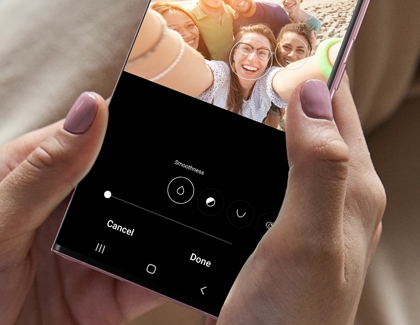
After tapping an option, follow the instructions on the screen or adjust the slider to choose your preferred intensity. For instance, Spot fixer will let you remove blemishes by tapping on areas of a person’s face.
Note: You can tap the arrows to undo or redo your edit.
When you’re finished editing, tap Done.
If you need to start over, tap Revert, and then tap Revert to original.
To save your newly edited picture, tap Save, and then tap Save again.
Note: You can also keep the original picture by tapping More options (the three vertical dots), and then tapping Save as copy.
Object eraser
The Object eraser tool will remove unwanted items from pictures. Plus, you can easily undo the edits if you make a mistake.
Navigate to and open the Gallery app, and then select the image you want to edit.
Tap the Edit icon, then tap the AI tools icon (Three lines with 2 stars), and then tap Object eraser.
Next, draw around something you want to remove. For example, you can draw a circle or a square around an object, or simply tap the object instead. Tap Erase to remove it.
Note: You can also tap Erase shadows and Erase reflections if desired.
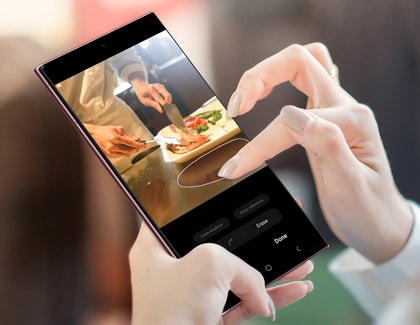
If needed, tap the arrows to undo or redo your edit. Continue removing objects until you’re finished, and then tap Done.
If you need to start over, tap Revert, and then tap Revert to original.
To save your newly edited image, tap Save, and then tap Save again.
Note: You can also keep the original image by tapping More options (the three vertical dots), and then tapping Save as copy.
Spot color
Spot color lets you add or remove color. Maybe you want to draw attention to a single object; just remove the surrounding color so the subject of your picture really stands out.
Navigate to and open the Gallery app, and then select the picture you want to edit.
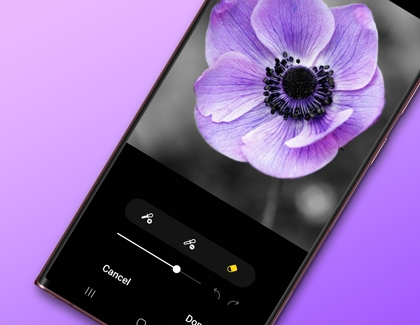
Tap the Edit icon, then tap the AI tools icon (Three lines with 2 stars), and then tap Spot color. The image will turn black and white; tap an area where you want to reveal the color.
To remove the color, tap the Remove color icon in the center (the dropper with a minus symbol), and then tap the desired area of the picture. To add more color, tap the Add color icon (the dropper with a plus symbol).
To manually erase color, tap the Erase color icon (it looks like an eraser) and then adjust the slider to your desired size. Then, swipe on the picture with your finger.
Note: You can tap the arrows to undo or redo your edit.
When you’re finished editing, tap Done.
If you need to start over, tap Revert, and then tap Revert to original.
To save your newly edited picture, tap Save, and then tap Save again.
Note: You can also keep the original picture by tapping More options (the three vertical dots), and then tapping Save as copy.
Style
Some social media apps allow you to add filter effects to your pictures, but with the Style option you can do this right on your phone!
Navigate to and open the Gallery app, and then select the image you want to edit.
Tap the Edit icon, then tap the AI tools icon (Three lines with 2 stars), and then tap Style.
Swipe through the available filters and then tap one that you like.
Note: To view your original image again, tap Original.
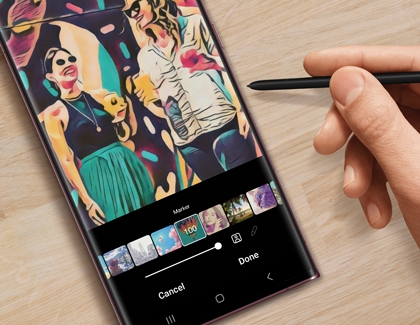
Once you’ve selected a filter, you can adjust the intensity with the slider.
Tap the Add area icon (it looks like a paintbrush) to draw on the image. If you need to remove your drawing, tap the Remove area icon (it looks like an eraser).
To view the before and after effects of your edited image, tap the Background only and Subject only icons to the right of the slider (these icons look like a person).
When you’re finished editing, tap Done.
If you need to start over, tap Revert, and then tap Revert to original.
To save your newly edited image, tap Save, and then tap Save again.
Note: You can save the original image by tapping More options (the three vertical dots), and then tapping Save as copy.
Color mix
Sometimes, a picture's colors may not look how you want them to. In this case, you can use the Color mix options to change up different colors' intensity in your pictures.
Navigate to and open the Gallery app, and then select the image you want to edit.
Tap the Edit icon, then tap the AI tools icon (Three lines with 2 stars), and then tap Color mix.
Tap your desired color at the bottom of the screen to begin editing. You can adjust the slider to increase or decrease the color’s intensity.
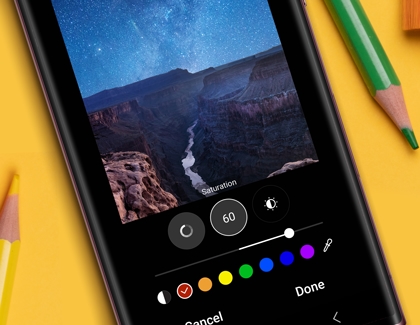
Tap Hue, Saturation, or Luminance and then adjust the slider to add your desired effects.
You can tap as many colors as you like to edit the image's colors. To add your own colors, tap the dropper tool icon, and then tap the desired area that has the color you want. The color will be added to the palette at the bottom of the screen.
Note: You cannot add more than three custom colors.
When you’re finished editing, tap Done.
If you need to start over, tap Revert, and then tap Revert to original.
To save your newly edited image, tap Save, and then tap Save again.
Note: You can also keep the original image by tapping More options (the three vertical dots), and then tapping Save as copy.
Portrait mode
Not only can you get stunning pictures of yourself and others with Portrait mode, but you can add effects before taking the picture! Plus, continue editing the picture to your heart’s content using various lighting and filter options.
Navigate to and open the Camera app, and then tap PORTRAIT. You can add effects before taking the picture by tapping the Portrait Effects icon in the bottom right corner.
Then, select from Blur, Studio, High-Key Mono, Low-Key Mono, Backdrop, or Color Point. Adjust the Effect strength slider at the bottom until the filter looks just right.
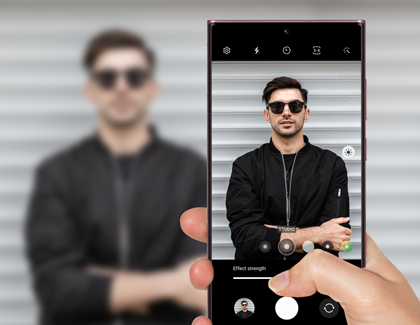
You can also tap the Brightness icon on the right side of the viewfinder to increase or decrease the brightness.
When you’re ready, tap Capture.
Next, tap the thumbnail in the bottom left to open your picture in the Gallery app. Tap the Edit icon to begin editing your picture.
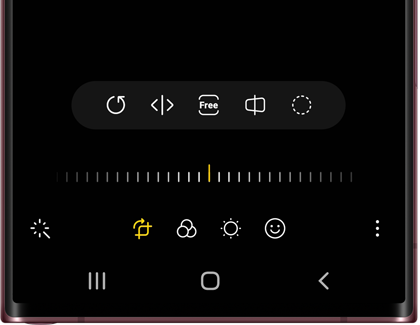
There are several editing options to choose from! For instance, you can rotate or flip your picture, change the aspect ratio, adjust the horizontal or vertical axis, or draw on a section of the picture to crop it. You can also add additional filters, change the light balance and exposure, and even add stickers and text.
When you’re finished editing, tap Done.
If you need to start over, tap Revert, and then tap Revert to original.
To save your newly edited picture, tap Save, and then tap Save again.
Note: You can also keep the original picture by tapping More options (the three vertical dots), and then tapping Save as copy.
Additional photo and video editing tools
You can edit your photos and videos even further with the Gallery app’s editing options, like changing a photo’s perspective or adding a filter. Or, create your own custom stickers and GIFs!
Navigate to and open the Gallery app, and then select the image or video you want to edit. Tap the Edit icon (the pencil), and then select from the following options:
Perspective: Tap the Perspective icon (it looks like a box with an arrow) to change the horizontal or vertical axis. Adjust the slider to find your desired perspective.
Decorations and Draw: Tap the Decorations icon (the smiley face), and then tap Draw to draw on your photo. You can select from different writing tools and colors as well. Tap Stickers to add preloaded or custom stickers to your image, and tap Text to type on your image using the keyboard.

Lasso: Tap the AI tools icon (Three lines with 2 stars), and then the Lasso icon (it looks like a dotted circle), and then draw around the area you want to keep. You can select from Free-form or Shape.
Tone: Tap the Tone icon (the sun), and then adjust your desired setting using the slider. You can select from options like Brightness, Exposure, Contrast, and Highlights.
Filter: Tap the Filter icon (it looks like three circles), and then swipe left or right to choose your desired filter. You can adjust the intensity using the slider. Tap Add (the plus sign) to download a filter or create your own.
Audio: Tap the Audio icon (the speaker), and then adjust the video volume using the slider. Tap Add background music to select a background track.
Trim: Tap the Trim icon (the scissors), and then trim your video using the slider.
The following are also available when editing videos:
Set photos and videos as wallpapers
On Galaxy devices running One UI 5, you can set your favorite picture or video as your Lock screen wallpaper background. You’ll need to have a Lock screen set up to use this feature, but once you do, you can show off any of your Gallery’s pictures or videos.

Galaxy Enhance-X
Galaxy Enhance-X is an app built exclusively for your phone or tablet to help you get the most out of your pictures. You'll be able to take advantage of Galaxy Enhance-X on the Galaxy S24 series, S23 series, S22 series, S21 series, S20 series, Note20 series, Z Fold4, Z Flip4, Z Fold3, Z Flip3, Z Fold2, Z Flip 5G and Z Flip.
You'll need to download the app from the Galaxy Store to get started. When you first open Galaxy Enhance-X, you'll need to give it permission to use files and images on your device. When ready, tap Select picture to edit, and then tap the picture you'll be enhancing.
You'll have the following options available:

Magic: Tap the sparkles icon to automatically analyze your picture and apply a series of enhancements. Often this is the only tool you'll need!
HDR: Increase the dynamic range of the picture. Adds clarity to darker and brighter sections of the image.
Brighten: Increases the overall brightness of the picture without losing detail.
Fix blur: Sharpens the picture if you have smudge on your lens, or the subject is slightly out of focus.
Sharpen: Enhance the definition of the edges in your picture.
Fix moire: A moiré pattern may appear when you take a photo of a screen, or some fabric patterns. Remove these artifacts with a single tap. This option will only be available when a moiré pattern is detected.
Remove reflection: If flash reflections are obscuring your subject's eyes behind their glasses, this option can clear them up.
Remove shadows: Under bright lighting conditions, shadows can obscure your subject. This option can make them less apparent.
Fix lens distortion: Every lens can impart some of its curve to photos, this option can remove that curve and even out the image. This option will only be available if distortion is detected.
Restore picture: Brings back clarity and cleans up old faded prints. This option is only available when a restorable image is detected.
Portrait: All the power of Samsung's Portrait mode, but now you can use it on any picture. This option is only available if a face is detected.
Face: Use the face enhancement options from Samsung's camera modes on any picture where a face is detected.
Increase resolution: Old scans or downloaded pictures may not be a very high resolution. This will upscale the image to a size that will look better on modern displays, or in print.
Tap More to see these additional features:
Other answers that might help
-
Mobile 8 AM - 12 AM EST 7 days a week
-
Home Electronics & Appliance 8 AM - 12 AM EST 7 days a week
-
IT/Computing 8 AM - 9 PM EST 7 days a week
-
Text Support 24 hours a day 7 Days a Week
Contact Samsung Support
