Password options for your Samsung laptop or notebook

No one wants unwanted visitors seeing their personal information. If security is an absolute must for you, be sure to set up a solid Microsoft password or local password for your Samsung Windows 10 laptop or notebook. Passwords are not the only way to protect your laptop or notebook - there are tons of sign-in options, such as PINs, pictures, and more.
Note: Information provided applies to laptops and notebooks sold in Canada. Available screens and settings may vary for devices sold in other countries.
Note: If you are not a Microsoft account user, you can still access your Samsung Windows 10 laptop or notebook through a local account. You can add or change a local password whenever you need to.
Select Start, and then select Settings. Select Accounts, and then select the Your info tab. Verify that you are signed in with a local account. If not, select Sign in with a local account instead, and follow the on-screen instructions if needed.
Navigate to Accounts again, and then select the Sign-in options tab. To create a new local account password, select Password, select Add, and then follow the on-screen prompts.
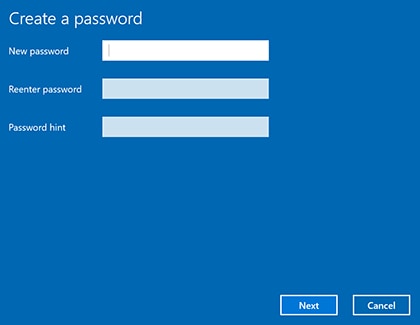
To change your current local account password, select Password, select Change, and then follow the on-screen prompts. You can also remove the password by changing it and then leaving the new password blank.
A Microsoft account is a computer account that uses your Microsoft email. Signing into a Microsoft account allows you to access a special cloud service. Your data, such as contacts, will sync to the cloud and to other connected devices, including on iOS and Android. You can change your Microsoft account password directly from your Windows 10 laptop or notebook.
Note: If you do not have a Microsoft account, you can create one on the Microsoft website.
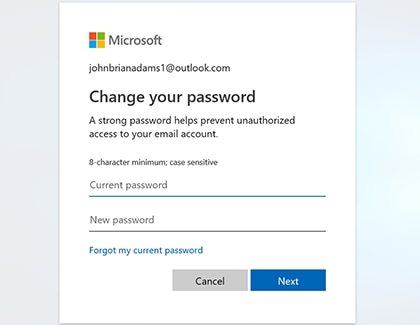
When you want to change your password, select Start, and then select Settings. Select Accounts, and then select the Your info tab. Verify that you are signed in with a Microsoft account. If not, select Sign in with a Microsoft account instead.
Navigate to Accounts again, and then select the Sign-in options tab. Select Password, select Change, and then follow the on-screen prompts to change your Microsoft account password.
Note: You cannot remove a Microsoft account password completely.
Note: Your laptop or notebook can use a PIN instead of a password for quicker access to your account, apps, and other services.
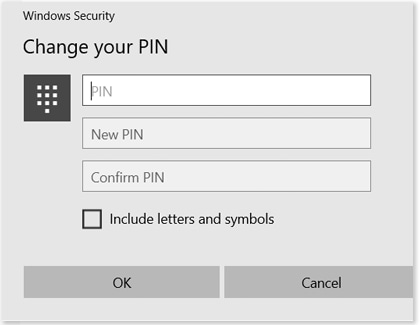
Select Start, select Settings, and then select Accounts. Select Sign-in options. Select Windows Hello PIN, select Add, and then follow the on-screen prompts.
You can always adjust or delete the PIN by selecting Change or Remove under Windows Hello PIN.
Note: If you are a local account user, you must add a password before you can use the other sign-in options.
Note: A picture password uses a photo and a pattern to create a password only you will know. For example, if you have a photo of a car, you can draw a circle around its hubcap.
Select Start, select Settings, and then select Accounts. Select Sign-in options. Select Picture Password, and then select Add. Verify your account, and then select Choose picture.
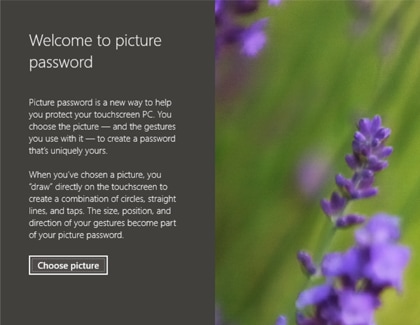
When you have found your desired photo, select Use this picture and follow the on-screen prompts. When you are done, select Finish. You can always adjust or delete the picture password by selecting Change or Remove under Picture Password.
Note: If you are a local account user, you must add a password before you can use the other sign-in options.
Note: A fingerprint password will ensure your device remains protected, because only you will be able to access it. Make sure to find the fingerprint sensor on your laptop or notebook before starting, and then follow the steps below.
Select Start, select Accounts, and then select Sign-in options. Select Windows Hello Fingerprint, and then select Set up. Select Get started on the setup window. You will need to enter your PIN to continue.
Rest and then lift your finger on your device’s recognition sensor until the setup is complete. You will need to repeatedly touch and lift your finger.
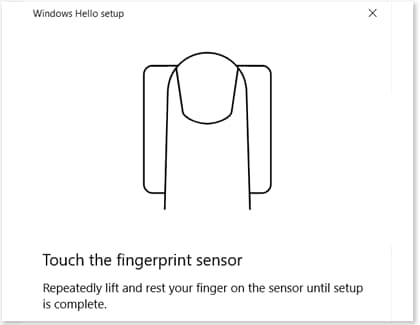
Your fingerprint will be registered and you can now unlock your device using your fingerprint. To add an additional fingerprint, select Add another.
Note: If you are a local account user, you must add a password before you can use the other sign-in options.
Note: With Dynamic lock, your phone can become the key to your laptop or notebook! In other words, if a paired phone is out of range, Windows will automatically lock your laptop or notebook. But first, you will need to connect the phone and laptop or notebook through Bluetooth.
First, make sure Bluetooth is activated on your phone.
On your laptop or notebook, select Start, select Settings, and then select Accounts. Select Sign-in options. Select Allow Windows to automatically lock your device when you are away.
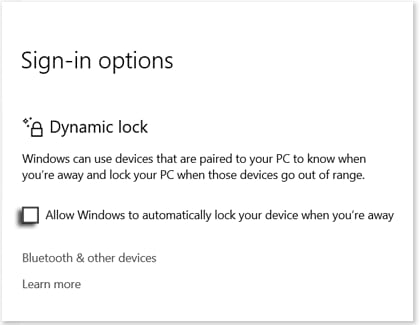
Next, select Bluetooth & other devices, and then select the switch to turn on Bluetooth. Select Add Bluetooth or other device, and then select Bluetooth. Follow the on-screen prompts to pair your phone to your laptop or notebook.
Once the phone and laptop or notebook are paired, Dynamic lock will work automatically.
Note: If the password you have forgotten is for your Microsoft Account, visit Microsoft's password reset site to recover it.
Or, if the password you have forgotten is for your Administrator account, log into a different Administrator account.
Then, open the Control Panel. It can be found under Windows System in the Start menu. Select User Accounts, and then select User Accounts on the next screen as well. Select Manage another account, and select the account you need to change. Select Change the password, and follow the on-screen prompts to change the password.
Finally, select Change password to confirm your changes.
Thank you for your feedback!
Please answer all questions.
The coding for Contact US > Call > View more function. And this text is only displayed on the editor page, please do not delet this component from Support Home. Thank you