Use the Gallery app on your Galaxy phone

Last Update date : Mar 02. 2022
 Use the Gallery app on your Galaxy phone

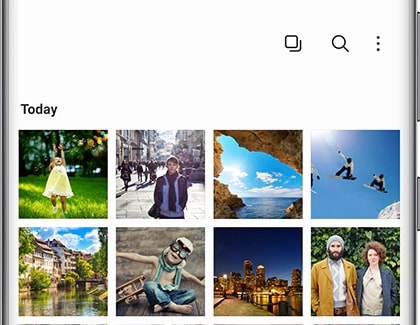
Leave that bulky photo album at home and use your Galaxy phone instead to relive all those precious memories. With the Gallery app, you can view, edit, and manage your pictures and albums right on your Galaxy phone.

Note: Information provided applies to devices sold in Canada. Available screens and settings may vary for smartphones sold in other countries.

Note: If you spent an hour trying to take that perfect selfie, you can look back at your hard work by viewing it in Gallery.

1 Navigate to and open Gallery, and then tap the Pictures tab.
2 Tap the thumbnail of the photo or video you want to view.
3 To search for a specific picture, tap the Search icon in the upper right corner. You may search for a picture by its tag, album name, or other details.
To search for a specific picture, tap the Search icon in the upper right corner. You may search for a picture by its tag, album name, or other details.
4 On newer phones, there is an option to group similar-looking pictures together. When this happens, not all of your images will appear in the Picture tab; instead, you will see a small number (i.e., 2, 3, or so on) in the corner of some image thumbnails. Tap the thumbnail to view the images that have been grouped together.
5 If you do not wish to use this feature and would like all your pictures to display, simply tap the Group similar images icon at the top of the screen (it looks like a square).

Note: You do not need a degree in graphic design to enhance your photos. Edit them right on your phone.

1 From Gallery, tap the thumbnail of a photo or video you want to edit.
2 Tap the Edit icon (the pencil icon), and then use the available tools to adjust the picture.
Tap the Edit icon (the pencil icon), and then use the available tools to adjust the picture
3 To undo or redo edits, tap the Undo or Redo icon. Tap Revert to undo all your edits.
4 To save edits, tap Back, and then tap Save in the pop-up window.

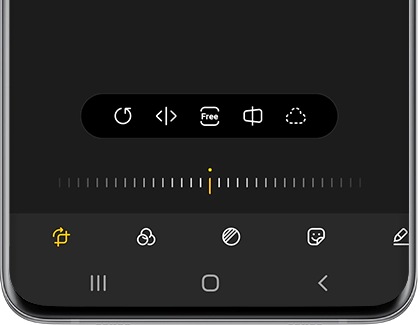
Note: You may be asked if you would like to save over the original image; tap your desired choice.

Note: Have a personal hobby that you're always documenting? Put all those photos in one place, so you can look at them again later.

1 From Gallery, touch and hold an image to select it, and then tap More at the bottom.
2 Then, tap Copy to album to copy the images to a different album. Or, tap Move to album to cut and paste the images into a different album.
Then, tap Copy to album to copy the images to a different album. Or, tap Move to album to cut and paste the images into a different album.
3 Then, select the album you want to move or paste the photo into.
4 To create a new album, tap Albums at the bottom, and then tap the More options icon (the three vertical dots). Tap Create album.
5 Enter the name of the album, and then tap Create.

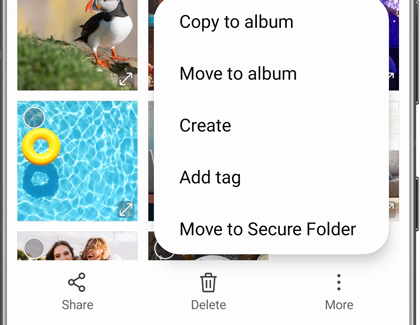
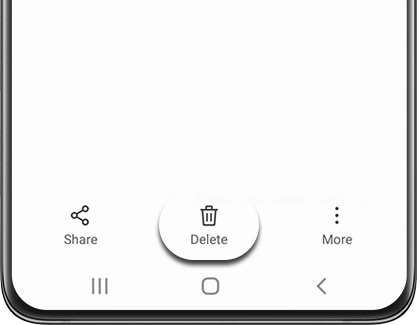
Note: Your friend photobombed an otherwise great picture. Delete their prank in just a few steps.

1 From Gallery, tap Albums, and then tap your desired album.
2 Touch and hold the thumbnail of the photo(s) you want to delete. Tap Delete
Touch and hold the thumbnail of the photo(s) you want to delete. Tap Delete.
3 Tap Move to Trash to confirm.
4 If you want to permanently delete images from the Trash, open Gallery, and then tap the Menu icon (the three horizontal lines) at the bottom.
5 Tap Trash, and then tap Empty.
6 Tap Empty Trash to confirm.

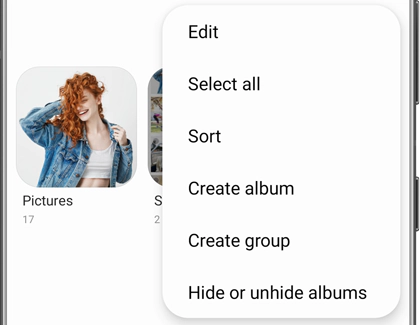
Note: With so many photos, your Gallery can get a little disorganized. Just create an album to get rid of the clutter. You can also group photos together so they are easier to find later.

1 Navigate to and open Gallery, and then tap the Albums tab.
2 Tap the More options icon (the three vertical dots), and then tap Create album.
Tap the More options icon (the three vertical dots), and then tap Create album.
3 Enter the desired name for your new album, and then tap Create.
4 To add pictures to your new album, tap the album. Tap Add items, and then tap the Pictures tab.
5 Select the pictures you want to add, and then tap Done.
6 Then, choose how you would like to move the images by selecting Copy or Move.
7 You can also combine your albums together by creating groups. From the Albums tab, tap the More options icon (the three vertical dots), and then tap Create group.
8 Enter the desired name for your new group, and then tap Create.
9 To add albums to your new group, tap the group, and then tap Add albums.
10 Next, select your desired albums. Tap Add when you are finished.

Note: Show off that amazing day you had in the city by sharing a story. Just follow these steps to create a story.

1 From Gallery, tap Stories, and then tap the More options icon (the three vertical dots).
2 Tap Create story.
Tap Create story.
3 Enter your desired name for the story, and then tap Create.
4 Select the desired photos for your new story, and then tap Done.

Note: You can also use the Sharing panel to share your images and videos to your favorite apps, such as Instagram or Facebook.

1 To begin, open Gallery and select the photo you would like to share
2 Then, tap the Share icon at the bottom of the screen.
Then, tap the Share icon at the bottom of the screen.
3 Select your desired app and then follow the on-screen instructions to share your image.

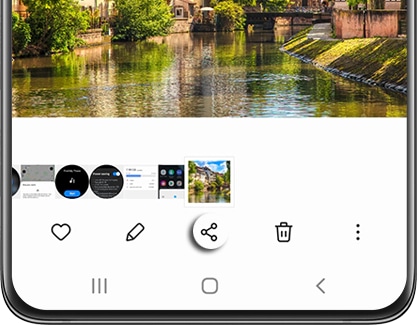
Note: If you want to send some new photos to your friends, you can also use Nearby Share, Quick Share, or Private Share. These features will let you send your images directly to a compatible phone without opening any additional apps.

Thank you for your feedback!

The coding for Contact US > Call > View more function. And this text is only displayed on the editor page, please do not delet this component from Support Home. Thank you