Set up and use the SmartThings Cam

Last Update date : Aug 20. 2021
Set up and use the SmartThings Cam

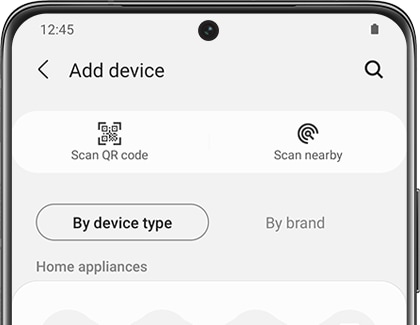
With the SmartThings Cam, you will have peace of mind because you will know exactly what's going on in your home at any hour of the day. But first, you will need to add the SmartThings Cam to the SmartThings app and mount it on a wall, so it can keep watch. You will also need to decide on a cloud storage plan so the SmartThings Cam can store all of the videos it takes.

Note: The provided information refers to devices sold in Canada. The available screens and settings may differ for devices sold in other countries. The SmartThings Cam footage can only be viewed on a mobile device. You can visit the SmartThings website to check device compatibility and gather more information.

Note: Ready to start keeping an eye on things? Set up the camera with the SmartThings app.

1 Navigate to and open the SmartThings app.
2 Tap the Devices tab (at the bottom of the screen).
3 Tap the Home icon.
4 Select the Location where you want to register the camera.
5 Tap the Add icon (the plus sign), and then tap Add device.
6 Tap By device type (if required).
Tap By device type (if required).
7 Tap Camera under "Devices/sensors", and then tap SmartThings.
8 Select your camera, tap Start, and then review the on-screen prompts.
9 Using your phone, scan the QR code as prompted. Or, tap Add device manually to enter the serial number instead. Then, tap Add device.
10 If prompted, select your desired Location or create a new one. Next, select a Room or create a new one.
11 Once the camera has been added, you can begin recording clips with it! You can also mount it to the wall if desired. Please see the next section for more details.

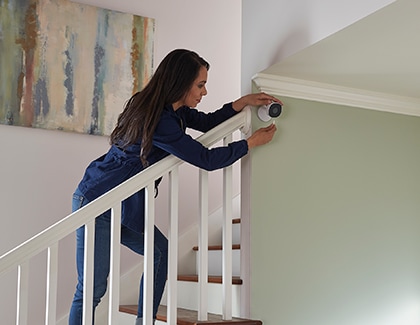
Note: If you want to record an entire room or record at a certain angle, you can try mounting the SmartThings Cam on the wall. You do not need a professional to install the camera; the included mounting plate makes DIY totally doable.

1 First, choose where you want to mount the SmartThings Cam. A location with a clear view of the area is preferable. Keep in mind that the camera is fixed, and so you will not be able to change angles or rotate it.
2 Remove the mounting plate from the stand by sliding it forward.
3 Hold the mounting plate at the desired location and mark two small dots where the mounting holes will go.
4 Drill two pilot holes in the wall at the marked location.
5 Next, align the mounting holes on the camera stand with the pilot holes.
6 Then, mount the plate on the wall surface using the provided screws.
Then, mount the plate on the wall surface using the provided screws.
7 Slide the camera stand onto the mounting plate until it clicks in place.
8 Insert the power cable into the hold of the stand, connect the cable to the camera, and then plug the power adapter into the outlet. Finally, adjust the camera.
9 Check the SmartThings app on your phone to make sure the SmartThings Cam provides your desired viewing angle. Remember, you cannot rotate the camera.

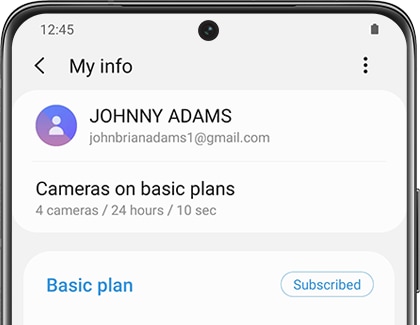
Even with the SmartThings Cam’s 145 degree wide-angle view, recording every single thing can be difficult. By adding additional cameras, you can keep an eye on more. However, the number of cameras that can be used depends on your subscription plan.

  • Basic Plan: With this plan, you can add up to four cameras for recording, plus additional cameras for live streaming only.
  • Premium Plan: If you have Premium, you can add up to eight cameras for recording and additional cameras for live streaming only.

Here are some of the key features of the Basic plan:

  • Provides 24 hours of cloud storage.
  • Is included for free with the camera.
  • Records clips up to 10 seconds long.
  • Does not record clips permanently in the cloud.

Check out the advantages of the Premium plan:

  • Provides 30 days of cloud storage.
  • Requires a paid subscription.
  • Records clips up to 60 seconds long.
  • Saves up to 100 clips permanently in the cloud.

Note: If you want to subscribe to a Basic plan or the upgraded benefits of the Premium plan, you can subscribe right from the SmartThings app.

1 Navigate to and open the SmartThings app.
2 Tap the Devices tab (at the bottom of the screen).
3 Tap the Home icon.
4 Select the Location with your SmartThings Cam, and then swipe through the rooms.
5 Tap your SmartThings Cam, tap the More options icon (the three vertical dots), and then tap My info.
6 Select the type of plan you want to subscribe to. Fill out the payment options, and then tap Subscribe.
Select the type of plan you want to subscribe to. Fill out the payment options, and then tap Subscribe.
7 Follow the on-screen instructions to start the new plan.

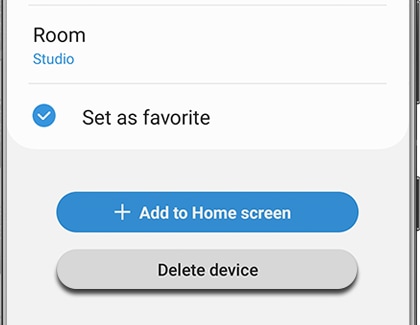
Note: Hopefully, you are removing the camera to give it to someone else. Either way, deleting it from SmartThings is as easy as adding it.

1 Navigate to and open the SmartThings app.
2 Tap the Devices tab (at the bottom of the screen).
3 Tap the Home icon.
4 Select the Location with your SmartThings Cam, and then swipe through the rooms.
5 Tap your SmartThings Cam, tap the More options icon (the three vertical dots), and then tap Edit.
6 Tap Delete device.
Tap Delete device.
7 Tap Delete to confirm.

Thank you for your feedback!

The coding for Contact US > Call > View more function. And this text is only displayed on the editor page, please do not delet this component from Support Home. Thank you