Set up your SmartThings Wifi Smart Plug

Last Update date : Aug 20. 2021
Set up your SmartThings Wifi Smart Plug

Did you leave the coffee pot on again? Next time, plug that coffee maker (or another device) into a SmartThings Wifi Smart Plug. You will be able to control the outlet anytime, anywhere. When your SmartThings Wifi Smart Plug is connected to Amazon Alexa, you can turn devices on or off with just your voice as well. Plus, you will be able to save on electricity and prevent any potential accidents. You can also reset your SmartThings Wifi Smart Plug to fix any issues.

Note: The provided information refers to devices sold in Canada. The available screens and settings may differ for devices sold in other countries. You can visit the SmartThings website to check device compatibility and gather more information.

Note: Before you can start using your SmartThings Wifi Smart Plug, you will need to connect the outlet to the SmartThings app on your phone.

1 First, plug the SmartThings Wifi Smart Plug into a three-pronged outlet and wait until the indicator blinks green.
2 Next, open the SmartThings app on your phone.
3 Tap the Devices tab (at the bottom of the screen).
4 Tap the Add icon (the plus sign), and then tap Add device.
5 Under By device type, tap Outlet under the "Devices/sensors" section.
Under By device type, tap Outlet under the "Devices/sensors" section.
6 Next, tap SmartThings.
7 Select Wifi Smart Plug, and then tap Start.
8 Select a Location and room for your Smart Plug, and then tap Next.
9 The indicator light on the SmartThings Wifi Smart Plug will slowly blink green when it is ready to connect.
10 When the installation is complete, the light will change to solid green for 3 to 5 seconds and then turn off. You can now use and control the outlet.

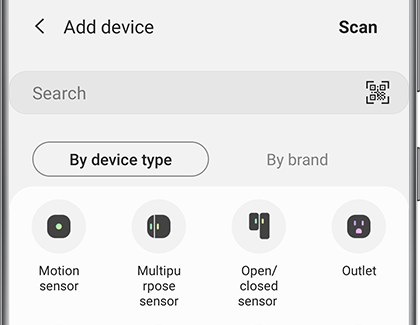
Note: If you need the plug's QR code, it can be found inside the plug’s user manual.

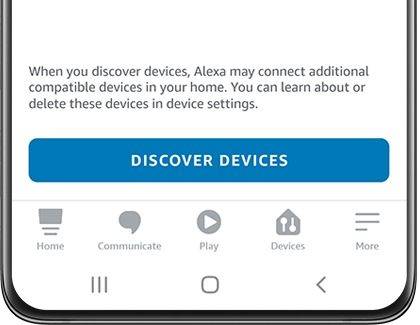
Note: Amazon Alexa (available for Android or iOS) and the SmartThings Wifi Smart Plug are sure to get along. They will work together in harmony to make your life easier. Just give a command to Alexa, and she will control the plug for you.

1 First, plug your SmartThings Wifi Smart Plug into an outlet, and then make sure the LED is blinking green.
2 On your phone, open the Amazon Alexa app.
3 Tap the Devices tab (at the bottom of the screen).
4 Tap the Add icon (the plus sign), and then tap Add device.
5 Tap Plug.
6 Tap SmartThings, and then use the on-screen prompts.
7 Tap DISCOVER DEVICES.
Tap DISCOVER DEVICES.
8 Tap CHOOSE DEVICE.
9 Tap Wifi Smart Plug, and then tap SET UP DEVICE.
10 If you want to add your device into a group, tap CHOOSE GROUP. Otherwise, tap SKIP, and then tap CONTINUE.
11 To use the smart outlet, say "Alexa, turn on Wifi Smart Plug".

Note: If your SmartThings Wifi Smart Plug is acting funny, a simple factory reset usually fixes the problem. It is one of the easiest and most effective ways to resolve any software issues that plug may be having. Before resetting the plug, you should remove it from the SmartThings app.

1 Open the SmartThings app on your phone.
2 Tap the Devices tab (at the bottom of the screen).
3 Tap the Home icon.
4 Select the Location with the SmartThings Wifi Smart Plug.
5 Swipe through the rooms to find your plug, tap your Smart Plug.
6 Tap the More options icon (the three vertical dots), and then tap Edit.
7 Tap Delete device, and then tap Delete to confirm.
8 To do a factory reset, press the Power button on the SmartThings Wifi Smart Plug for 5 seconds.
To do a factory reset, press the Power button on the SmartThings Wifi Smart Plug for 5 seconds.
9 The LED on the front of the SmartThings Wifi Smart Plug will blink red. This indicates that the plug is resetting. When the LED slowly blinks green, the reset is complete.
10 Then, add the SmartThings Wifi Smart Plug back to the SmartThings app. Please see the first section for more details about adding the SmartThings Wifi Smart Plug.

Note: When you factory reset the plug, any Automations or Scenes associated with the plug will need to be reset.

Thank you for your feedback!

The coding for Contact US > Call > View more function. And this text is only displayed on the editor page, please do not delet this component from Support Home. Thank you