Use Maintenance mode on your Galaxy phone or tablet
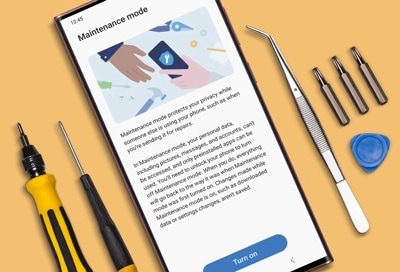
Your Galaxy phone or tablet with One UI 5 (or higher) introduces the handy Maintenance Mode feature. When activated, Maintenance Mode conceals your personal data, including photos, videos, contacts, and messages. This is especially useful if you're sending your device for repairs. Rest assured, your privacy remains intact, preventing unauthorized access to your device.
Note: Available settings may vary by carrier and software version.
Note: Maintenance mode is only available on devices running One UI 5 (or higher).
To ensure your personal data remains safe when using Maintenance mode, please keep the following in mind:
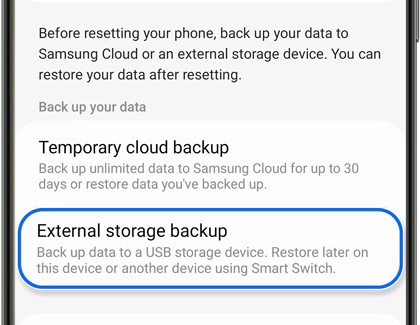
- It's prudent to backup your data before activation. Should your device undergo a factory reset or memory replacement during repairs, your data stays retrievable. See the sections Back up your data using a temporary cloud backup and Back up your data using an external storage backup for more information.
- A Lock screen setup is mandatory for Maintenance Mode. First-timers will be guided to set up a Lock screen. Alternatively, go to Settings, tap Lock screen, then Screen lock type. Choose and set up your preferred lock type.
- You must have sufficient free space to enable Maintenance mode. Devices with 64GB of internal storage will require 1.5GB of free space. Devices with more storage will require 500MB of free space.
Note: Maintenance mode is only available on devices running One UI 5 (or higher).
Upon activation, Maintenance Mode sets up a distinct user profile, ensuring your primary account and data remain private. This mode can be activated either through the device’s Settings or the Samsung Members app.
Settings menu
Step 1. Navigate to and open Settings, and then tap Battery and device care.
Step 2. Navigate to and tap Maintenance mode.
Note: You'll be asked to create a Lock screen if absent. Refer to the prior section for more details.
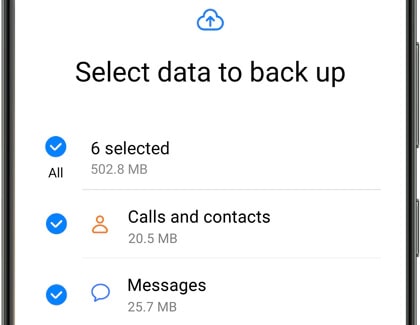
Step 3. If you would like to make a backup, tap Back up your data (see the next 2 sections for additional details). Otherwise, tap Turn on and follow the on-screen prompts.


Samsung Members app
Step 1. Open the Samsung Members app.
Step 2. Tap the Support tab.
Step 3. Swipe to and tap the Maintenance mode section.
Step 4. Tap Turn on, and then follow the on-screen prompts.


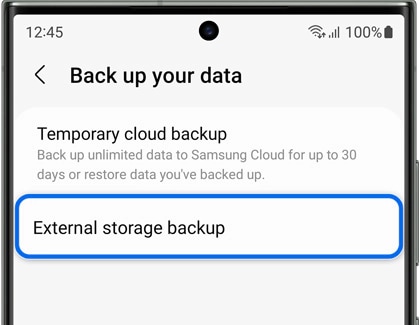
Using Maintenance Mode, backing up your data is strongly advised. This ensures your data's safety during device resets or memory replacements. You can either opt for a temporary cloud backup or utilize external storage (detailed in the next section).
Your cloud backup stays on the cloud for 30 days after it's deleted. The backup size is unrestricted, but individual files over 100GB aren't supported.
Notes:
- With temporary cloud backup, data transfer and restoration are exclusively available over Wi-Fi.
- Some carriers might not support this backup method. Consult your service provider for clarity.
Note: A Samsung account is required to use this service as the data is saved on Samsung Cloud.
Note: Not all data can be backed up. Tap Find out what data can't be backed up for details.
Note: Backup duration is influenced by the volume of data and your internet speed. Please anticipate a variable wait time.
The external storage backup requires a USB storage device (plugged into the USB-C port), or a MicroSD card (installed in your device). This method employs Smart Switch, ideal for long-term backups. The backup size depends solely on your storage device's capacity.
Note: A Samsung account is required to use this service because some data will be saved on your Samsung account.
Note: You may be prompted to grant specific permissions for the Smart Switch app or to update the app.
Note: Not all data can be backed up. Tap See what can't be backed up for details.
Note: The duration of the backup process depends on the amount of data and your internet connection speed. Some waiting might be required.
On retrieving your device, deactivating Maintenance Mode is straightforward. Remember, any new apps or services added during Maintenance Mode will be erased, restoring your device to its prior state.

Notes:
- You can also turn off Maintenance mode from the Notification panel. Swipe down from the top of the screen, tap the notification that says “Your phone is in Maintenance mode” or “Your tablet is in Maintenance mode”, and then follow the on-screen instructions.
- In some cases, turning off Maintenance mode might revert certain device settings to their original state as set by the manufacturer.
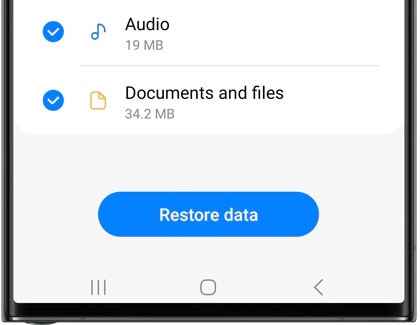
If you backed up your data, and need to restore it, proceed to the Restore your data from a temporary cloud backup or Restore your data from an external storage backup section (below).
Should your device be reset during repairs, restoring your backup becomes essential. First, complete the device setup and ensure you're logged into the Samsung account linked with your backup.
Note: Restoration time varies depending on the volume of data. Please be patient.
If your device was reset as part of the repair process, you'll need to restore your backup. Complete your device's initial setup, and be sure to sign in to the same Samsung account that holds your backup. Additionally, after using Maintenance mode, you have the option to restore your data if desired.
Note: Restoration duration varies based on data volume. Patience is key.
Thank you for your feedback!
Please answer all questions.
The coding for Contact US > Call > View more function. And this text is only displayed on the editor page, please do not delet this component from Support Home. Thank you