How to import or export contacts stored in SIM card

Last Update date : Oct 16. 2023

Please Note: The information on this page is for New Zealand products only. Sequences or settings will vary depending on location and/or where the product had been purchased. To be redirected to your local support page please click here.

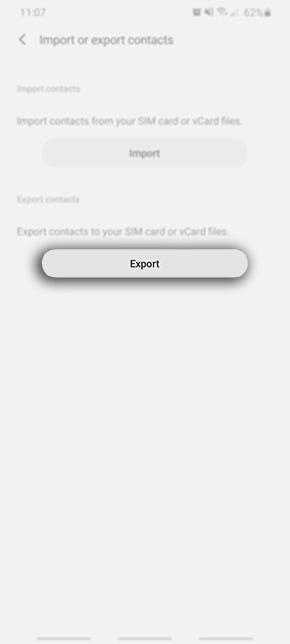
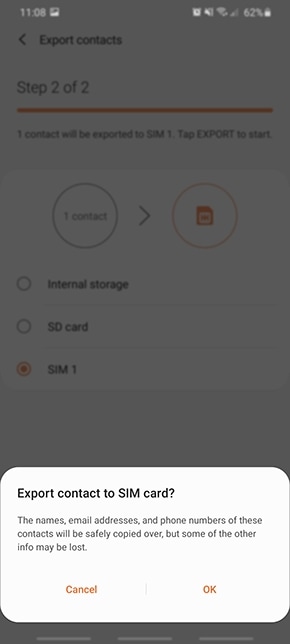
If you need to quickly transfer phone numbers from one device to another - exporting them to the storage on your SIM card is an effective way - however, only phone numbers and names will be transferred to a SIM card. Any addresses, email addresses or other information will stay on the device. 


You won't be able to add any details to contacts that are stored on a SIM card, so importing them to your device or Google/Samsung accounts will allow you to add photos, email addresses and other information to each contact. 


The step-by-step guides in the dropdowns below are organised by operating system.

1 From the Home screen, tap Contacts. Alternatively, if Contacts icon is not available on your Home screen, tap Apps. Then tap Contacts on the Apps page.
2 Press the Menu key, then tap Import/Export.
3 Select Import from SIM card
4 Tap Device to copy all your contacts from SIM to your device. You may opt to save contacts to other options available as well. You will then see a progress at the top left side of the notification bar that your contacts are being copied.
4.1
1 From Home screen, tap Contacts. Alternatively, if Contacts icon is not available on your Home screen, tap Apps, then tap Contacts on the Apps page.
2 Tap on the 3 dots in the top right hand corner(or MORE) button
3 Tap Settings
4 Tap Contacts.
5 Tap Import/export contacts.
6 Select an action, either to Import from device storage or Export to device storage.
7 A prompt will then appear, choose new location of contacts being copied.
4.2.2
1 Open the Contacts app
2 Select the 3 dot menu button and then select Settings
3 Select Import/Export to see the options to move contacts.
4 To save contacts to the SIM card, select Export
5 Select where to save the contacts (in this example SIM card)
6 Select the contacts to copy overAnd then select DONE to finish
9.0
1 Head into the contact icon Contact app.
Open Contact app
2 Tap onthree lines icon
Tap on 3 lines
3 Select Manage contacts
Select Manage contacts
4 Tap on Import/export contacts
Tap on Import/export contacts
5 Select Export
Select Export
6 Select SIM card > tap on the contact numbers you would like to export then tap on Done once complete. To export the contacts to your SIM card, tap on Export.
1 Head into the contact icon Contact app.
Open Contact app
2 Tap onthree lines icon
2 Select Import or export contacts
tap on Import ir export contacts
4 Tap on Export
Select Export
5 Select SIM card then tap on Export
Select Sim card  then tap on Export.
6 Choose a contact to export to your SIM card then tap on Done
Choose a contact to export to your SIM Card then tap on Done
7 Read through the popup message then tap on OK
Read through the popup message then tap on OK
8 Once the contact has been exported to your SIM Card tap on OK
Contact has been exported tap on OK

You can download the user manual from our Manuals & Downloads page. For all other queries or further technical assistance, please call Samsung Customer Care on 0800 726 786 or Live Chat with our Technical Team online, services are open 24 hours, 7 days

Check*, Repair, or Replace

Check*, Repair, or Replace

*Check and Optimise your Galaxy through the Samsung Members App

Thank you for your feedback!