How to clean your Samsung oven

Cleaning your oven doesn't have to be a huge chore anymore because your oven comes with a self-clean function to handle all of the heavy work. Some models also come with other cleaning modes as well, such as Steam Cleaning or Descaling. After that, all that's left is to clean the racks and the exterior and give it all a good wipe down.
Note: The provided information refers to ranges sold in Canada. The available settings and options may differ for ovens sold in other countries.
Before diving into the convenience of self-cleaning, let's ensure safety is our top priority. Following these guidelines will help prevent damage to the oven, potential fire hazards, and personal injury. Remember, these precautions are standard practice for safe and effective use.
- Children and Safety: Keep children away from the oven during a self-cleaning cycle. The exterior can get hot enough to cause burns.
- Caution When Opening: Stand back when opening the oven door post-self-cleaning due to the risk of escaping hot air and steam.
- Preparing the Oven: Remove all racks, utensils, and foreign objects before activating self-clean. Ensure the oven is free from excessive spillage and aluminum foil, as these can cause damage or ignite.
- Oven Cleaners: The use of commercial oven cleaners or liners inside the oven is strictly prohibited. These products can damage the interior during the self-cleaning process.
- Rack Care: While porcelain-coated racks can remain, nickel ones should be removed before a self-clean cycle.
- Pet Safety: Fumes from self-cleaning can be harmful to birds. Keep them in a well-ventilated area away from the oven.
- Oven Door: Do not attempt to open the oven door during the self-cleaning cycle to avoid damaging the automatic door-locking system.
Warning: Before starting a Self Clean cycle, make sure you review the warnings and safety precautions in the “Self Clean warnings” section (above).
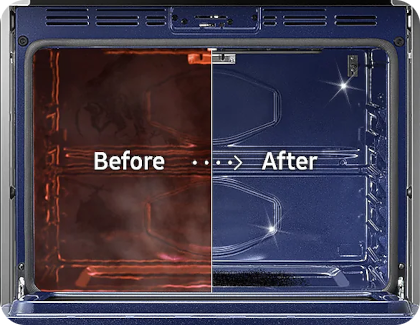
The Self Clean cycle heats up the inside of your oven to a very high temperature which will burn away or dissolve food residue. It's the best way to clean the oven's interior, if you don't want to use the regular soap and water method (If you do use soap and water, be sure to avoid harsh chemicals or coarse pads/brushes that may scratch or otherwise damage the cavity finish).
Caution: Do not use oven cleaners to clean the oven. Commercial oven cleaners or oven liners should NEVER be used in or around any part of the oven. Residue from oven cleaners will damage the inside of the oven during a self-cleaning operation.
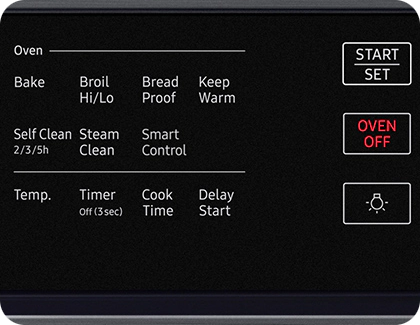
Note: The location and appearance of the Self Clean button will vary based on your specific model. The controls are a little different for models with knobs or a touchscreen. Please refer to your user manual for specific details.
Steam Cleaning, available on some models, is a less intensive alternative to a full Self Clean cycle. When dealing with heavy residue, rub detergent into the residue before starting the cycle to help the steam break it up.
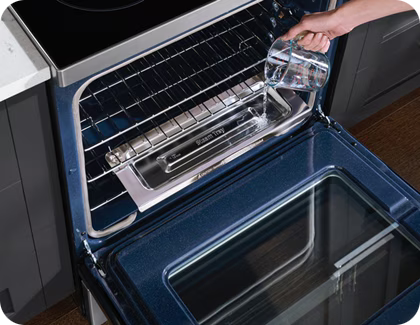
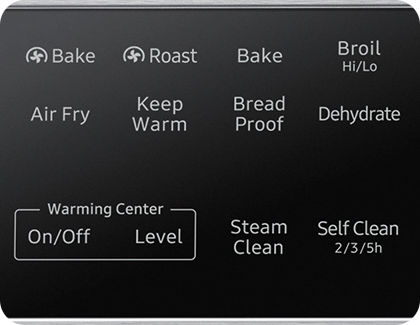
Note: The location and appearance of the Self Clean button will vary based on your specific model. The controls are a little different for models with knobs or a touchscreen. Also, if your model has a reservoir, the cycle may be called Hybrid Clean, and you would put 2 and 1/4 cups of water in the reservoir instead of in the oven. Please refer to your user manual for specific details.
If your oven has a water reservoir, you'll also have these additional cleaning functions:
- Descale: Removes minerals from the oven that affect the taste of food. The cycle requires a descaling agent. If you use steam cooking, you will need to Descale when prompted by your oven. Unlike other cleaning cycles, this cycle has multiple steps. See your user manual for instructions specific to your model.
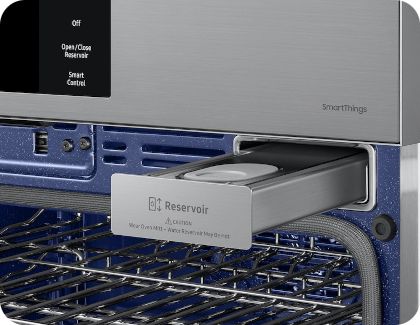
- Drain: Drains water out of the steam system into the reservoir. It's ideal for getting water out of the system and starting fresh, or for when there's long periods between using the steam cook function.
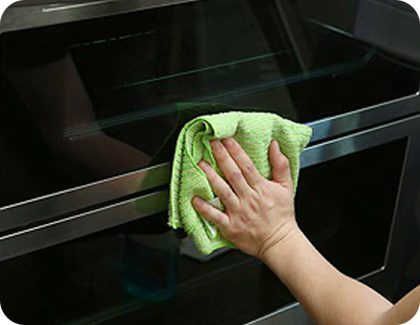
Over time, the exterior of your range can get smudged with fingerprints or dirty from food spills. You should clean it every once in a while to keep it looking brand new.
Notes:
- Do not use stainless steel cleaners on the outer glass panels of your oven because it could make the glass appear smeared. Instead, clean the glass using a glass cleaner or soapy water, and then rinse and dry the glass thoroughly.
- Make sure the gasket does not get wet and do not allow moisture into the cracks in the door because it may get between the glass panes. If this happens, see the section for “Clean between the glass on your oven door” (below).
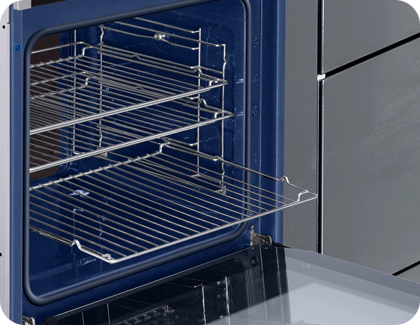
Depending on what you cook, the oven racks inside the oven can get dirty as well. Clean them regularly to keep them in tip-top condition.
Note: If your model has a partition (also called a divider), it can be cleaned the same way you clean the racks.
Important: Although door cleaning is not covered by warranty, if you take the door apart yourself (or any method involving a screwdriver) any resulting damage may not be covered by any remaining warranty. If you are unable to clean it yourself, visit our Service Centre to request out of warranty service to take the door apart for cleaning.
You will need a few things to clean between the glass panes. First, you'll need something long, thin, and preferably flexible, like a yardstick or a clothes hanger. Next, wrap it in a cleaning cloth, and use tape or rubber bands to make sure the cloth cannot come loose. You can also invest in an oven cleaning tool.
You'll also need an oven cleaner. You can buy something specific for this purpose, or simply mix baking soda and water to create a paste that's great for removing greasy food residue. Apply the paste, and then wipe it off using white vinegar, which reacts with the baking soda to help it dissolve.
For more tips on keeping your kitchen appliances in top condition, check out our other cleaning articles:
_JPG$)
Thank you for your feedback!
Please answer all questions.
The coding for Contact US > Call > View more function. And this text is only displayed on the editor page, please do not delet this component from Support Home. Thank you