How to run the calibration mode on my washing machine
Your Samsung washing machine has a sensor that detects the weight of the clothes automatically. This helps balance the washer and improve performance. It is recommended to perform calibration AND leveling after installation.
Note:
- Make sure the tub is empty before running Calibration.
- The actual design of the control panel may differ from the model, please look for the most similar one.
- This image is only a sample in English, but it is available in the language of your country.
* Click on the ᐯ symbol to see the information
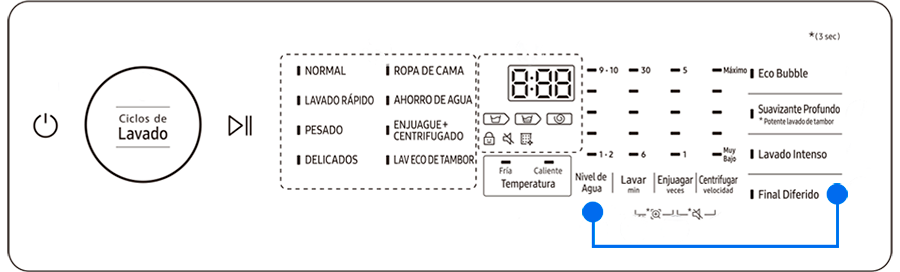
Washing machine model 1.
Step 1. Remove all clothing or other items.
Step 2. Turn the washing machine off and on again.
Step 3. Press and hold the Temperature and Delay End buttons simultaneously for 3 seconds to enter calibration mode (Cb message will appear on the screen.)

Step 3. Press and hold START/PAUSE to turn on calibration.
Step 4. The drum rotates to the right and left for approximately 4 minutes.
Step 5. When the calibration is complete, a 0 appears on the display and the top-loading washer will automatically shut off.
Note:
- The actual design of the control panel may differ from the model.
- This image is only a sample in English, but it is available in the language of your country.
- Run the test cycle to ensure that your equipment is installed correctly after the product is moved/installed. (Applicable models only)
Washing machine model 2: Multicontrol
Step 1. Remove all the clothes or any other object inside the machine
Step 2. Turn off and Turn on again the washing machine
Step 3. Press and hold the “Aditional Functions” button (the hand icon) for 3 seconds and turn the navegation handle to select calibration

Step 5. Press the button with the icon “O” in your panel
The drum will rotate clockwise and counterclockwise for about 3 minutes.

Step 6. When the calibration is complete, it will appear a message on the screen “Calibration Complete” and the washing machine will turn off automatically
Panel Model 1.
Step 1. Remove all clothing or any other contents from the machine.
Step 2. Press and hold Wash Cycles and Delay End simultaneously for at least 3 seconds with power on.

Step 3. Press and hold START/PAUSE to turn on calibration.
Step 4. The drum rotates to the right and left for approximately 4 minutes.
Step 5. When the calibration is complete, a 0 appears on the display and the top-loading washer will automatically shut off.
Note:
- Make sure the tub is empty before running Calibration.
- The actual design of the control panel may differ from the model, please look for the most similar one.
- This image is only a sample in English, but it is available in the language of your country.
Panel Model 2
Step 1. Remove all the clothes or any other contents from the machine
Step 2. Press and hold the “Water Level and Delay End” while simultaneously during at least 3 seconds
Step 3. Press and hold START/PAUSE to activate calibration.
Step 4. The drum turns to the right and to the left during 4 minutes approximately.
Step 5. When calibration has ended, it will appear a “0” on the screen and the washer will automatically turn off
When the washing machine stops during operation, there can be several reasons.
If this is your first use of your washing machine after changing or installing, run the calibration before washing clothes.
Note: Perform the test cycle to ensure that the washer is installed correctly right after installation or movement of the product. (Applicable models only)
Note: It is recommended to run the calibration after installing or moving the washer.


Service Centers


Locate the nearest Samsung service center for your product review.

Thank you for your feedback!
Please answer all questions.
Contact Info
WhatsApp
![WhatsApp]()
![WhatsApp]()


Monday to Sunday
8:00 a.m. a 12:00 a.m.
LiveChat
![LiveChat]()
![LiveChat]()


Monday to Sunday
8:00 a.m. a 12:00 a.m.