Troubleshooting the HDMI connection
If you have an issue with the connection of your device (Soundbar, projectors, audio devices, etc.), which is connected to the TV with an ARC/EARC HMDI cable, you can follow these steps to solve the issue:
Check 1. Remove all external devices connected to the TV.
Remove all external devices connected to the TV, then try playing again. Some external devices may not properly comply with HDMI connection specifications.
Check 2. Check the Anynet+ (HDMI-CEC) is activated.
From the TV, check and confirm that the Anynet+ (HDMI-CEC) feature is set to On.
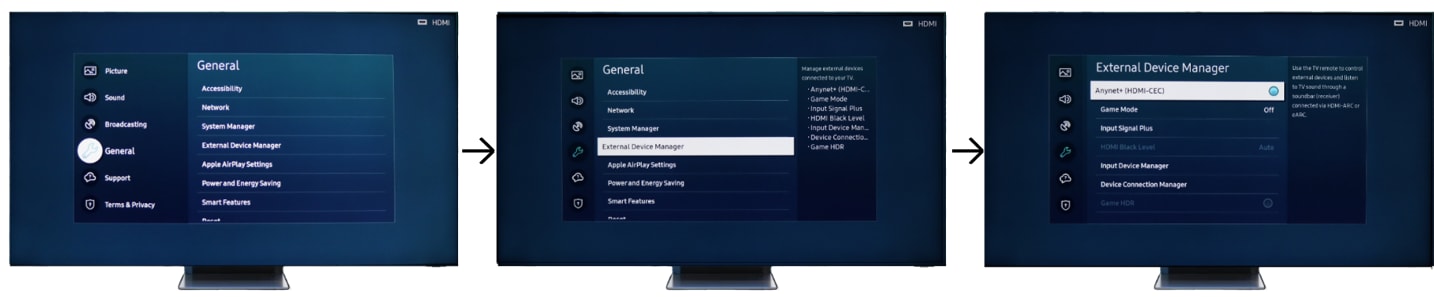
Step 1. From Settings go to General.
Step 2. Select External Device Manager.
Step 3. Go to Anynet+ (HDMI-CEC) and ensure that feature is on.
Note: Anynet+ (HDMI-CEC) cannot function under specific circumstances. (when the TV is scanning channels or performing Reset).
Check 3. Check the Digital Output Audio Format.
It is recommended to set Digital Output Audio Format to Auto if only a limited audio format is supported depending on the performance of the connected sound bar or A/V receiver.
Step 1. From Settings go to Sound.
Step 2. Go to Expert Settings.
Step 3. Go to Digital Output Audio Format then select Auto.

Check 4. Check your Sound Output setting.
If you are using a third-party soundbar or home theater system, please check whether the HDMI CEC or the ARC function is activated. Then switch the input source to HDMI ARC on your speaker.
Depending on the series, make the following settings on your Smart TV so that the sound is then reproduced by your speaker:
Step 1. From Settings go to Sound.
Step 2. Select Sound Output.
Step 3. Select the Receiver (HDMI) from the list.

Check 5. Diagnose your HDMI connection.
It is recommended that you use a certified HDMI cable to connect your devices. If you use a low-quality cable you can replace it with a higher one, or adjust the setting on the TV to improve compatibility with the cable.
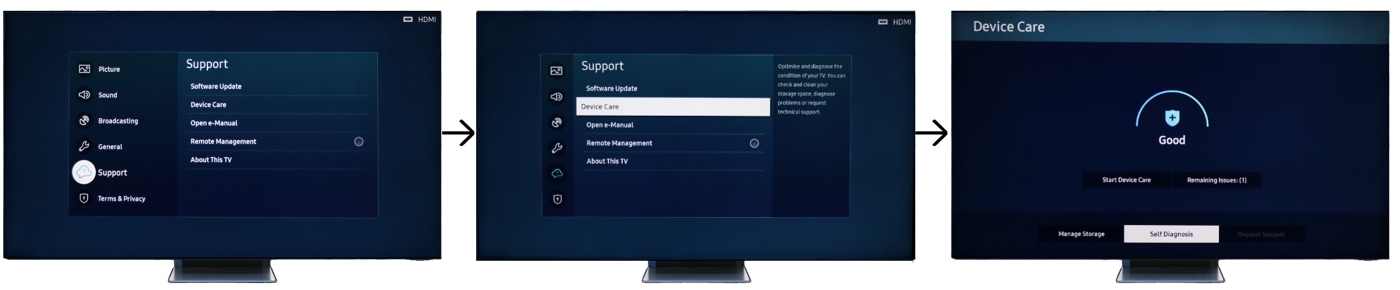
Step 1. From Settings select Support.
Step 2. Select Device Care.
Step 3. Go to Self-Diagnosis.
Step 4. Select Signal Information.
Step 5. Select Signal History.
Step 6. Select the HDMI Delay level you want.

The Delay Levels are:
· Basic: This is the default setting for normal operation.
· Slow 1: This adds a slight delay before determining that the HDMI cable is not sending a signal.
· Slow 2: This adds a significant delay.
Setting this option to Slow 1 or Slow 2 will improve the signal quality from a poor HDMI cable, but a side effect is that this delay will also occur when changing the source.
Check 6. Reset Your Soundbar.
If you connect the HDMI ARC cable to the Soundbar and all of the settings are correct, but it does not work, you can also reset the Soundbar device by following the steps listed below.
1. Power off the TV and Soundbar.
2. Press and hold both the Volume Up (+) and Down (-) buttons on the remote for more than 5 seconds. “INIT OK” appears on the display and the Soundbar is reset.
Note: When connecting or disconnecting an HDMI cable, turn the TV off and then back on again.
Thank you for your feedback!
Please answer all questions.