Basic Guide to install your Washing Machine
Basic Requirements for Washing Machine Installation
SAMSUNG recommends taking into account the following points about installing Washing machines.
** This information may vary depending on the Region in which the product is distributed.
Location: Select the right place to locate the washing machine. We recommend that the product have considerable space (10 - 15 cm) away between the wall and product. The surface or base of the product should be flat and vibration resistant, omitting this step could generate excessive noise/sounds or vibrations, which could affect the performance and/or performance of the product.
In relation to the position or stability of the product, you can check, regulate and support with the Adjustment Brackets that come in the product (rotating legs). The location should not be in places where it is exposed to moisture (rain, etc.), and in the same way to direct sunlight.
Excessive humidity could have a long-term effect in the internal components of the product (general suggestion for any product).
Excessive exposure to sunlight creates conflicts with electronic and plastic components by heat effects. Consider having close to the current point, water entry points [hot and cold (optional)] and water venting points.
Current Point: Before installing the washing machine, you must ensure that the power supply offers 110 – 120 V, 60 Hz and a protection of 15 Amps. In addition, a wall outlet intended for the exclusive use of the washing machine.
Water Entry Point: Consider that the product requires a strong influx of water (Good pressure) Consider having installed the ideal pipe, Garden Pipe or Gardener 1/2 inch with 3/4 inch coupling.
Water discharge point: Consider having the vent point with a minimum height between 90cm to 1m. Consider NOT to add a hose extension.

After validating the location where the product will be, we suggest reviewing the product and components to begin the installation. When you receive the washing machine, you should check the box where the product comes from, which must be in good condition (without dents, no damage), if there are any incidents that do not meet the delivery, please discuss with product distributor The wrapper covering the washing machine (box) must necessarily be removed, as should the Tecnopor covering the washing machine.
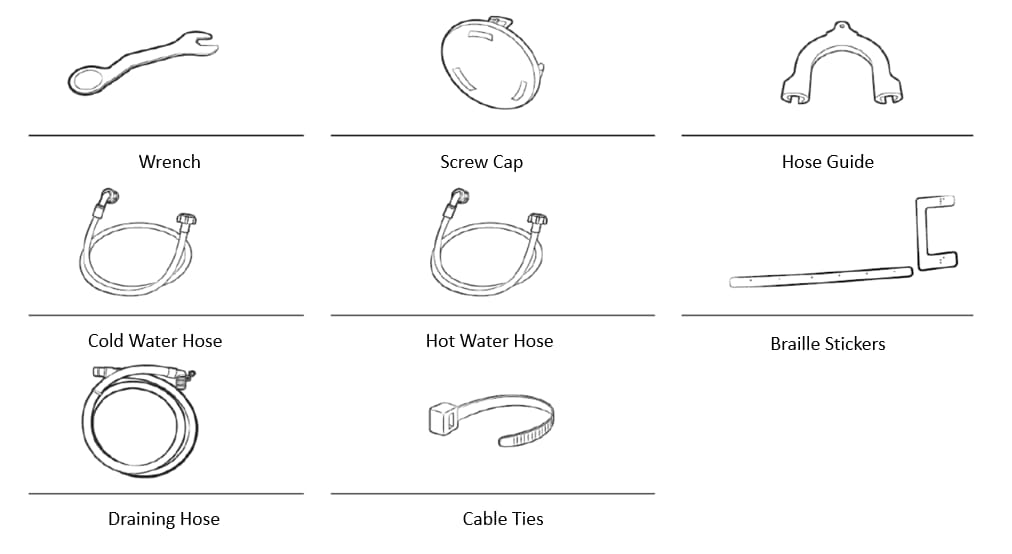
Note that inside the drum comes the Installation Kit [hot/cold water hoses, "U" shaped plastic accessory to hold the vent hose, product manual, filter(s)].
In this section we will use the cutter and gloves.
Open the box with the cutter.
• Place the product and cut the side corner of the box.
• The length of the cutter blade must be below 5 mm to prevent scratches on the product.

Check that the equipment does not have any scratches or dents. If you want to use the product, even if you have scratches or dents, it will be under your responsibility (this could be considered misuse by the customer).

In this section we will use the wrench provided in your washing machine kit.
Transport bolts prevent damage to the drum due to external shocks when the product is transported. Transport bolts are necessary when we change homes to prevent damage to the drum. Failure to remove may cause damage to the cabinet, drum or suspension. Remember to place all plastic
caps for the screws.


Before using the washing machine for the first time, check all valve and faucet connections for water loss.
Calibration ensures that the washing machine detects weight accurately. Make sure the drum is empty before running Calibration.
a. Turn the washing machine off and on again.
b. Press and hold Temperature and +—from the Final Deferred option—simultaneously for 3 seconds to enter Calibration mode. The message "Cb" appears.
c. Press and hold START/PAUSE to run the Calibration cycle. The drum will rotate to the right and to the left for about 3 minutes.
d. Once the cycle is complete, the display shows "End/En" and the washing machine turns off automatically.e. The washing machine is ready for use.

Open the water supply key.
Start test mode: Water supply, press Temp / water valve test.
Check that water is supplied in the drum for 1 minute.
Check water drain.
Press Drying button for 1 second.
Check water draining status on the drum.
Turn off the faucet after finishing the test.
Check water leaks.
Check water leaks at hose connection points.

Select Spin mode for maximum RPM.
Check vibration or noise from the washing machine for 2.5 minutes.
If the washing machine has vibration or noise, adjust the leveling leg height to the floor.
Vibration or noise can be caused by load unbalance, check if the floor is smooth, also affects the stability of the equipment.

We recommend to get to know your product, for this we ask you to review the following sections in the manual:
• How to clean pump filters and valves.
• Drum cleaning.
• Washing machine functions.
• Drying function in case of having a washer / dryer unit
• Special functions InverterTechnology, EcobubbleTechnology , Automatic detergent dispenser.
Thank you for your feedback!
Please answer all questions.
Contact Info
WhatsApp
![WhatsApp]()
![WhatsApp]()


Monday to Sunday
8:00 a.m. a 12:00 a.m.
LiveChat
![LiveChat]()
![LiveChat]()


Monday to Sunday
8:00 a.m. a 12:00 a.m.