Smartphone initial configuration
Before carrying out the initial configuration of your Smartphone, it is important that it has a sufficient level of charge.
1. Insert the USB cable into the charging cube and connect it to the nearest electrical outlet.

2. Insert the other end of the USB cable to the charging port of your Smartphone located at the bottom of it.

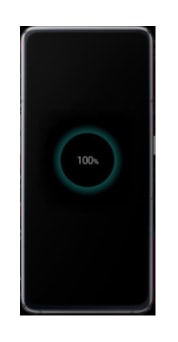
3. Place your Smartphone on a flat surface and wait for a 100% charge to be shown on the screen.
4. Disconnect the USB cable from your Smartphone and the charging cube from the electrical outlet.
Caution: Use only the charger and cable contained in the sales kit. Using other chargers could slow the charging time and cause damage to the equipment.
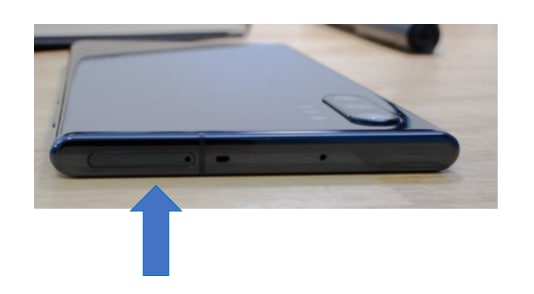
Before turning on your equipment for the first time, you must insert the SIM card provided by your operator.
1. Locate the SIM tray on your Smartphone. It can be located on the top or sides of the equipment.
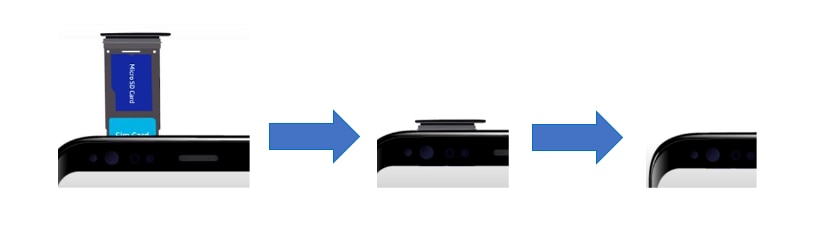
2. Using the key contained in the sales kit, remove the tray from the equipment. For them, insert it into the hole of the same gently until the tray pops out by itself.

3. Remove the tray and position the SIM card to be used. If you want to use a micro SD memory, you can also place it in the corresponding space.

4. Put the tray back on the computer. Guide yourself through the hole in the tray to verify proper orientation, and gently push down on the tray until it is fully inserted. In case you feel that it does not fit correctly, check that the orientation and that the SIM and / or micro SD card are correctly positioned.
Caution: Only use the key contained in the sales kit. Using another sharp object can cause irreparable damage to the equipment. When inserting the tray, do not force it as it may damage it.
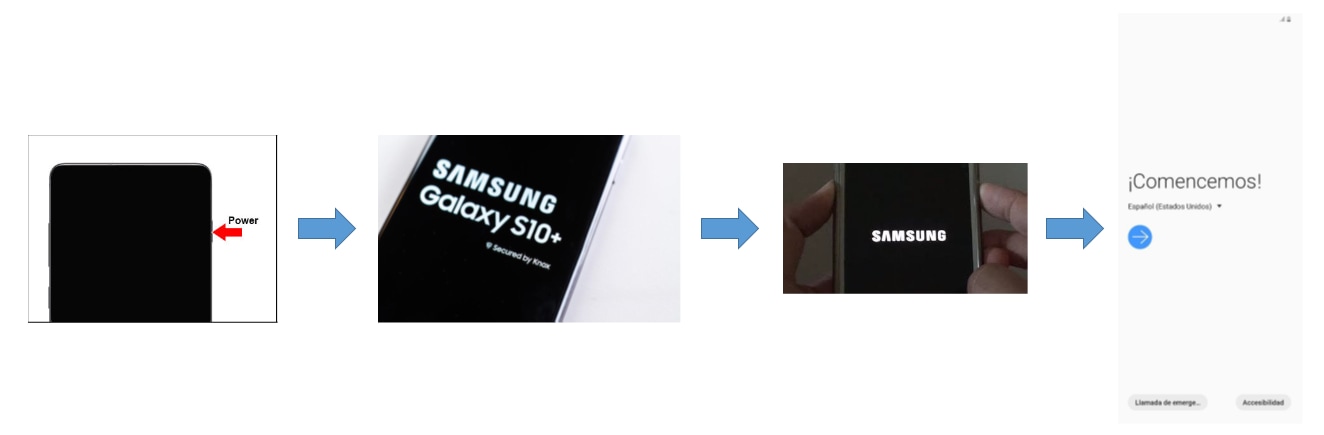
Turn on the computer. Press the power key located on the side of your computer for approximately 2 seconds and wait for the start-up cycle consisting of:
- Samsung display and model description
- Display of the operator logo or Samsung logo
- Configuration home screen
Important: The side location of the power key may vary from model to model; the key could be on the left or right side of the computer.
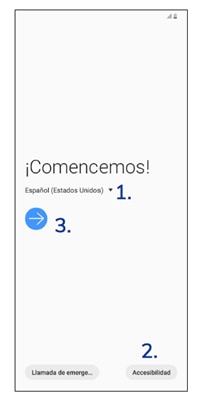
In the configuration start screen you can do the following:
1. Change the language
2. Access special functions for people with disabilities
3. Continue with configuration
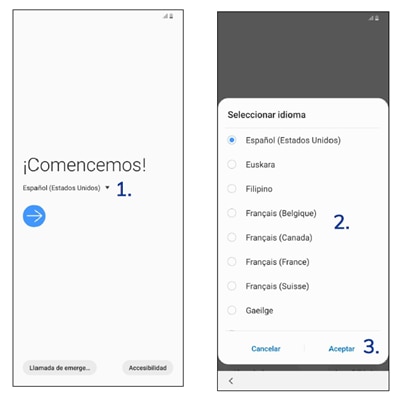
To change the language with which the initial configuration of the equipment will be carried out, you must do the following:
1. Select the arrow for the current language
2. Choose the language you want
3. Select the OK option
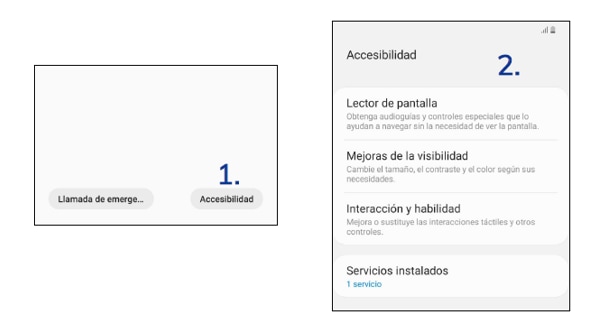
The special accessibility functions allow you to configure help options for people with some visual impairment. To configure them, you must do the following:
1. Select the Accessibility option on the home screen
2. Choose the option you want
Screen Reader: Allows you to configure an assistant with a virtual voice so that it can be an auditory indicator of what is shown on the screen.
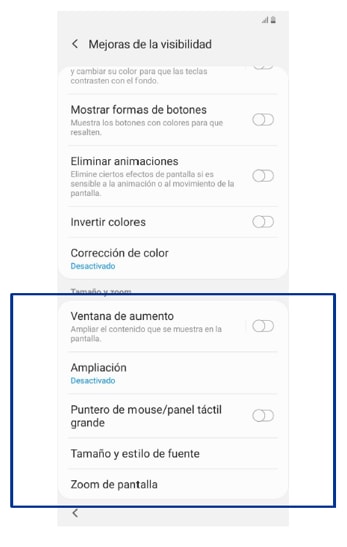
Visibility enhancements: allows you to configure screen options to improve image contrast, enlarge the font size, or enlarge sections of the screen as if you had a magnifying glass.
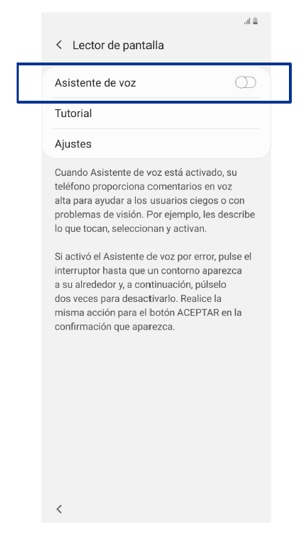
To configure the virtual voice assistant you must activate the Voice assistant option. The system will ask for confirmation and after it the text on the screen will automatically be converted to speech.
The most important functions to configure are:
Magnification Window: enlarges the section that is selected on the screen, such as the magnifying glass function
Font size and style: allows you to configure the size and options of the font (font, bold) with which the text is displayed on the screen.
Screen Zoom: allows you to enlarge the entire screen by a desired percentage.
To continue with the configuration after having enabled the special functions or changing to the required language, you must do the following:
1. Select the Next arrow displayed on the home screen.
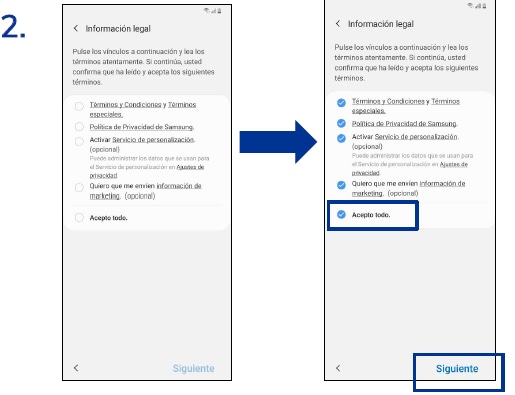
2. Read the privacy policy and select the option "I have read and accept all of the above."
3. Select the Next option.

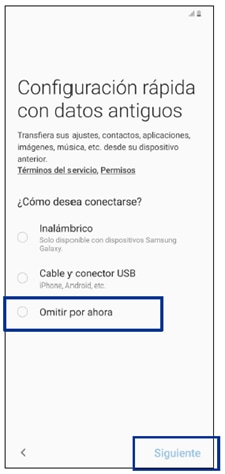
The displayed screen will allow you to indicate whether as part of the configuration procedure you will be transferring from your old Smartphone to the new one. It is recommended at this point that the option "Skip for now" is selected and that after performing the initial configuration, the necessary information is restored.
Important: Wireless transfer can be done via Wifi Direct between Samsung devices only and wired transfer can be done using Samsung's Smart Switch program regardless of the brand of your old Smartphone.
It is important that you select the Wi-Fi network to which you want to connect to configure the equipment. Internet connection during the initial setup procedure is important to connect to Google and Samsung servers.
If you do not select a Wi-Fi network, internet access will be taken from your SIM card as long as you have an active data plan. In case you do not have internet access, all registration steps on the indicated servers will be skipped. This is not recommended since some of the equipment's operating options will be lost.
To connect to a Wi-Fi network at this point you must do the following:
1. Select the network with which you want to make a connection.
2. Enter the password to access the network.
3. Verify that the connection has been successful, showing the legend “Connected” under the selected network.
4. Select the Next option to continue.

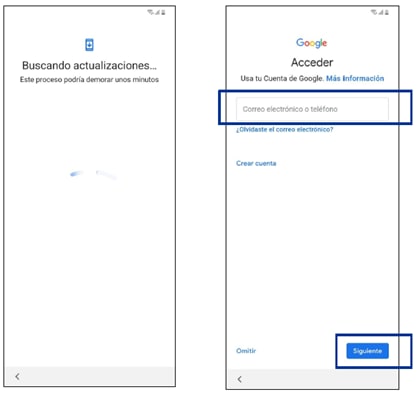
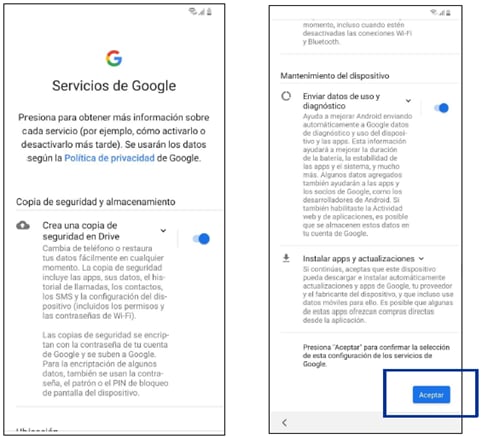
The computer will connect to the Google servers and download the necessary updates to continue with the configuration procedure.
After downloading the corresponding updates, you will be asked to enter your Google account. Enter your Gmail email address and select Next.
If you do not have a Google account, in this step you can create one by selecting the "Create account" option. Skipping account creation or registration is not recommended as important computer functions such as syncs, email access, and application download will be lost.
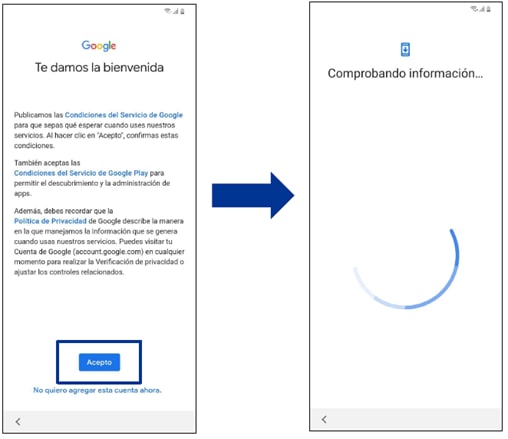
After entering your email, the security policies and conditions of use of Google services will be displayed. After reading them, you must select the "I accept" option to continue. The information will be verified and will be registered in the corresponding server.
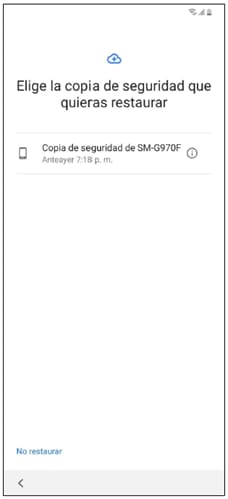
If you have a backup copy of your previous device stored in your Google account, you will be asked if you want to restore it to your new Smartphone. It is recommended that you finish the initial configuration first and then perform the corresponding restoration.
If you select restore, the initial setup procedure may take longer than expected because the computer will need to download all the information stored on the server.
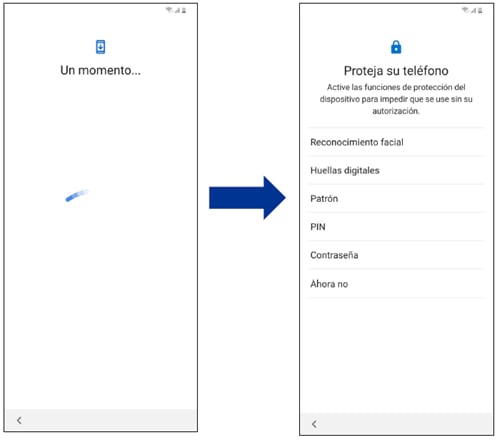
After a few seconds the computer will ask you to configure the way in which it will protect your computer. Setting this feature is important to prevent your computer from being easily accessed by third parties.
Among the most common forms of protection is the use of a PIN (a series of numbers), a password (an alphanumeric text) or a pattern (a figure formed by the union of certain points on the screen). However, depending on your Smartphone model, other forms of biometric protection such as fingerprint registration or facial recognition may be available.
Select the option you want and follow the options on the screen to make the corresponding settings. If you do not want to use a form of protection (not recommended) select the "Not now" option.
On the next screen you can consult the privacy policy and use of Google services to which you can access through your Gmail account entered previously.
Once you have read them, you must confirm that you agree. To do this, you must scroll to the bottom of the screen and select the "OK" option.
Now the equipment will show a screen requesting access to the Samsung account. Having a Samsung account is necessary to access necessary functions of the device such as cloud synchronizations and access to applications developed by Samsung.
Depending on the model of your Smartphone and the country where you purchased it, it is likely that you have free storage in the
cloud. If you do not configure or enter your account you will not be able to access this function.
Among the most important Samsung applications are Samsung Find My Mobile to locate your device in case of theft or loss
and Samsung Members to access news, tips for use, promotions, perform a unit diagnosis, apply optimizations to the operation or even report problems to the Samsung technical team.
If you do not have a Samsung account yet, select the "Create account" option and follow the instructions on the screen. If you already have one, you must do the following:
1. Enter your email address and password and select the login option.
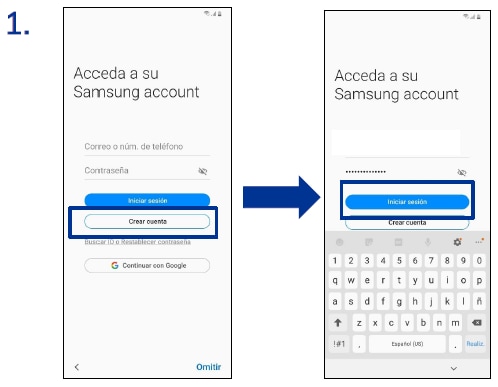
2. Read and accept the terms of use of the Samsung account.
3. Select Next to continue.
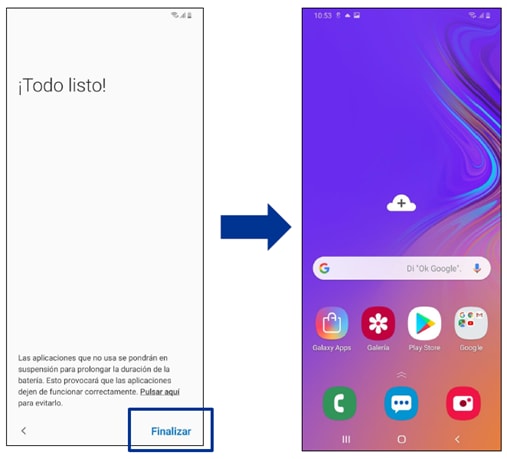
You have now completed the initial setup of your Smartphone. Select the Finish option to have your computer load the user interface with the applications pre-installed on the computer.
From now on, you will be able to download other applications you want from the Play Store (as long as you have set up a Google account) and restore the information from your old computer with the above-mentioned methods.

Thank you for your feedback!
Please answer all questions.
Contact Info
WhatsApp
![WhatsApp]()
![WhatsApp]()


Monday to Sunday
8:00 a.m. a 12:00 a.m.
LiveChat
![LiveChat]()
![LiveChat]()


Monday to Sunday
8:00 a.m. a 12:00 a.m.