How to use the different camera modes on Galaxy Tab S4?
Take photos and record videos using various modes and settings.
Customising camera settings
To launch the Camera, tap on the Camera App.
Please note:
• Some methods may not be available depending on the region or service provider
• If photos appear blurry, clean the camera lens and try again
On the preview screen, tap Settings (Gear icon). Some options may not be available depending on the shooting mode.
REAR CAMERA
• Picture size: Select a resolution for photos. Using a higher resolution will result in higher quality photos, but they will take up more memory
• Video size: Select a resolution for videos. Using a higher resolution will result in higher quality videos, but they will take up more memory
• Timer: Select the length of the delay before the camera automatically takes a photo
FRONT CAMERA
• Picture size: Select a resolution for photos. Using a higher resolution will result in higher quality photos, but they will take up more memory
• Video size: Select a resolution for videos. Using a higher resolution will result in higher quality videos, but they will take up more memory
• Timer: Select the length of the delay before the camera automatically takes a photo
• Save pictures as previewed: Invert the image to create a mirror-image of the original scene, when taking photos with the front camera
• Shooting methods: Select shooting options to use
COMMON
• Edit camera modes: View available shooting modes or edit the shooting modes list
• Video stabilisation: Activate anti-shake to reduce or eliminate blurry image resulting from camera shake while recording a video
• Full screen view (16:9): Set the device to preview photos or videos using the full screen ratio
• Grid lines: Display viewfinder guides to help composition when selecting subjects
• Location tags: Attach a GPS location tag to the photo
• Review pictures: Set the device to show photos after capturing them
• Storage location: Select the memory location for storage. This feature will appear when you insert a memory card
• Floating Camera button: Add a camera button that you can place anywhere on the screen
• Hold Camera button to: Select an action to perform when you tap and hold the camera button
• Press Volume key to: Set the device to use the Volume key to control the shutter, zoom in or out, or adjust the volume level for system sounds
• Reset settings: Reset the camera settings
Taking photos or recording videos
• To adjust the brightness of photos or videos, tap the screen. When the adjustment bar appears, drag Brightness (Light bulb icon) on the adjustment bar towards + or -
• To capture an image from the video while recording, tap Camera icon
• To change the focus while recording a video, tap where you want to focus. To use autofocus mode, tap Autofocus (AF icon)
Please note:
• The preview screen may vary depending on the shooting mode and which camera is being used
• The camera automatically shuts off when unused
• Make sure that the lens is not damaged or contaminated. Otherwise, the device may not work properly in some modes that require high resolutions
• Your device’s camera features a wide-angle lens. Minor distortion may occur in wide-angle photos or videos and does not indicate device performance problems
• The maximum recording time may reduce when you record video at high resolution
Adding another camera button
Add another camera button to the location you want on the screen to capture photos more conveniently.
Drag the Center button (White Circle icon) to the preview screen.
Setting the camera button action
You can take a series of photos or create an animated GIF by tapping and holding the camera button.
On the preview screen, tap Settings (Gear icon) > Hold Camera button to and select an action you want to use
• Take burst shot: Take a series of photos
• Create GIF: Create an animated GIF with sequential photos you taken
Please note:
• This feature is available only in some shooting modes
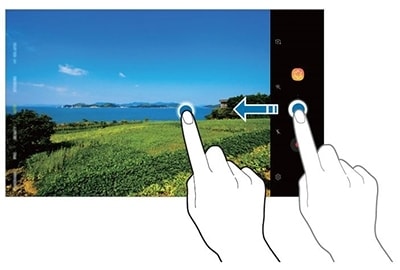
Zooming in and out
Use various methods to zoom in or out.
• Spread two fingers apart on the screen to zoom in, and pinch to zoom out
• Control the zoom with one finger. Drag on the zoom bar towards + or -
Please note:
• Zooming features are available only when using the rear camera
Using the focus and exposure features
You can lock the focus or exposure on a selected area to prevent the camera from automatically adjusting based on changes to the subjects or light sources.
Tap and hold the area to focus, the AF/AE frame will appear on the area and the focus and exposure setting will be locked. The setting remains locked even after you take a photo.
Please note:
• This feature is available only in AUTO and PRO modes
Capture photos and videos with various live stickers. As you move your face, stickers will track with your movements. You can also record a lovely and funny sticker that keeps moving in a video.
Applying stickers randomly
You can apply stickers randomly, instead of selecting one from the stickers list. Tap Random repeatedly until the sticker you want appears.
To change the shooting mode, drag the shooting modes list to the left or right, or swipe to the left or right on the preview screen. Select a shooting mode you want.
Please note:
• You can edit the shooting modes list. On the preview screen, tap Settings (Gear icon) > Edit camera modes. Alternatively, tap and hold the shooting modes list on the preview screen
Auto mode
Auto mode allows the camera to evaluate the surroundings and determine the ideal mode for the photo.
On the shooting modes list, tap AUTO
Beauty mode
Take a photo with lightened skin tone and modified facial features. On the shooting modes list, tap BEAUTY.
To apply beauty effect, tap the 3 sparkling stars icon and select options.
Pro mode
Capture photos and videos while manually adjusting various shooting options, such as exposure value and ISO value.
On the shooting modes list, tap PRO. Select options and customise the settings, and then tap the Center button (White circle icon) to take a photo or tap Record button (Black circle with red dot) to record a video.
Panorama mode
Using panorama mode, take a series of photos and then stitch them together to create a widescene.
Please note:
To get the best shots using panorama mode, follow these tips:
• Move the camera slowly in one direction
• Keep the image within the frame on the camera’s viewfinder. If the preview image is out of the guide frame or you do not move the device, the device will automatically stop taking photos
• Avoid taking photos of in distinct backgrounds, such as an empty sky or a plainwall
HDR mode
Take photos with rich colours and reproduce details even in bright and dark areas. On the shooting modes list, tap HDR.
Food mode
Take photos of food with more vibrant colours.
Please note:
• You must first add this mode to the shooting modes list before you can use it. On the preview screen, tap Settings (Gear icon) > Edit camera modes > Rear camera, and then tick Food
To resize the circular frame, drag a corner of the frame
Hyperlapse mode
Record scenes, such as passing people or cars, and view them as fast-motion videos.
If you set the frame rate to Auto, the device will automatically adjust the frame rate according to the changing rate of the scene
Sports mode
Take clearer photos of fast-moving subjects, such as a person running or a pet in motion.On the shooting modes list, tap SPORTS.
Please note:
• You must first add this mode to the shooting modes list before you can use it. On the preview screen, tap Settings (Gear icon) > Edit camera modes > Rear camera, and then tick Sports
Selfie mode
Take self-portraits with the front camera. You can preview various beauty effects on the screen.
Please note:
• To use various shooting options for the front camera, tap Settings (Gear icon) > Shooting methods and then tap the switches to activate them
Selfie focus mode
Take selfies that focus on your face by blurring the background.
Please note:
• To use various shooting options for the front camera, tap Settings (Gear icon) > Shooting methods and then tap the switches to activate them
Wide selfie mode
Take a wide self-portrait and include as many people in the photo as possible to avoid leaving people out.
Alternatively, show your palm to the front camera. After recognising your palm, acountdown timer will appear. When the time is up, the device will take a photo
Please note:
• To use various shooting options for the front camera, tap Settings (Gear icon) > Shooting methods, and then tap the switches to activate them
Please note:
• Make sure to keep the white frame inside the viewfinder window
• The subjects should remain still while taking wide self-portraits
• The top and bottom parts of the image displayed on the preview screen may becut out of the photo depending on the shooting conditions

Thank you for your feedback!
Please answer all questions.
Samsung Members
![]()
![]()


RC01_Static Content