How do I level my washing machine?
![]() Please Note: The information on this page is for Australian products only. Models, sequences, error codes or settings will vary depending on location and/or where the product had been purchased. To be redirected to your local support page please click here.
Please Note: The information on this page is for Australian products only. Models, sequences, error codes or settings will vary depending on location and/or where the product had been purchased. To be redirected to your local support page please click here.
One of the most important things about using a washing machine is levelling; making sure that the washing machine is installed on a level, solid floor that is not slippery. If the floor is not level, use the levelling feet to adjust the height of the washing machine. Excessive noise and vibrations may occur during wash cycles if the washer is not levelled properly.
However, please be advised that the motor can cause noise during operation - it is normal. Clothing with metal can cause noise when being washed as well (e.g. metal buttons, zipper, etc.). Metal objects, such as coins, can also cause noise. After washing, please remove these objects from the drum or filter case.
Checklist before levelling
- Make sure that the shipping bolts are removed (for front load models only).
- Make sure that the washing machine is not contacting any other object.
- Remove any items from your washing machine.
- Allow at least a minimum of 10 cm of free space from the sides and back of the washing machine.
Note:
- Please thoroughly read all of the important warnings and safety instructions written in the user manual.
- Be careful not to injure yourself during any repairs.
These tools may be needed for levelling:
*These tools are not provided with the washing machine.


Wrench (Spanner): Your unit may come with a spanner (~14mm) for use


Flat-head Screwdriver


Leveller
Note:
- The design of the parts and accessories may differ from the pictures above.
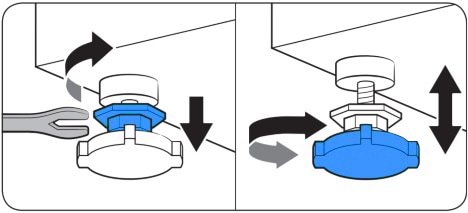
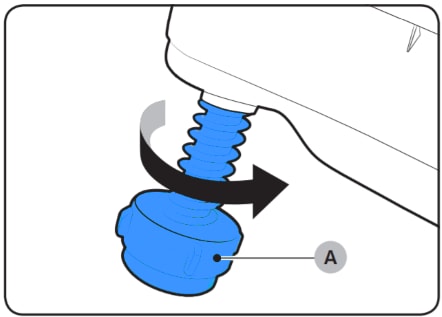
- • To raise the height, turn levelling feet counterclockwise.
- • To lower the door, turn levelling feet clockwise.
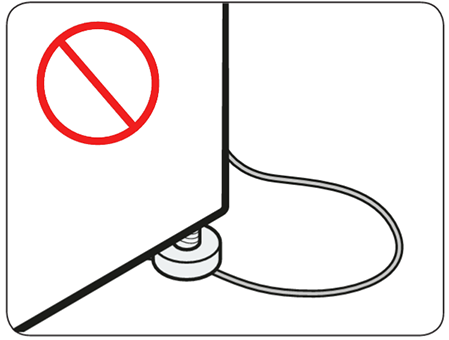
CAUTION:
- When installing the product, make sure the levelling feet is not pressing the power cord.
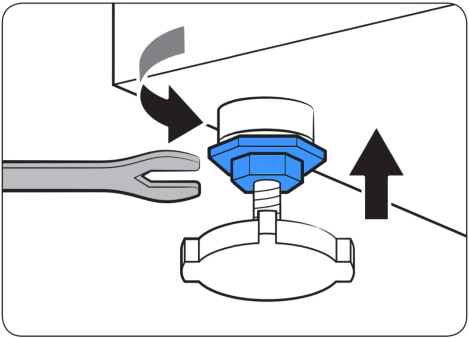
- Make sure all of the levelling feet are seating on the floor surface to avoid the washing machine from moving or generating noise due to vibration. Then, check if the washing machine is rocking. If the washing machine is not rocking, tighten the nuts.
Note:
- Excessive force may damage the levelling feet.
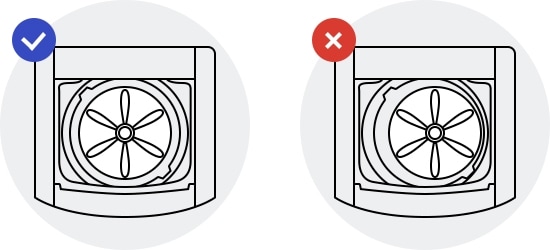
See if the washer is level by checking the position of the tub.
Slide the washer into position. Open the lid of the washer and pour the water into the tub to just below the pulsator level.
- If the washing machine is level, the pulsator is positioned at the center of the water.
- If not, level your washing machine by turning the front leveling feet clockwise or counterclockwise, as necessary.
Adjusting the Levelling Feet
Level the washing machine by manually adjusting the levelling feet.

For further assistance, please contact our Chat Support or technical experts on 1300 362 603. To find your Samsung product's User Manual, head to Manuals & Downloads.
Thank you for your feedback!
Please answer all questions.
Samsung Online Store
![online store]()
![online store]()
Join Members Community
![samsung members]()
![samsung members]()
Warranty Information
![Warranty Information]()
![Warranty Information]()
Apps & Services Customer Support
Samsung Rewards : 1300 362 603
Find My Mobile : 1800 216 454
Galaxy Store : 1800 216 454
Galaxy Themes : 1800 216 454
Samsung Account : 1800 216 454