How To Use The BESPOKE Jet™ Stick
![]() Please Note: The information on this page is for Australian products only. Models, sequences, error codes or settings will vary depending on location and/or where the product had been purchased. To be redirected to your local support page please click here.
Please Note: The information on this page is for Australian products only. Models, sequences, error codes or settings will vary depending on location and/or where the product had been purchased. To be redirected to your local support page please click here.
With the BESPOKE Jet™ Stick Vacuum, cleaning is made convenient yet still powerful. With powerful cleaning performance designed to effectively capture dust from multiple surfaces, a multi-layered filtration system to ensure hygienic cleaning1, and an integrated Clean Station™ to easily empty the bin without dust escaping or dirtying yourself2.
Continue reading below to learn more about the BESPOKE Jet™ Stick Vacuum and its features.
1Results may vary depending on actual usage.
2Results may vary depending on individual use. Dust and hair stuck inside the grille may not be removed with a single cycle.

Installing the Clean Station™
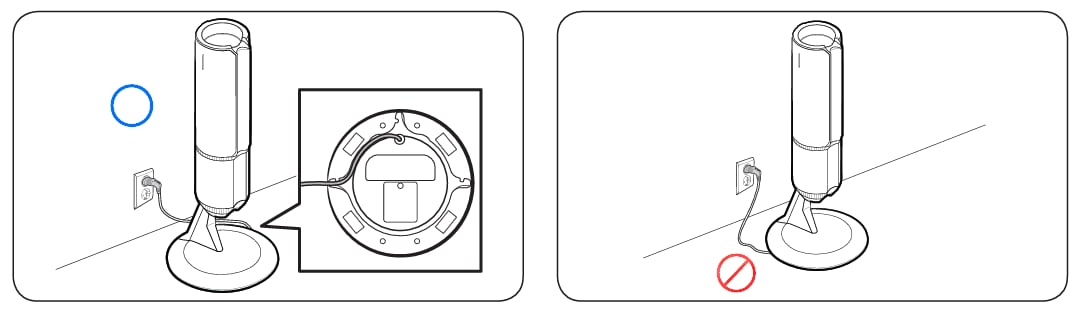
-Make sure the power cord is correctly placed so that the Clean Station™ stands without tilting.
Using the Clean Station™

- After inserting the vacuum cleaner into the Clean Station™, press the START/STOP button to empty the dustbin.
- Press the START/STOP button again to stop its operation.
- Close the bottom cover of the dustbin before using the vacuum cleaner as the bottom cover is open after emptying the dustbin at the Clean Station™.
Note:
- Results may vary depending on individual use. Dust and hair stuck inside the grille may not be removed with a single cycle.
Charging the Battery
- When the battery level indicator turns red or the 'Low battery' message appears on the display, charge the battery.
- You cannot use the vacuum cleaner while charging.
- Make sure the back of the battery is correctly placed onto the vacuum charging part.
- Check that the battery level indicator is displayed while charging.
- When charging starts, the battery level indicator turns on (red, orange, or yellow depending on charging progress), it rises gradually, and changes to green when the charging is complete.
Inserting the Battery

Push the battery to the end until you hear it click.
Ejecting the Battery

Caution:
- Before ejecting the battery, the vacuum cleaner must be turned off. *The vacuum cleaner may malfunction if you eject the battery forcibly from the operating vacuum cleaner.
- Be careful not to drop the battery. If you do, you can injure yourself or damage the battery.
Press the battery release button at the rear of the handle to eject the battery.
Changing the Additional Battery

Charge the additional battery at the additional battery charging slot at the bottom of the Accessory Cradle.
- Push the battery in firmly.
Note:
- VS20A958*** model: To charge the battery at the Accessory Cradle, a charger needs to be purchased separately (VCA-SAPA95)
Using the Buttons and Display

- Displays the current mode ('MIN, MID, MAX, JET, or WET') or the alert message.
- Press this button to turn on or off the vacuum cleaner.
- When you turn on the power, the vacuum cleaner starts in the 'MID' mode.
- If you assemble the Spray Spinning Sweeper, the vacuum cleaner starts in the 'WET' mode.
- You can change the suction power mode ('MIN, MID, MAX or JET').
- In the 'WET' mode, press the + button to spray water once or press and hold the + button to spray water for up to 2 seconds.
- Press and hold the + button for 3 seconds to enter or exit the language setting. Press the + or - button to select a language.
- While the vacuum cleaner is on the Clean Station™, press and hold the + button for 5 seconds to enable or disable the Energy Saving mode.
*For further information on how to use the BESPOKE Jet™ Stick display, visit Using the BESPOKE Jet™ Stick LED Panel.
Note:
- Displays and functions may vary depending on the product model. To check the functions of your Samsung Jet™ Stick please refer to the User Manual specific to your model.
- BESPOKE Jet™ Spray Spinning Sweeper sold separately.
- Only the + button works when the vacuum cleaner is on the 'WET' mode.
- You cannot enter the language settings when the vacuum cleaner is in the 'WET' mode.
- The Energy Saving mode is automatically disabled if you use the vacuum cleaner.
- The brush may cling to the floor or does not turn properly depending on the floor material (a carpet, a mat, bedding, etc.). If such a problem occurs, change the suction power mode to 'MIN' or 'MID'.
Alert Messages
|
Message |
Explanation |
|---|---|
|
Low battery |
Displays when battery is low. |
|
Object stuck in brush/tool |
Error displays when something is caught in the brush or tool. |
|
Filter not inserted |
Error displays when Mirco Filter is missing. |
|
Clogged |
Error displays when the vacuum cleaner is clogged. |
|
Check brush, tool, or filter |
Alerts the user to check the brush, tool, or filter in order to solve the clogging error. |
|
Clean Micro filter |
Alerts and recommends the user to regularly check and wash the Micro filter. (Refer to Cleaning the BESPOKE Jet™ Stick Filters) |
|
Energy Saving on |
Displays when the Energy Saving mode is on. |
|
Energy Saving off |
Displays when the Energy Saving mode is off. |
For further assistance, please contact our Chat Support or technical experts on 1300 362 603. To find your Samsung product's User Manual, head to Manuals & Downloads.
Thank you for your feedback!
Please answer all questions.
Samsung Online Store
![online store]()
![online store]()
Join Members Community
![samsung members]()
![samsung members]()
Warranty Information
![Warranty Information]()
![Warranty Information]()
Apps & Services Customer Support
Samsung Rewards : 1300 362 603
Find My Mobile : 1800 216 454
Galaxy Store : 1800 216 454
Galaxy Themes : 1800 216 454
Samsung Account : 1800 216 454