Install a Samsung washing machine in your home

Most retailers these days include washing machine installation at little to no cost, but if you are looking for a DIY project, you can always tackle the installation yourself. Either way, this guide will go over the things that need to be done during installation to prevent leaks, excessive vibration, and issues with spinning, draining, and filling. You can find our available washing machines on our website.


Note: The washing machine and provided accessories may differ by model. You can check your user manual for specific details. We also have a guide for installing a Bespoke AI Laundry Hub, installing a Bespoke AI Laundry Combo, and for installing a dryer.

A Samsung washing machine and dryer stacked on top of each other in a modern laundry room A Samsung washing machine and dryer stacked on top of each other in a modern laundry room

Install a Samsung washing machine in your home

1. Prepare your laundry room

A closet with sliding doors and shelves, providing organized storage space for clothes and other items.

Before installing a washing machine, you'll want to prepare your laundry room or closet. Measure the space to make sure your new appliance fits without blocking anything else, such as a door. For specific measurements, please check your washing machine's user manual or refer to your model's listing.


You should also gather your installation accessories and parts to check that you have everything you need. Replacements for damaged or lost accessories can be purchased from a local retailer, Samsung Parts, or by contacting Support.

Laundry room essential traits:

  • The room needs a firm, level surface without carpeting or slippery flooring. If the washer can slide around when a load shifts inside of it, unbalanced load errors will occur.

  • The ambient temperature should always be higher than freezing (32°F).

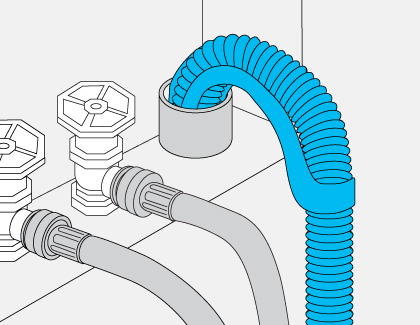
  • You’ll need adequate space for ventilation, wiring, water supply hoses, and the drain hose (at least 6 inches). Make sure there is room for the washer's door to open freely.

  • Make sure to keep a minimum of 1 inch between your washing machine and dryer. Your appliances should also be a minimum of 1 inch away from the walls. Washing machine doors can't be reversed, but dryer doors can.


Do I need a drip pan?


A drip pan, also known as a drain pan, is required when the washing machine is not installed on the ground floor of your home. We recommend low profile drip pans for front load washing machines because they allow access to the pump filter (which requires routine cleaning). Certain models (such as the WA54R7200 series) may require the drip pan's bulge to be less than 5/8 inches. You can find drip pans on Amazon, or at local home improvement and hardware stores. 

Please see the list below for the dimensions of our current models.

27 inches (D) x 24 inches (W)
32 inches (D) x 27 inches (W)
33 inches (D) x 27 inches (W)
34 inches (D) x 30 inches (W)


Things to know when stacking:


Only front load washers can stack with dryers, and the dryer must always be on top. The washing machine and dryer must be matching models. The user manuals for both appliances contain information about which stacking kit is needed and how much space is required. Instructions for stacking the washer and dryer will be provided with the kit itself. Stacking kits and other laundry accessories can be found on our website.

Read less

2. Remove the shipping bolts (front load models only)

An illustration of a shipping bolt be removed by turning counterclockwise and pulling outwards.

Before using your front load washing machine, you must remove the shipping bolts from the back. The specific location and number of shipping bolts varies by model, but they are always on the back of the machine. Please check your model's user manual for the exact location of the shipping bolts.

  1. Loosen and remove all bolts with the supplied wrench.
  2. Fill the holes with the supplied plastic covers.
  3. Keep the shipping bolts and spacers, because you'll need them if you ever decide to move the washing machine.
Read less

3. Connect the water supply hoses

A illustration of a wrench tightening the cold water supply faucet.
Caution
Leaks from the water supply hoses can lead to electric shock.

Any time you're installing a washing machine, brand-new water supply hoses are a must. Using the old hoses could potentially lead to leaks.

  1. Connect the ends of the water supply hoses to the hot and cold faucets.

    Note
    : Make sure that each connector on both ends of the hose has a rubber gasket when you connect it. These will help prevent leaks.
  2. Tighten the fittings by hand until they are snug, and then tighten them an additional two-thirds of a turn with a wrench. Do not fasten them too tight. Do not apply tape or sealant to the faucets or water supply intakes since this can damage the fittings.
  3. After they are secured, pull the hoses down to make sure they are connected correctly.
  4. Place the unconnected ends of the hoses into a bucket. Open the faucets connected to the two water supply hoses for 10 or 15 seconds; this will help remove any foreign substances from the hoses. Close the faucets before continuing.
  5. Connect the ends of the water supply hoses to the water supply intake connections at the back of the washer. Make sure you connect the appropriate hoses to the hot water intake and cold water intake. Getting your lines crossed will eventually lead to a no fill or water supply error (nF, nF2, 4E, or 4E2, nF2).
  6. Tighten the fittings by hand until they are snug, and tighten them an additional two-thirds of a turn with a wrench. Make sure the hoses aren't bent or twisted. If they are, they could leak.
  7. Turn on the hot and cold water supplies, and check all water supply intake connections for leaks.
Read less

4. Position the drain hose

A illustration of a drain hose positioned downwards using a standpipe.

Don't forget the drain hose! If you don't install the drain hose properly, it will result in no drain errors, water leaks, and even odor issues. There are two ways to install and position the washing machine's drain hose.

  • Over the edge of a wash basin: The drain hose must be placed at a height between 24 inches and 35 inches from the floor. To keep the drain hose's spout bent, use the supplied plastic hose guide (A). Secure the guide to the wall using a hook to ensure stable drainage.

  • In a standpipe, laundry tub, or utility sink: The laundry tub (B) or standpipe (C) must be no shorter than 39 inches and no higher than 96 inches from the floor. To keep the drain hose's spout bent, use the supplied plastic hose guide. Use zip ties (D and E) to secure the drain hose to the tub or standpipe without kinking the hose. Heights will vary.


When installing the drain hose, please keep the following in mind:

  • If using a standpipe, insert the drain hose at least 6 inches but no more than 8 inches into the standpipe. Make sure the connection between the drain hose and the standpipe is NOT airtight.

  • The drain hose can be installed up to 96 inches maximum, but the draining capability can be reduced at this height. It can also cause odors in the washer because water may remain in the drain system.

  • If the drain hose is installed below 39 inches, water may drain into the washer's cycles due to a siphoning effect. This causes the washing machine to display the 4C error code.
Read less

5. Level the washing machine

A illustration of a feet from a Samsung washing machine being adjusted by turning the leg counterclockwise.

Details are very important in a washing machine installation, and leveling the machine is no exception.

To level your machine, follow the instructions specific to your washer type.

  • Front load washers: Place your hands on opposite sides of the washing machine and try to gently rock it. If the washing machine rocks in any direction, turn the leveling feet clockwise to lower it or counterclockwise to raise it.

  • Top load washers: Open the lid of the washer, and pour the water into the tub just below the pulsator level. If the pulsator is positioned in the center, the washer is level and no further steps are required. If the pulsator is not in the center, adjust the front leveling feet. Turn them clockwise to raise the washer or counterclockwise to lower it.
  1. Once the washer has been leveled and no more adjustments are needed, tighten the locking nut on each leg to ensure it stays in place. Tighten it until it's flush against the bottom of the washing machine. This will lock the leg at its current setting and maximize the length of time before it needs to be leveled again. When you're done, make sure all feet are making contact with the floor.
  2. Run the washing machine with a small load of laundry to determine if it's level. If the washing machine rocks, repeat these steps again.
  3. For applicable models, including WA54R7200, you will need to install leg rings. Please see the next section for instructions.
Read less

6. Install the leg rings (applicable models only)

Leg rings are only used if they are included with your washer AND ONLY if you are using a drip pan. The leg rings will raise the height of the washer. This will prevent the motor from rubbing against the drip pan and causing noise.


Note: The motor will still rub against the drip pan if the bulge in the middle of the pan is greater than 5/8 inches. If the bulge is larger than that, use a different drip pan.

  1. Begin by lifting the washing machine slightly. Turn one of the leveling feet counterclockwise to separate it from the washing machine.
  2. Place the leg ring on the leveling foot, and then turn the leg ring counterclockwise.

    A diagram showing a washing machine leg with a leg ring pointing to it.
  3. Insert the leveling foot back into the washing machine, and then turn it clockwise. Continue turning clockwise until the leveling foot is fully retracted.
  4. Repeat these steps for each leveling foot. This will ensure that the washing machine does not rub against the motor or make a grinding noise.
Read less

7. Connect power to your washing machine and run a test cycle

Now that you have completed your washing machine installation, there's only one more thing to do: run a test cycle.


Plug the power cord into a three-prong, well-grounded 120V 60 Hz outlet, protected by a 15-amp fuse or comparable circuit breaker. When plugged into a three-prong grounded outlet, your washer will be grounded through the third prong of the power cord.


To begin a test cycle, close the door, select Rinse + Spin, and touch and hold Start until the cycle starts. The Rinse + Spin cycle is one of the shortest cycles, but it still uses your washer's filling and draining functions, so it's a good cycle to test with. Make sure the filling, spinning, and draining functions all occur correctly and without any errors.


If you have any vibration issues, make sure the shipping bolts are removed (for front loaders) and the leveling feet are adjusted and locked securely.


Watch out for any error codes on the display. Some installation issues can be quickly identified through troubleshooting a specific error code that occurs.

Read less

8. Calibrate your washing machine

A finger adjusting the settings on the control panel of a Samsung washing machine.
Note
On some models, the washer must be turned on before running Calibration mode, while other models require the machine to be turned off. Check your user manual for instructions specific to your model. Some models don't have a Calibration mode, so if the manual doesn't give instructions, then the model doesn't have it.

You should use Calibration mode right after your washer is installed, any time you make adjustments to your washing machine, and if you ever feel like the weight detection (and amount of water per cycle) isn't right. It only takes a few minutes, and it never hurts to do it periodically. Just make sure you've got your washing machine right where you want it first and that it's nice and secure before calibrating it.

  1. First, make sure your washing machine is empty.
  2. Touch and hold Temp. and Delay End simultaneously for 3 seconds until Cb appears on the display. Please see your user manual if your washing machine does not have this button combination.
  3. Then, touch Start/Pause to start Calibration mode. The tub will begin rotating back and forth for 3 minutes. Once the display shows En, End, or 0, you can turn off the washing machine.
Read less

9. Do more with your washing machine

A Galaxy phone in front of a Samsung washer using the SmartThings app to control a Samsung washer

Clean your washer: How and when to clean your Samsung front and top load washers, whether you're cleaning surface spots or running a Self Clean or Pure Cycle.


Use detergent in your washer: How much detergent you should be using, what type to use, and how to fill your particular machine. We have some helpful answers and tips right here.


Use SmartThings with your washer: With Wi-Fi connectivity you can connect your washer to the SmartThings app on your phone and receive notifications and manage your washer.


Cycles and settings on your washer: Your Samsung washing machine is programmed with features that ensure your clothes and linens come out spotless every time. 


Wash bedding: Use the bedding cycle intended for bulky items like duvets, comforters, pillows, blankets, and sheets. We have some general guidelines for washing your bedding.


Wash whites: Nothing stains more easily than white clothing. Barbecue sauce, grass stains, or a random red sock that got mixed into the load will make you wonder if your whites will ever be white again.

Read less
Was this content helpful?
We're here for you

Contact Samsung Support

Contact us online through chat and get support from an expert on your computer, mobile device or tablet. Support is also available on your mobile device through the Samsung Members App.
auto-contact_us-pc-2x auto-contact_us-pc-2x