How to use the Remote Access on your Samsung Smart TV
If you’ve ever wished your TV could double your computer or laptop, you’ve got your wish with your Samsung Smart TV. When you need to access MS Office 365 web page or share the PC screen, there is an easy way to access your PC using your TV remotely.
Use Remote Access when you work and learn at home
As days go by, the functions that can be performed on TV are becoming increasingly developed. The TV itself also supports many features, and if your personal computer is available as it is on the TV, the possibilities of what you can do will be more extensive. In addition to PC remote access and PC mirroring, you can access MS Office 365 directly and work on documents on your TV. Check out the features available in the Remote Access.
Three connection methods using Remote Access on the TV
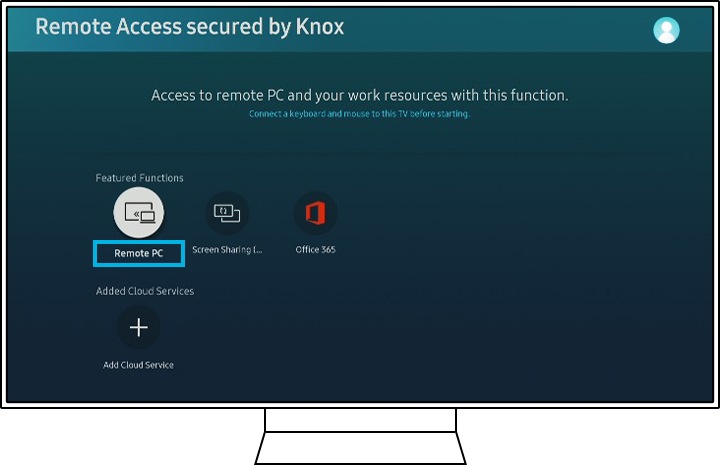
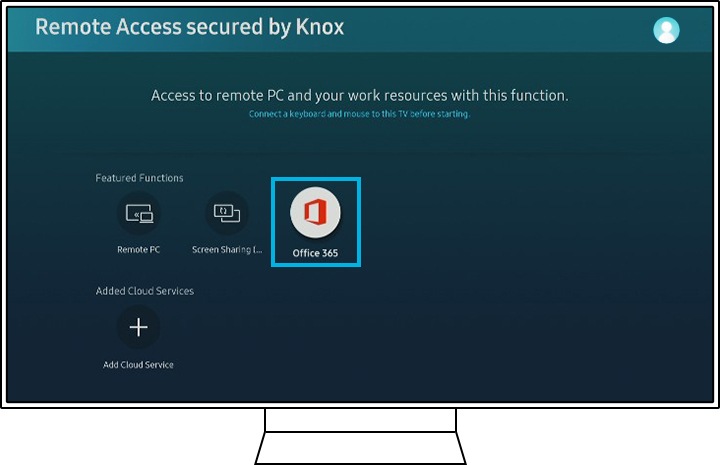
Three basic functions are available in Remote Access menu panel. It is the Remote PC that you can remotely control your PC through an IP network, Screen Sharing that mirrors a PC or smartphone connected to the same Wi-Fi network, and the Office 365 function that can be accessed directly using the TV web browser.

Remote PC function allows you to control PC from Smart TV. First of all, you need to know your PC's correct IP address, username, and password in order to use the remote PC features. Make sure your keyboard and mouse are connected to the TV, and follow the guide on how to access to your PC on the TV.
How to connect to remote PC
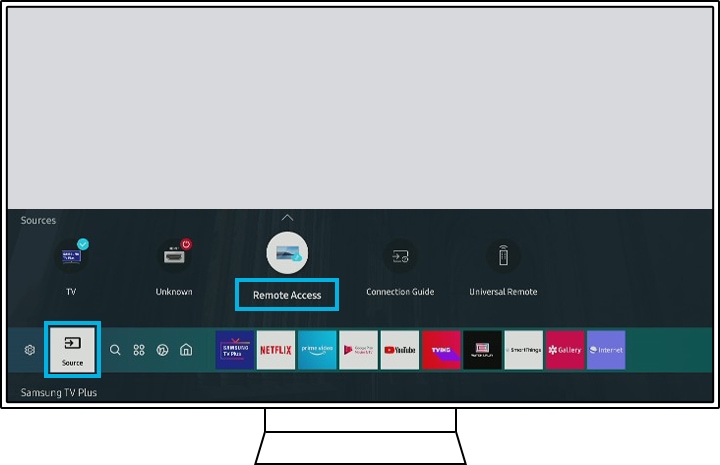
Step 1. Select Source on Smart Hub menu, and then choose Remote Access.
Step 2. Select Remote PC in Remote Access menu panel.
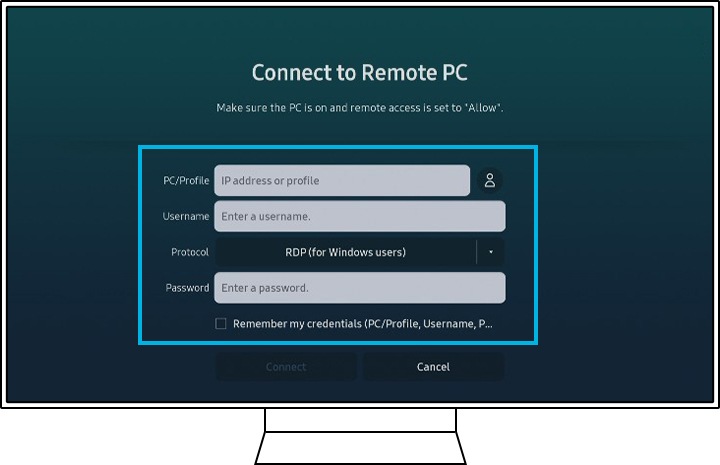
Step 3. Enter your computer’s IP address and user ID and password of you PC.
Note: This feature is only available on 2019 and newer TV models. Your TV and computer must be connected to a network.
Check Remote Desktop Activation on remote PC
You need to make sure that the Remote Desktop setting on your PC is activated. Navigate System menu in your PC control panel, and select the Remote Desktop, then switch to activate Remote Desktop Activation.

Supported conditions
Window: Only supported by Window 7 Professional or higher with RDP (Remote Desktop Protocol) except win10 Home
MAC: Only supported by MAC OSX 10.5 or higher with VNC (Virtual Network Computing for Mac)
Note:
- If MAC PC connection using VNC is too slow, app installation and additional setting to lower resolution needed.
- No Audio supports for VNC. (by the Protocol limitation)
- Supported under the condition of using Identical AP. (Without entering IP, IP list shown under the identical AP)
- PC setting must be ‘Allow remote control’, and Linux is not supported.
Remote Access also comes equipped with Wi-Fi Direct, which facilitates seamless screen sharing between TVs and PCs. To share your PC's screen on your TV, or vice versa, use the on-screen instructions to adjust your setting and connect the TV to a computer using Wi-fi.
How to activate Screen Share
Step 1. On your PC, select Management Center or Device in the notification area of the taskbar.
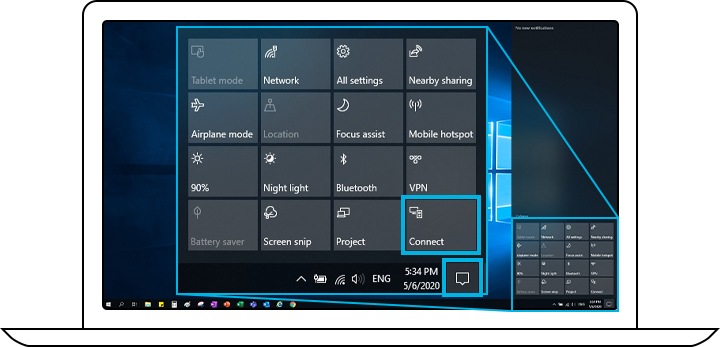
Step 2. Select Connect or Project, and then choose your TV to complete the connection.

Note:
- Screen Sharing is only supported by Window 10 Professional or higher version.
- There is no resolution limit, since the PC screen is captured in real time, and re-encoded the TV supports.
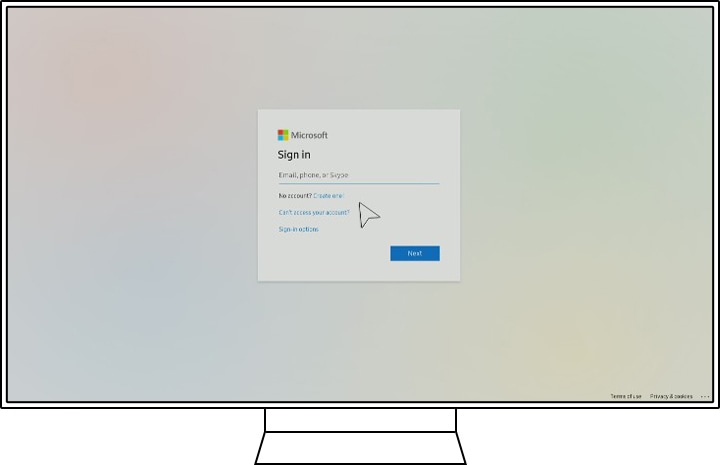
You can access MS Office 365 web pages through the Remote Access feature to edit Word, Excel, and PowerPoint.
This feature is based on Cloud Service by web browser on TV. Therefore, there is no OS limit.
How to access Office 365
Step 1. Select Office 365 icon on Remote Access panel.
Step 2. Enter your ID and password for Microsoft Office account.
Note: Some symbols not supported by Samsung One UI Font may not be legible.
Note: Available settings and screens may vary by software version and device. models.
Thank you for your feedback!
Please answer all questions.
Sign Language Support
![]()
![]()


Samsung Members
![Samsung Members app icon]()
![Samsung Members app icon]()


Always here for YOU
![Always here for YOU]()
![Always here for YOU]()

