How to resize a photo in the Gallery app on your Galaxy phone
Important Note: The information on this page is for Hong Kong products only. Models, sequences or settings will vary depending on location and/or where the product had been purchased. To be redirected to your local support page please click here.
After taking a photo with your Galaxy phone, if you want to change the size of the photo or make the size of the photo file smaller, you can easily adjust it using the photo editor in the Gallery app. Check out the guide below for resizing photos.
Resize a photo in the Gallery app
Most of the photos taken with the high-definition camera of the Galaxy phone are large. If you upload photos online and your photos are too large, you can simply resize them with the editing features of the Gallery app. Resize the photo by following the steps below.
Step 1. Open the Gallery app and select the photo you want to resize.
Step 2. Tap the Edit icon at the bottom of the screen.

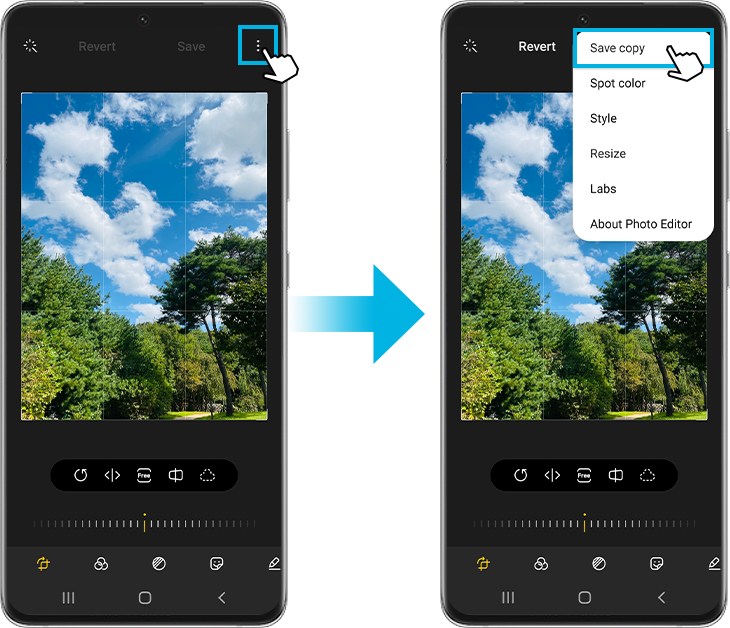
Step 3. Tap More options (the three vertical dots) at the top right.
Step 4. Select Resize.

Step 5. Choose your preferred resized image percentage from the Resize image options, and then tap on Done to apply changes.
Step 6. When you're done editing, tap Save.

When the photo is resized, you can see the size of the image file is reduced within the image details.
For Android 11, when you save the edited photo, the original photo will be overwritten instead of creating a new one. If you want to save it separately from the original, follow the steps below before tapping Save.
Step 1. Tap More options (the three vertical dots).
Step 2. Select Save copy. The edited photo will be saved separately from the original photo.
Note:
- Resizing the photo to be larger than its original size is not an option.
- If you want to cancel after saving, you can revert at the editing step.
- The resize feature may not be supported depending on the model version.
- Device screenshots and menus may vary depending on the device model and software version.
If the above information does not match what your product is showing, you may check the User Manual for your product. If you are unable to solve the problem, please contact us for further assistance.
Thank you for your feedback!
Please answer all questions.
RC01_Static Content : This text is only displayed on the editor page