How to Set a No-go Zone for Your Jet Bot
Samsung Jet Bot and Jet Bot AI + are able to distinguish between areas that need cleaning and areas that you don't want cleaned. Here is how to set up a No-go zone for your Jet Bot.
Set restricted areas in your home

You can designate specific areas that you want your robot to avoid, called No-go zones. No-go zones can be set for various reasons. For example:
- They can be set for areas where your Jet Bot tends to get stuck on cables, clothing, or kids' toys.
- You can restrict areas due to your pet.
- You can also use this feature to avoid entire rooms.
Based on deep learning AI technology with 3D sensors, the Jet Bot has a database of more than 1 million images to recognize various objects. With these excellent object recognition capabilities, Jet Bot cleans around various objects such as furniture and home appliances as closely as possible and avoids dangerous obstacles such as pets' droppings and glasses. Moreover, Jet Bot can select and clean in the most optimal route according to its environment based on its LiDAR sensor similar to that used for self-driving cars. This efficient technology lets you divide and select your home areas in more detail.
Once you've created the restriction areas, Jet Bot will remember them for future cleaning sessions so you don't need to reset them. At any point, you can go back into the SmartThings app to create, delete or adjust any of your restriction areas.
Note:
- This feature is available on the SmartThings app and Android iOS operating system.
- We recommended Android 6.0 or higher (minimum 2GB RAM space), iOS 10.0 or higher, and iPhone 6 or higher to operate the SmartThings app.
- This feature requires a Wi-Fi router and also connection to the Wi-Fi.
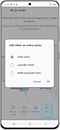
Setting a restricted area with SmartThings
To use the No-go zone feature, Jet Bot needs to map your home on the SmartThings app. Once Jet Bot has connected with the SmartThings app, you can easily control your appliance using your smartphone and tablet.
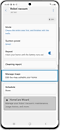
Step 1. Open the SmartThings app and connect to the vacuum cleaner (Robot).


Note:
- The Clean Station cannot be set as a No-go zone.
- If the Jet Bot does not start from the Clean Station or the Clean Station installation place has been changed, the Jet Bot may clean the set No-go zones.
The proper locations for setting a No-go zone
- Furniture which has space at the bottom (a cabinet, a sofa, etc.)
- Around a fireplace
- A floor less than 5 cm (0.59~1.96 inch) of height difference (a bathroom, a porch, etc.)
- A carpet with fiber longer than 2.5 cm (0.98 inch)
- A personal area that you wish the device would not enter.
Using boundary strips
Attach the boundary strips to the places that you want to keep the Jet Bot away from. Select the spots where there is a risk of falling, there are steps, or there is furniture. These tapes will help the Jet Bot operate safely.
Note: You can purchase additional boundary strips at a service center.
Correct location to attach boundary strips
- Place the tape where there is a step that is 5cm or lower.
- Place the tape where the door sill is 1.5cm or higher.
- Avoid a sliding door, the swing of the door, pots, a heater/fireplace, spots with fire or moisture.
- Avoid places where there is risk of falling, such as stairs, a porch, or a railing.
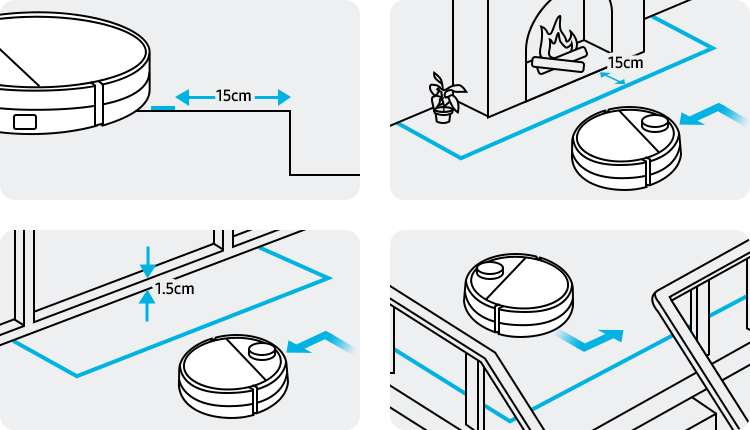
How to set a boundary strip
Place the boundary strips 15cm away from the spot to avoid and attach in a 'ㄷ' shape.

Note:
- Available technologies and functions may vary depending on the country, service provider, network environment, or product.
- Before you try out the app connection, be sure to check if your device's software and related apps are updated to the latest version.
- Mobile screen images on this content may vary depending on the device model you have.
Thank you for your feedback!
Please answer all questions.
Samsung Members
![]()
![]()


RC01_Static Content