Welcome to the
! Please enjoy our special offers for you

Galaxy S25 Front Camera

Replacing the front camera on the Galaxy S25 requires precision, proper tools, and careful handling of internal components. This step-by-step guide walks you through the complete disassembly and reassembly process, from safely removing the back cover and main board to preparing the new camera module with fresh adhesive. Whether you are restoring camera functionality or performing a professional repair, follow each instruction closely to ensure a safe and successful front camera replacement.
Person taking a selfie on the Galaxy S25 with the front camera interface visible on the screen.

Galaxy S25 Front Camera

Galaxy S25 Front Camera Disassembly
Galaxy S25 Front Camera Disassembly
Note
Remove the Back Cover first before you begin.
1

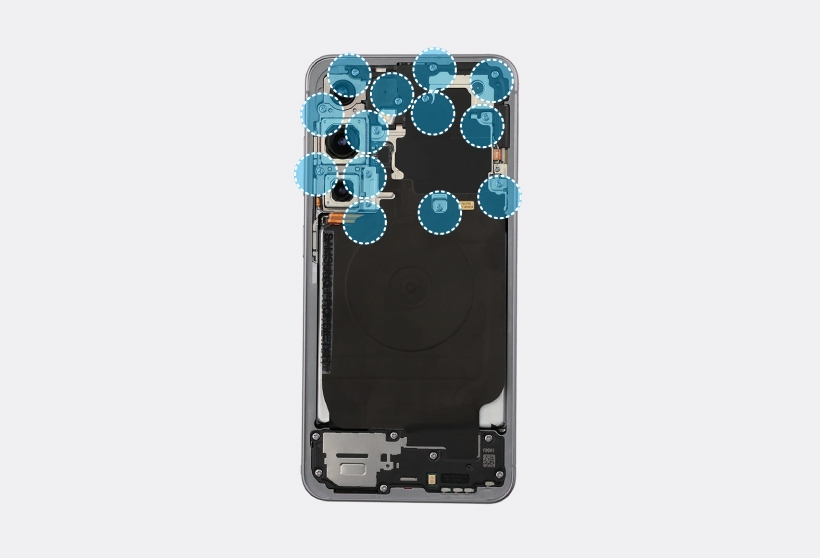
Check the 13 screws on the top of the rear and remove them using a cross-head screwdriver.
Galaxy S25 interior with thirteen top screws highlighted for removal.
Caution
Be careful not to damage the main board and near components.
Note
Check the number of screws that have been removed, and store them carefully to make sure that no unassembled screws are left inside the device during assembly.
2

Using the tweezers, separate the NFC antenna connector.
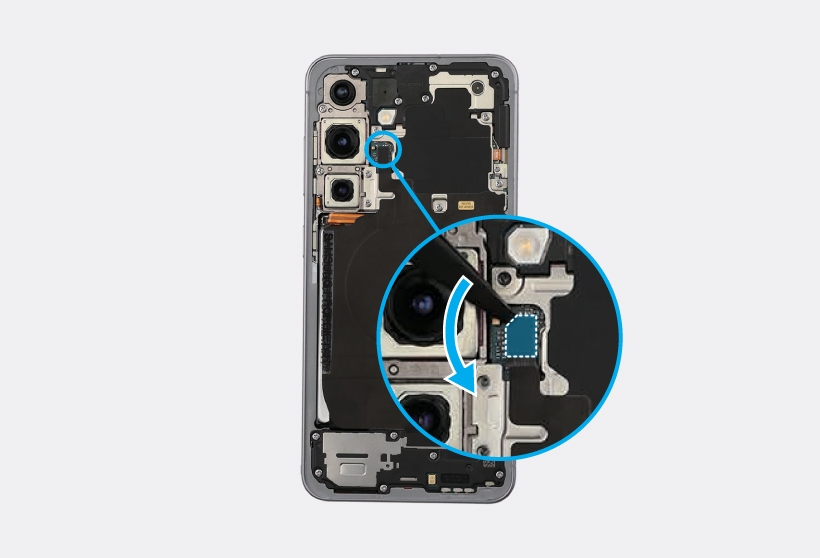
Close-up of NFC antenna connector inside the Galaxy S25.

Warning
  • Make sure to first disconnect the battery connector for your own safety.
  • Be careful not to damage the battery.
Caution
  • Be careful not to damage the battery connector, main board, and near components.
  • Be careful not to damage the NFC antenna connector and the FPCB cables.
  • Be careful not to tear any connected components near the wireless charging module.
  • Ensure that the wireless charging module is unfolded to prevent damaging the FPCB.
3

Using the tweezers, separate the NFC antenna connector. Using the tweezers or your fingers, lift up on the right of the metal plate carefully and pull it out from the device, and tilt it back to downward slowly.
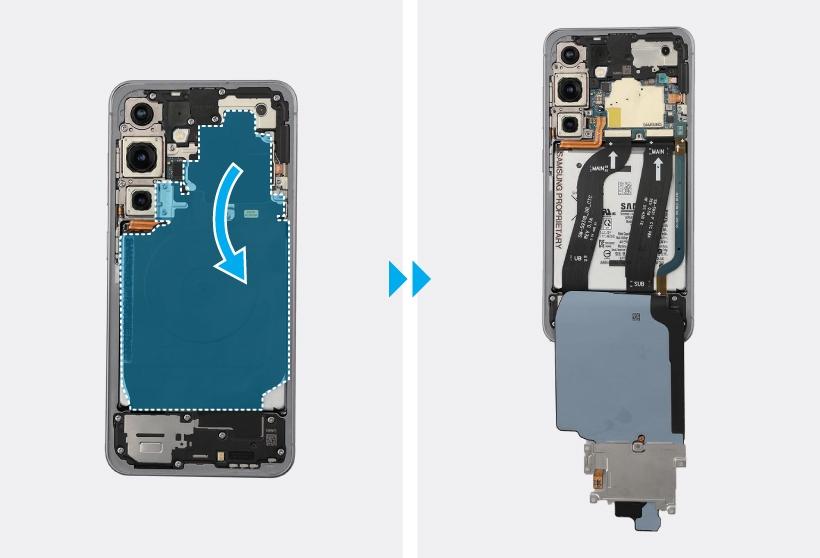
Metal plate highlighted in the Galaxy S25 interior and tilting it downward as it is removed.

4

Then, disconnect the battery connector from the main board using the tweezers.
Close-up of battery connector in the Galaxy S25 main board.

5

Using the tweezers, disconnect the top FRC connector and lift up on the separator groove of the rear top and remove it carefully.
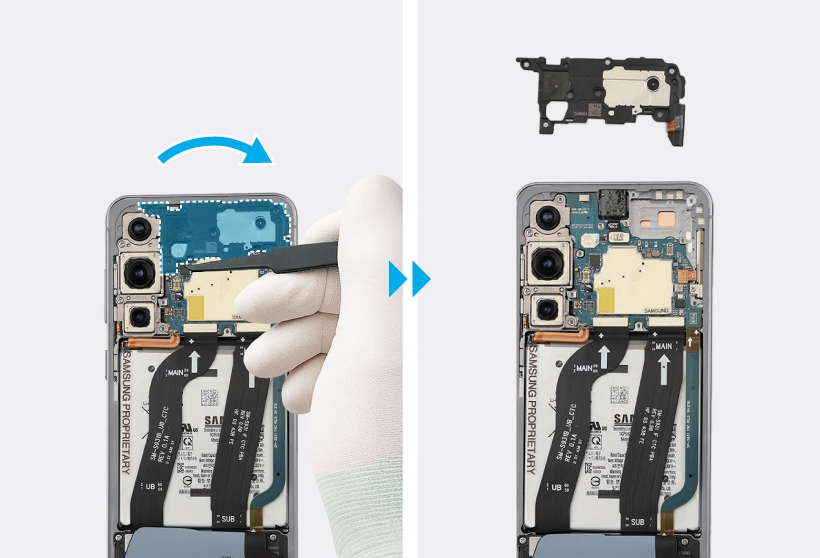
Gloved hands using tweezers to disconnect the highlighted top FRC connector, then lifting the rear top cover by its separator groove and removing it from the Galaxy S25.

6

Using the tweezers, disconnect the front camera connector and 3 flex cable connectors from the main board. For the United States 5G devices, disconnect the additional 5G mmWave antenna connector.
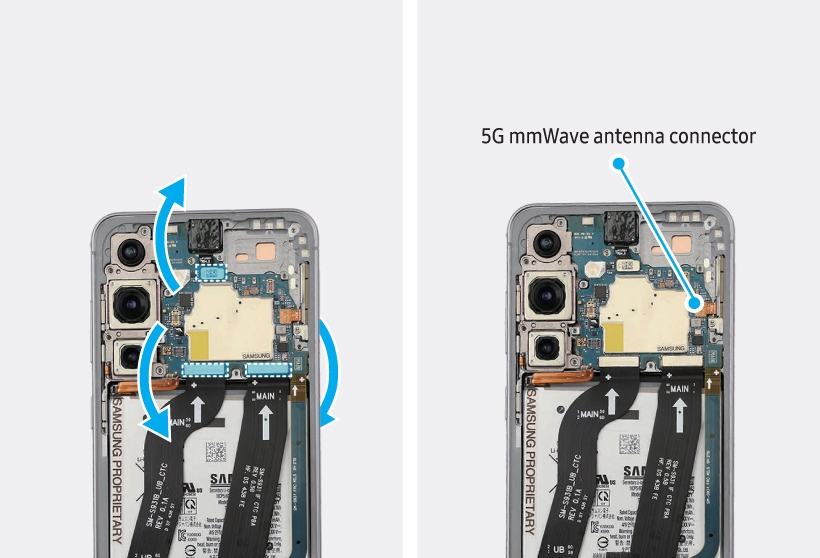
Highlighted arrows showing the front camera connector and three flex cable connectors in the Galaxy S25 main board.

Warning
Be careful not to damage the battery.
Caution
  • Be careful not to damage the battery connector, main board, and near components.
  • The FPCB cables have to be positioned outside so as not to interfere when disassembling the main board.
Notes
  • The 5G mmWave antenna module and its connectors are only available in United States devices.
  • The cables and connectors may vary depending on the country, region, or specification.
7

Using the tweezers, lift up on the separator groove of the main board, and remove it carefully.
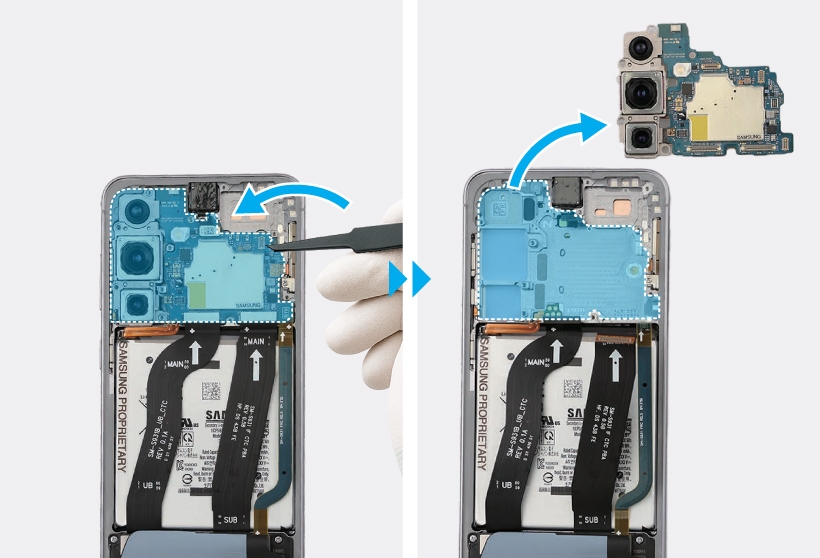
Gloved hand using a tweezer lifting the separator groove of the main board from the Galaxy S25 and removing it from the device.

Caution
The FPCB cables have to be positioned outside so as not to interfere when disassembling the main board.
8

Heat the microwaveable heating bag and apply it to both the front and back sides of the front camera module for 3 minutes.
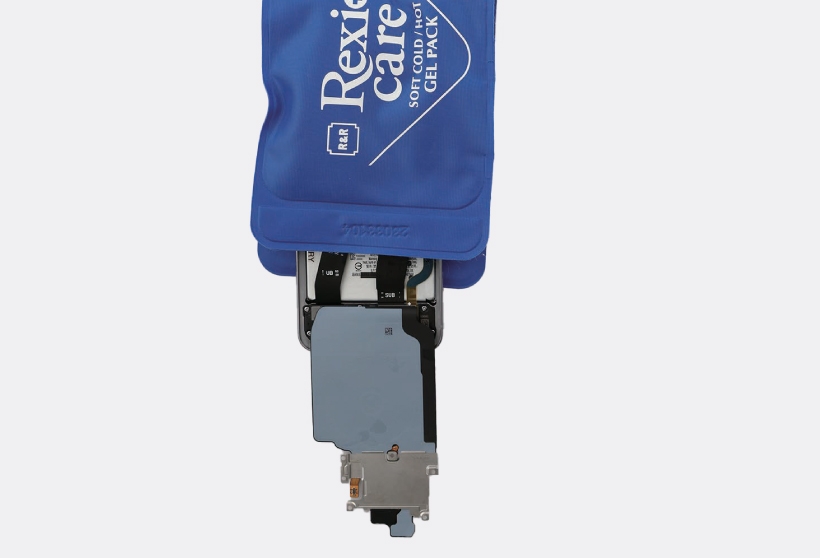
Heated microwaveable bag placed on the Galaxy S25.

Warning
  • It is possible for the device or battery to be damaged by heat.
  • Do not heat the device in a microwave. Doing so could cause an explosion.
  • If your device’s glass breaks, the debris can cause injury to your hands or other body parts. For your safety, attach an acrylic protective cover before disassembling the device.
Caution
  • Follow the heating bag’s instructions for heating. The recommended time for heating the bag is 50 seconds in a 1000 W microwave and 70 seconds in a 700 W microwave. (Correct temperature for use: 55-65 °C.)
  • Be careful not to damage the device through excessive heat. (It is recommended to disassemble the device in an area with a temperature gauge.)
9

Before the heat cools with the heating bag applied, remove the adhesive between the front camera and the screen module using the SIM card tray ejection pin.
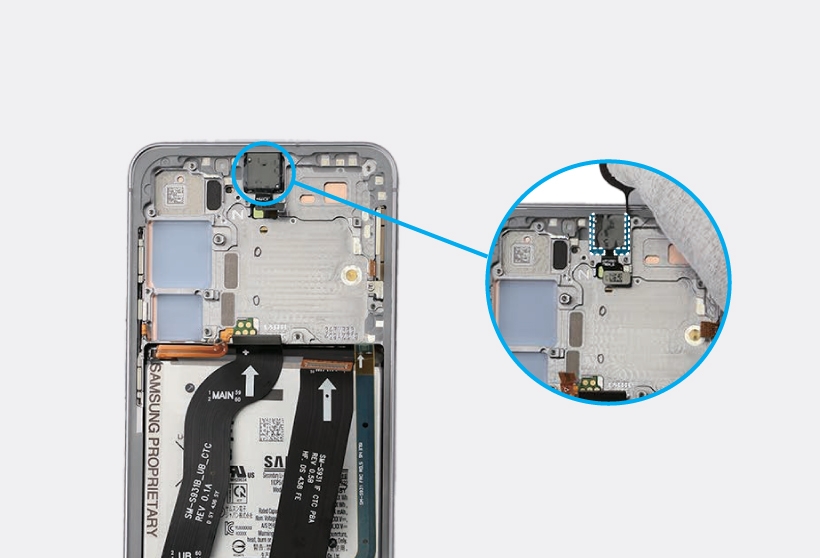
Gloved hands using a SIM ejector pin to separate the adhesive between the front camera and the screen module.

Caution
As the adhesive securing the camera is very strong, work slowly.
Note
If you have trouble removing the adhesive, heat the microwaveable heating bag additionally, and apply it to the front camera module to further soften the adhesive. When reheating, it should be heated no longer than 30 seconds.
10

Then, remove the front camera carefully using your fingers, and leave the camera lens facing up.
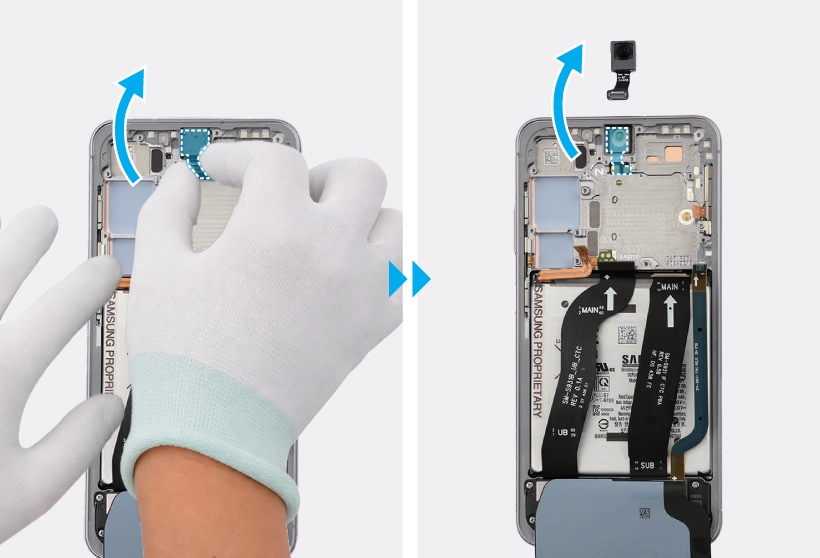
Gloved hands lifting the front camera out of the device and removing it with the camera lens facing upward.

Read less

Galaxy S25 Front Camera Reassembly

Galaxy S25 Front Camera Reassembly
Warning
Leaving screws inside the device may damage internal components, such as the battery. When assembling, be extra careful not to leave any unassembled screws inside the device.
1

Using the tweezers, remove the adhesive and tape from the front camera hole completely.
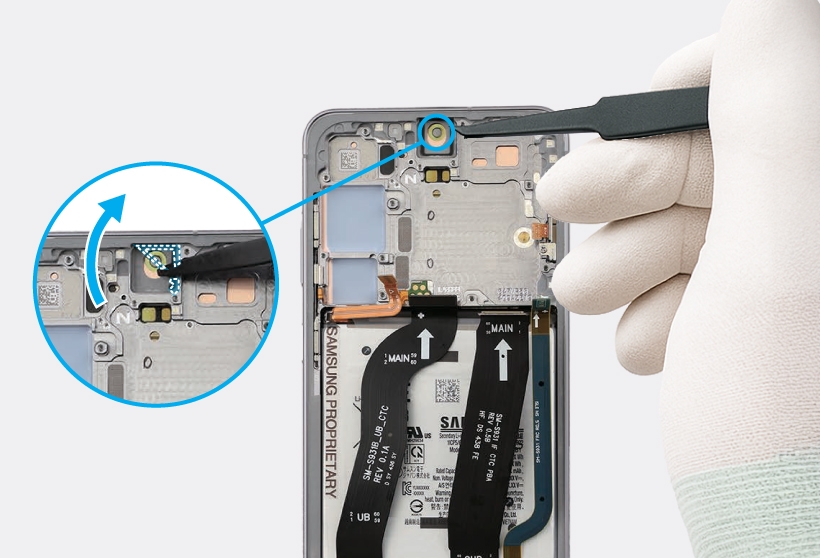
Gloved hand using tweezers removing the adhesive and tape from the front camera hole on the device.

2

Remove the clear film from the new front camera adhesive tape with the tweezers. Align the outside shape of the adhesive tape with the position of the camera hole and attach it accurately. Then, gently press down the tape with the tweezers so that the tape can be attached well.
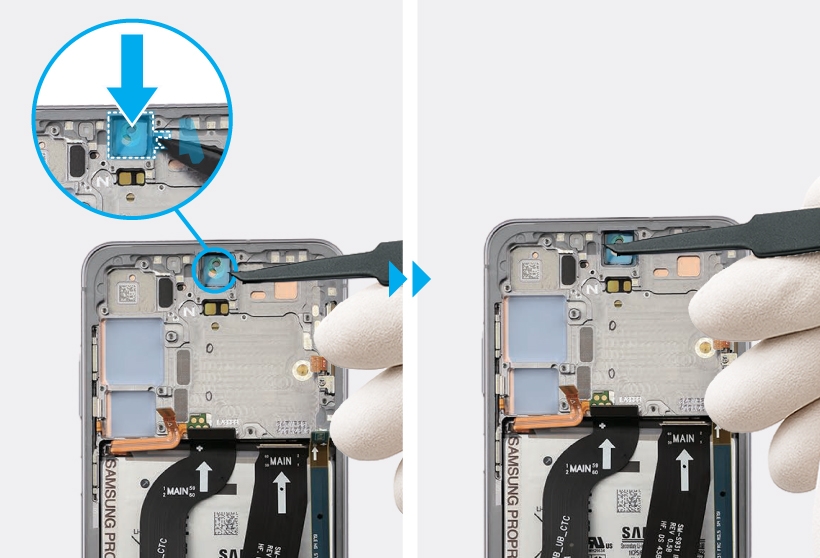
Gloved hand using tweezers placing a new piece of front camera side adhesive tape on the front camera hole and pressing it down.

3

Using the tweezers, hold the protruding clear film of the attached tape and remove it carefully.
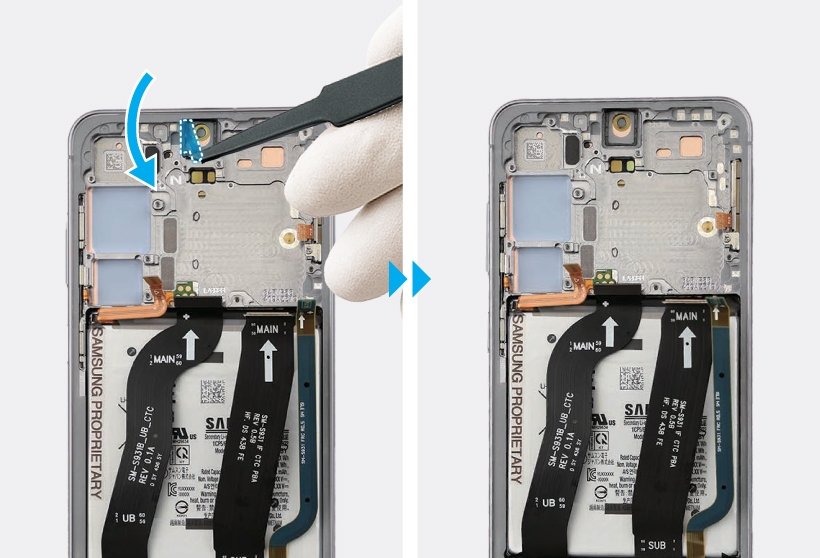
Gloved hand using tweezers removing the protruding clear film of the attached tape in the Galaxy S25.

4

Using the tweezers or your fingers, place the front camera in the camera hole so that the lens faces forward, and gently insert the front camera.
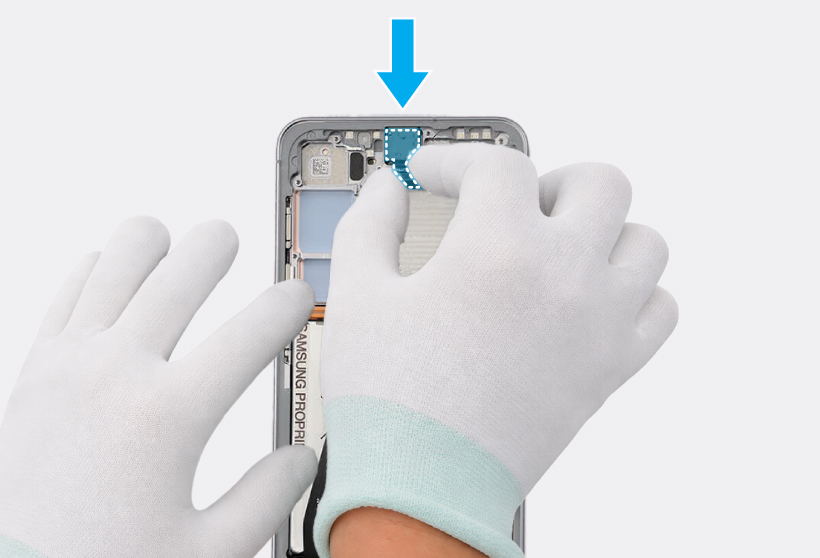
Gloved hands placing the front camera in the Galaxy S25 camera hole.

Caution
  • Be sure to place the camera in the correct position.
  • Be careful not to damage the camera lens.
  • Be careful not to damage and scratch the camera module.
5

Press down softly and evenly on the camera module so that the front camera can be fully inserted.
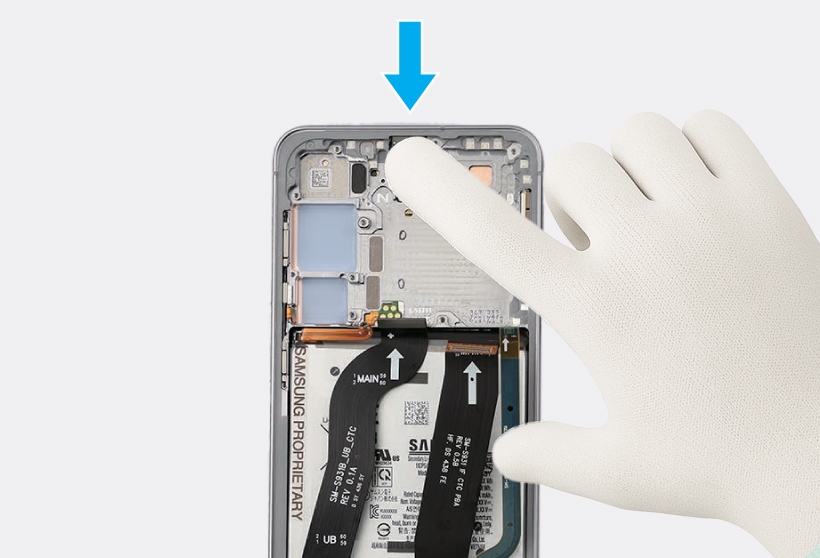
Gloved hand pressing down on the camera module with an index finger.

6

Align the main board module onto the device frame. After attaching the upper part of the main board diagonally on the screen module, assemble the lower part.
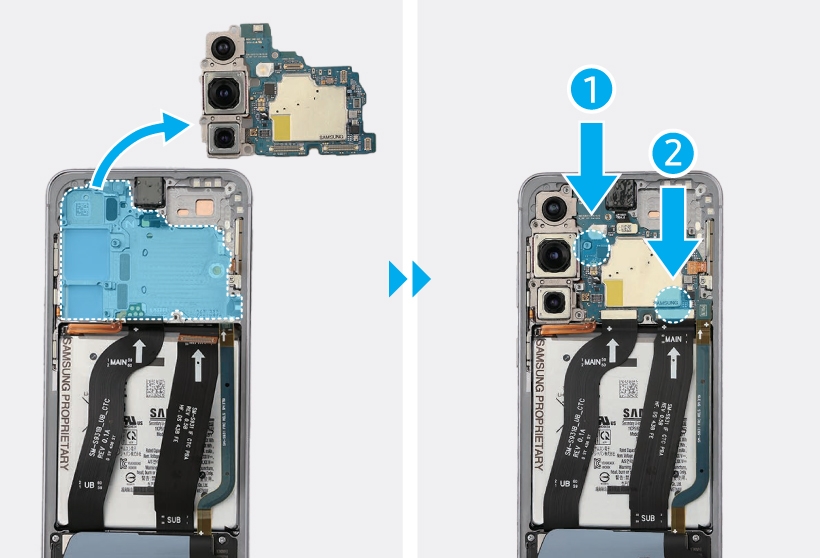
Galaxy S25 interior with the main board module separated on the left, attached on the right.

Warning
Be careful not to damage the battery.
Caution
  • Be careful not to damage the battery connector.
  • The FPCB cables have to be positioned outside so as not to interfere when assembling the main board.
7

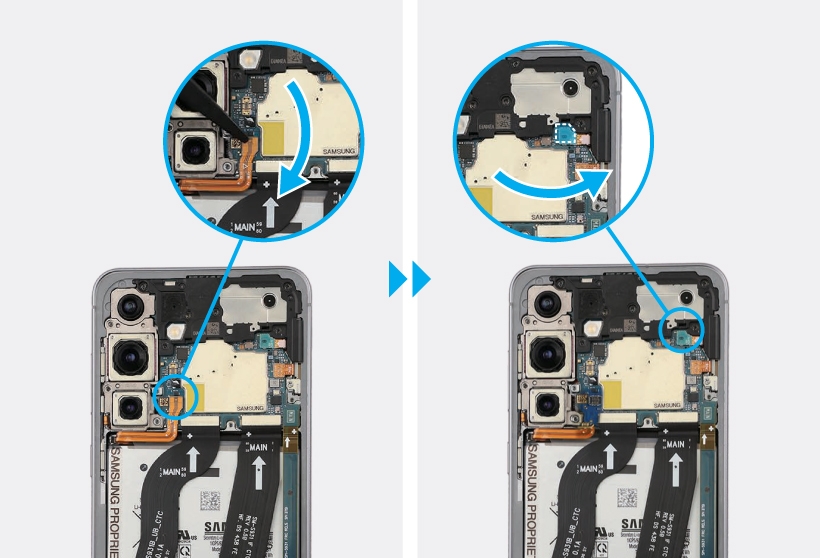
Using your fingers, connect the front camera connector and the 3 flex cable connectors on the main board. For the United States 5G devices, connect the 5G mmWave antenna connector on the main board.
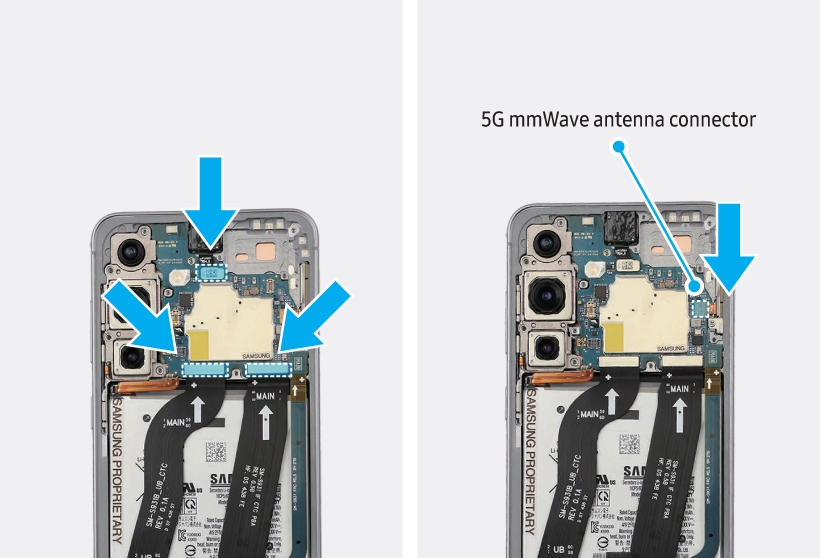
Main board showing multiple connectors being reattached on the left, close-up of the main board part showing the 5G mmWave antenna connector highlighted with an arrow.

Warning
Be careful not to damage the battery.
Caution
Be careful not to damage the main board.
Notes
  • The 5G mmWave antenna module and its connectors are only available in United States devices.
  • The cables and connectors may vary depending on the country, region, or specification.
8

Using the tweezers or your fingers, place the rear top in the correct location and gently press down to secure it in its position until you hear a locking sound. Then, connect the top FRC connector to the main board.
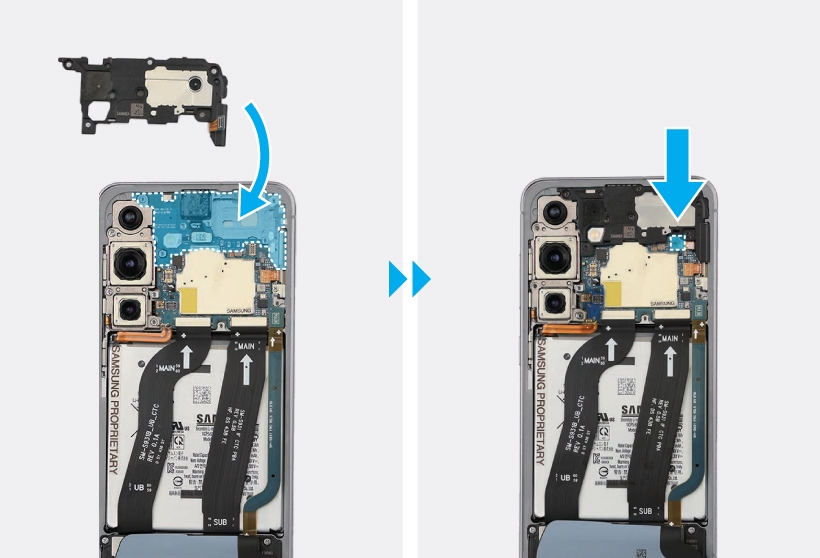
Rear top cover positioned above the device frame on the left and shown installed on the right, with a highlighted top FRC connector location.

Caution
Be careful not to damage the main board and near components.
9

Connect the battery connector to the main board.
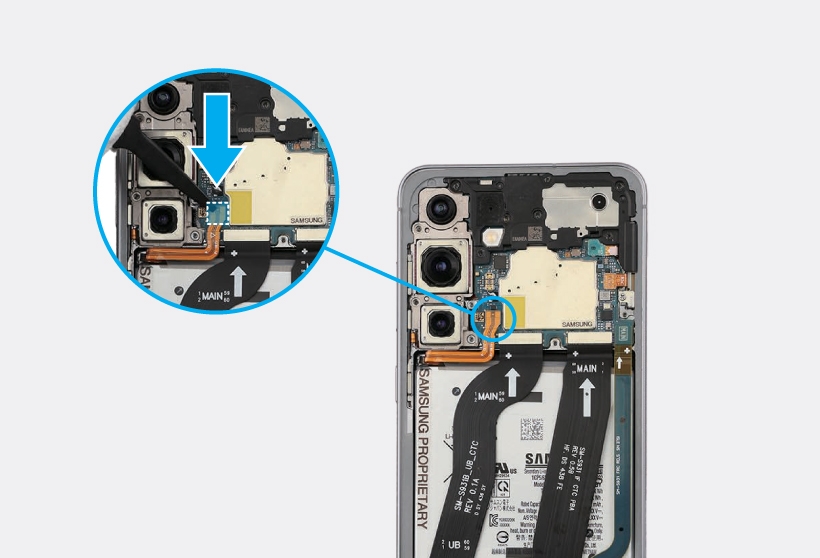
Battery connector on the Galaxy S25 main board highlighted with a blue callout.

Warning
Be careful not to damage the battery.
Caution
Be careful not to damage the battery connector and near components.
10

Hold the tilted wireless charging module with the tweezers or your fingers and carefully assemble to its original state.
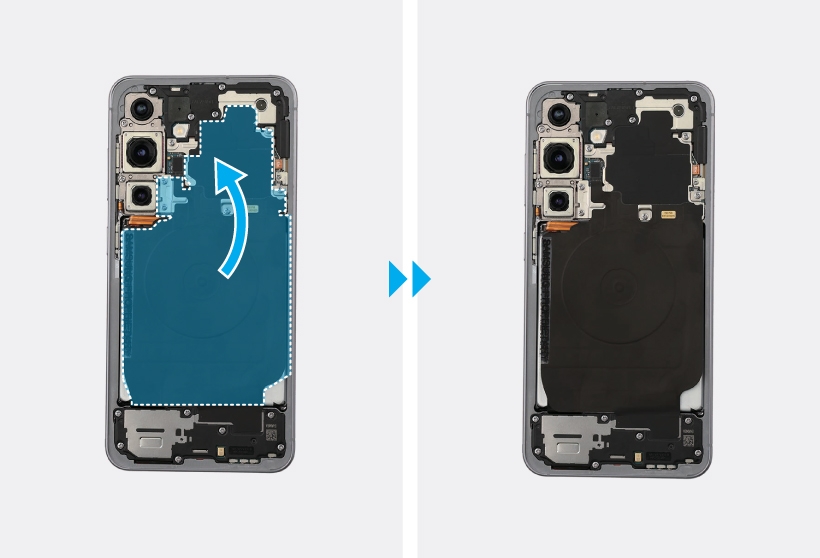
Wireless charging module inside the Galaxy S25 being lowered back into place.

Warning
Be careful not to damage the battery.
Caution
  • Be careful not to damage the NFC antenna connector and the FPCB cables.
  • Be careful not to tear any connected components near the wireless charging module.
  • Ensure that the wireless charging module is unfolded to prevent damaging the FPCB.
11

Connect the NFC antenna connector to the main board.
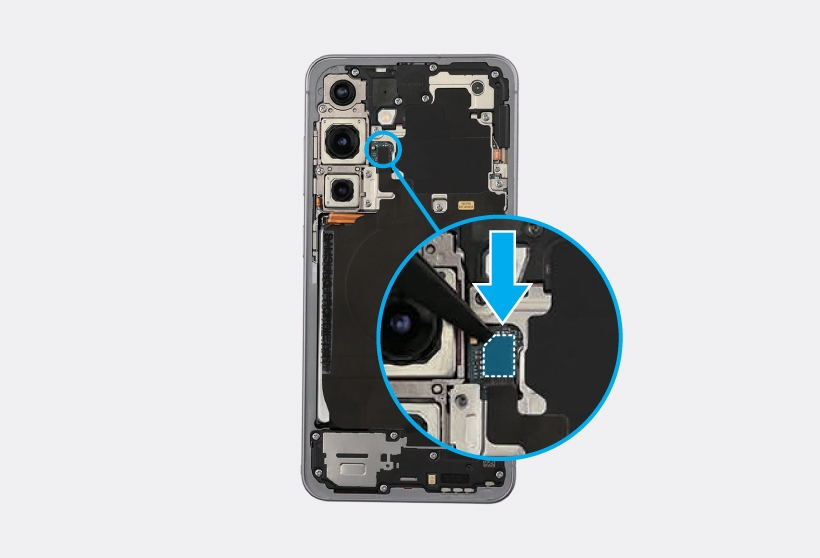
NFC antenna connector inside the Galaxy S25 highlighted with a blue callout.

Caution
Be careful not to damage the main board and near components.
12

Check the screw 3428 (13 ea) at the 13 different points on the top of the rear and fasten them using a cross-head screwdriver.
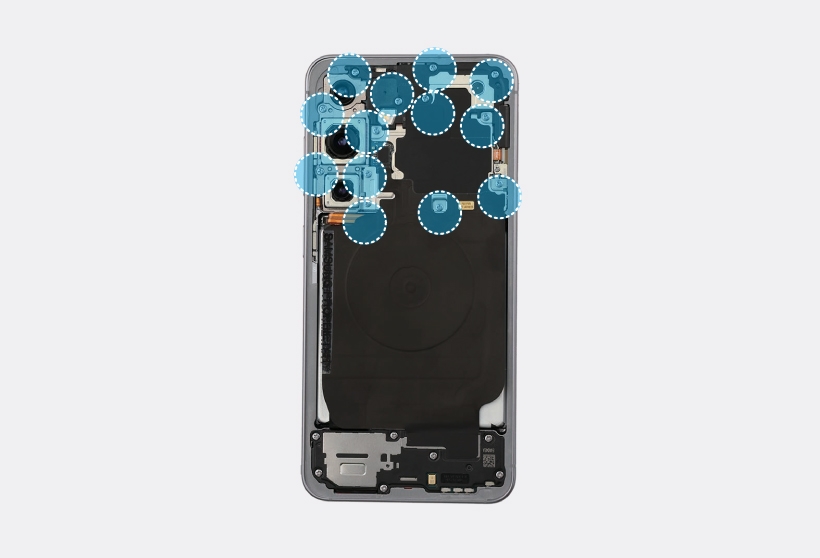
Screws highlighted around the top section of the Galaxy S25 interior.

Caution
Be careful not to damage the main board and near components.
13

Check carefully with your fingers to see if there are any screws or other foreign substances inside the device (battery, PBA, cable, etc.). Shake the device lightly with the back of the device facing down to remove any remaining screws.
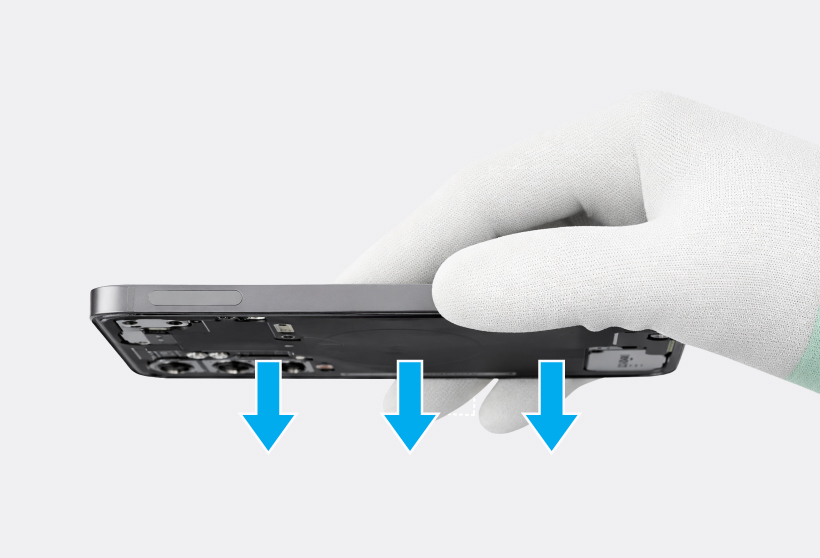

Gloved hand holding the Galaxy S25 upside down with three downward arrow icons below the device.

Note
Reassemble the Back Cover to complete assembly.
Read less
Was this content helpful?
Table of contents
We're here for you

Contact Samsung Support

Contact us online through chat and get support from an expert on your computer, mobile device, or tablet. Support is also available on your mobile device through the Samsung Members App.
Fast, easy checkout with Shop Samsung App
Easy sign-in, Samsung Pay, notifications, and more!
Or continue shopping on Samsung.com
×
The Shop Samsung app
Free standard shipping, exclusive offers and financing options.
GET
×
The Shop Samsung app
Free standard shipping, exclusive offers and financing options.
GET
×

You Are About To Be Redirected To Investor Relations Information for U.S.

Thank you for visiting Samsung U.S. Investor Relations. You will be redirected via a new browser window to the Samsung Global website for U.S. investor relations information.
CANCEL
CONTINUE
×

Redirect Notification

As of Nov. 1, 2017, the Samsung Electronics Co., Ltd. printer business and its related affiliates were transferred to HP Inc.

For more information, please visit HP's website: http://www.hp.com/go/samsung


Select CONTINUE to visit HP's website.

CANCEL
CONTINUE