How to set up your Samsung Dishwasher

Getting a new dishwasher can be exciting. Samsung dishwashers are whisper quiet and efficient. Let us show you how to remove your old dishwasher, select the right dishwasher, install your dishwasher, and get the most out of it.

Skill Level

Advanced

How to set up your Samsung Dishwasher

Advanced

Select a dishwasher

Dishwasher types

There are many options to choose from when it comes to selecting the perfect Samsung Dishwasher for your home. All of our dishwashers are extremely quiet, but the decibel level is listed in the specifications for every dishwasher. There are also different handle styles, button types, features, and colors. Your choice will ultimately come down to personal preference, but here's a summary of the three main types of dishwashers and their features:

  • Rotary: These dishwashers feature water sprayers in the bottom and near the top of the tub, usually under the top rack. Most of our rotary dishwashers feature a hybrid tub where the main body is plastic and the door is stainless steel. These generally have a heated dry feature.
  • Stormwash: These dishwashers feature water sprayers in the bottom and near the top like Rotary, but they also feature a specially targeted sprayer that uses powerful rotating jets to target really hard-to-clean dishes that are placed in the Stormwash zone.
  • Stormwash+: The next generation of Stormwash. The targeted sprayer is 1.5x bigger and these models feature dual rotating sprayer arms at the bottom of the tub in addition to the sprayer arm under the top rack which makes for maximum coverage.
  • Linear wash: AquaBlast jets provide corner-to-corner coverage for superior cleaning.

Additional features

Our dishwashers have some amazing features. Some are available on all dishwashers while others are found only on specific models:

  • 3rd rack: Many of our dishwashers have a special rack at the top designed for cutlery so you can wash even more during a wash cycle.
  • Auto release door: Models with this feature have a special drying technique that will automatically pop open the door to release steam and heat towards the end of the cycle. This helps the dishes dry faster than if the steam was trapped inside.
  • Heated dry: Some models have a heating element that will heat up towards the end of the cycle to aid in the drying process. (This feature is only on models with a hybrid or plastic tub).
  • SmartThings: Models that have a SmartThings connection allow you to schedule, start, stop, or delay cycles from your phone. You can also monitor your dishwasher's power usage.
  • Bespoke: Most dishwasher types are available as Bespoke models, but Bespoke helps you express your style with different colors.

How much space do you need?

The good news is that while some of our dishwashers vary slightly in size, there are minimum and maximum measurements that will fit all models. You still need to check the specifications for the model you select so you can ensure the perfect flush fit. As a guideline, if you have at least this much space the dishwasher will fit:

  • Width 24"
  • Max Height 35.4"
  • Depth 25"
Read less

Prepare for your new dishwasher

Now that you've chosen the perfect Samsung dishwasher, it is time to get ready for its arrival.

  • Make sure you have a clear path to your kitchen for delivery of your new dishwasher. Measure the doorway to confirm it will fit.
  • Have a plan for what to do with your current dishwasher. Your delivery service more than likely offers a haul-away option. If not, you will need to look into your local waste options and guidelines for proper disposal. If your old dishwasher still works you may be able to donate it to a local charity. Some can even pick it up for you.

Delivery, installation, and haul-away options

You have delivery options when you purchase from Samsung. You can choose basic delivery or delivery with installation, which also gives you the option of “haul-away.” Haul-away means they will also remove and dispose of your old dishwasher.

Delivery only

  • Includes delivering the dishwasher to your home, unboxing it, and taking it to your room of choice. If you have stairs, please be aware the delivery team will only move the dishwasher a maximum of three flights of stairs.
  • Inspection of unit and confirmation of correct model.
  • Removal of packaging if requested during delivery.


Delivery + Installation

  • Includes delivering the dishwasher to your home, unboxing it, and taking it to your room of choice. If you have stairs, please be aware the delivery team will only move the dishwasher a maximum of three flights of stairs.
  • Installation of the dishwasher. The dishwasher kit is included: (a 6’ stainless steel dishwasher water line, 6’ straight power cord, 3/4” elbow, 3/8” elbow, plastic Romex connector, worm gear clamp (2), wire nuts (3), and Teflon tape and screws (2).
  • Plugging in the dishwasher and confirming it is fully functional.
  • Leveling of the new dishwasher.
  • Removal of the packaging.

Haul-away

Haul-away includes the removal of the old dishwasher. It must be emptied of any personal belongings beforehand.


Other retailers may have similar delivery, installation, and haul-away options, but you will need to confirm their options with them when you purchase your new dishwasher.

Delivery Checklist

Whether your dishwasher is delivered by Samsung or another retailer, or you are bringing it home yourself, make sure these things have been checked ahead of time:

  • Check the dimensions: Measure the height, width, and depth of the empty space your appliance is going into. Make sure to account for your existing countertops and cabinets. (Please reference the dimensions provided in the "Select a dishwasher" section or the specifications of the dishwasher you chose).
  • Depending on the building codes in your area, a GFCI or Arc Fault GFCI outlet may need to be installed by an electrician, prior to delivery.
  • To ensure proper drainage, dishwashers must be installed no more than 10 feet from the sink/primary drain.
  • An accessible shut-off valve, located under the sink or behind the dishwasher location, must be available. The delivery team cannot install a dishwasher if the shut-off valve is located in a crawl space, or a basement, or is inaccessible. The shut-off valve must be free of rust and corrosion.
  • Ensure that there is a 110/120-volt, 3-prong, grounded electrical outlet protected by a dedicated 15 or 20-amp circuit breaker located within 5 feet of the installation location.
  • Accessories required: Dishwasher Kit (6’ stainless steel dishwasher water line, 6’ straight power cord, 3/4” elbow, 3/8” elbow, plastic Romex connector, worm gear clamp (2), wire nuts (3), Teflon tape and screws (2) (included with Delivery + Installation from Samsung)

Uninstall your dishwasher

1. Disconnect from power.

1. Switch off the circuit breaker for your dishwasher.

2. If there is a cutoff switch (light switch) for your dishwasher, you can also switch it to the off position.

3. The next step depends on how your dishwasher is connected. If it uses a standard power cord and outlet, unplug it. The outlet is normally located under the sink.

4. If your dishwasher is directly connected to the wire (hardwired) you need to disconnect the power cord connection which is normally in the front of the dishwasher. You will have to go ahead and remove the kick plate panel (step 6) to disconnect the power cord.


2. Turn off the water.


The water supply hose usually connects under your kitchen sink. On the wall under the sink, you should be able to turn the water supply connection knob clockwise to shut the valve. If the hose connects somewhere other than under the sink, follow the metal water hose from the back of your dishwasher to where it connects to the valve on the wall.


3. Disconnect the water supply hose.


Use a wrench to loosen and disconnect the water supply hose from the supply valve that you already turned off completely.


4. Disconnect the Drain hose.


This is a plastic hose that runs from the back of your dishwasher (normally) to a drain under your sink or your garbage disposal. There will most likely be a clamp holding this on so you can use a flathead screwdriver to loosen the clamp and disconnect the hose. Some water may pour out of the hose when it comes loose.


5. Remove the screws from the counter.


Your dishwasher will be attached to the countertop with brackets. Remove the screws to disconnect the brackets from the countertop. Be sure to save the screws especially if you plan to sell your old dishwasher. Your new dishwasher comes with new screws and brackets.


6. Remove the kick plate.


There should be at least one screw on either side of the kick plate that needs to be removed. Then you can take the kick plate off and set it aside. The electrical connection is usually located behind the kick plate, but the water supply and drain hose may either be here or at the back of the dishwasher.


7. Loosen the front leveling legs.


Use a wrench to loosen the leveling legs (counterclockwise). You will be lowering the dishwasher or raising the legs off the floor so you can get it loose from the cabinet.


8. Double-check that you have disconnected the power.


The circuit breaker is switched off, the light switch is off, and the power cord is unplugged. But it's a good idea to recheck and make sure. If your dishwasher is hardwired, you might not have disconnected the power until you removed the kick plate, so make sure that is done.


9. Slide the dishwasher out of the cabinet.


It's time to slide the dishwasher out carefully, making sure not to scratch the floor. The water supply hose is still connected at this point so make sure to feed it and the drain hose through the opening in your cabinet. You also may need to lower the back leveling legs at some point during this process. Some dishwashers have a way to do this from the front, but it depends on the model and manufacturer.

Read less

Install and set up your new dishwasher

Your new dishwasher is here and it's time to install it. This guide includes an overview of many installation steps, but you should still refer to your user manual and installation guide for specific details on your model.

1. Gather your tools and materials.

These supplies aren't included with your dishwasher but are necessary for successful installation. (Items that are included with the dishwasher are not listed here and will be called out in the installation steps when needed)


  • Electric drill
  • Safety glasses, gloves, and flashlight
  • Adjustable wrench, Phillips, and flat screwdriver
  • Wire strippers, pliers, and tin snips
  • Tape measure, pencil, and level
  • Twist-on wire connectors, strain relief, and screws for the side wall (not necessarily required).
  • Electrical tape, standard duct tape, and Teflon tape
  • Hot water supply line, 90° Elbow (3/4" or 3/8" depending on the model and water supply hose), power cable
  • Tube fittings, Air gap, Rubber connector
Important
If this is a first-time dishwasher installation, additional steps and tools are needed. This guide assumes that you are replacing a dishwasher. Please refer to the installation guide that is included with your dishwasher.

2. Unpack your dishwasher.

1. Make sure the box is upright with the arrows pointing up.

2. Cut the straps and remove the box from the top of the dishwasher.

3. Locate the dishwasher's kick plate, which is attached to the packing material. Set it aside.

4. Lift the dishwasher off the bottom tray and place it on the floor.

5. Remove the bag that covers the dishwasher.

6. There is packing material inside the dishwasher that needs to be removed before running a cycle but should be left in place until installation is complete.

7. Do not remove the sound-dampening fabric that surrounds the exterior of the dishwasher tub.

Caution
Always lift the dishwasher to move it. Sliding it over rough surfaces can damage the dishwasher's feet and sliding the feet over finished surfaces can, in some cases, damage that finish or the underlying surface.

3. Inspect the dishwasher.

Check all parts of the dishwasher before installing it to make sure that nothing was damaged during shipping or delivery. If there are any problems, contact the shipping company or the retailer that delivered the dishwasher.

4. Confirm the included parts are available.

  • 2 installation brackets
  • 2 flat screws (brackets)
  • 2 rounded screws (kick plate)
  • Nut connector and seal (for 3/4" 90° fitting)
  • Zip tie (for the drain hose)
  • Kick plate

5. Prepare the dishwasher for installation.

1. Make sure the circuit breaker and water supply valve are turned off before proceeding.

2. Use the provided nut connector to connect the water hose to the dishwasher. Follow these steps:


Installing the elbow

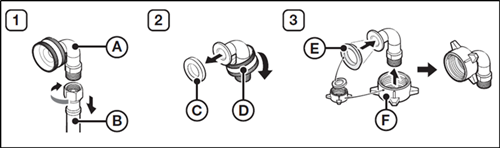
1. Disconnect the 90° fitting (A) from the hose (B).

2. Remove the seal (C) and the nut (D) from the 90° fitting.

3. From the provided nut connector, separate the seal (E) and the nut (F), and then assemble them to the 90° fitting as shown in the figure. You must insert the smaller side of the seal.


3. Then, insert the ¾" 90-degree fitting into the inlet valve. Tighten until the ¾" fitting is tight. Do not over-tighten.
 
4. Adjust the leveling legs so they are as short as possible. This will prevent them from breaking when moving the dishwasher or laying it down. Level the dishwasher after it is in place.
 
5. Make sure there are no kinks in the drain hose.
 
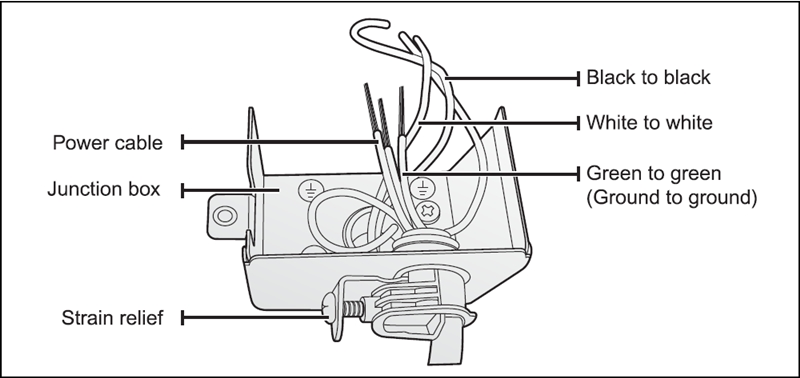
6. Remove the junction box cover located at the bottom front of the dishwasher using a screwdriver and install the strain relief.
 
7. If the countertop is made of wood or a material that is not damaged by drilling, attach the mounting brackets to the dishwasher. They will be used later.

6. Position the dishwasher and connect the hot water.

1. Adjust the leveling legs at the bottom of the dishwasher after measuring the height of the cabinet opening from under the countertop to the floor.
 
2. Locate the hot water supply line and the power cable.
 
3. Place the dishwasher so that the power cable is in the right channel of the base of the dishwasher. Use standard duct tape or cable ties to secure the electrical cable to the adjacent channel in the base. This can prevent the electrical cable from being squeezed when you push the dishwasher into place.
 
4. Pull the drain hose through the hole in the sink cabinet side wall. Keep it free of kinks.
 
5. Make sure the hot water supply line is not twisted, and then connect the hot water supply line to the elbow joint.
 
6. Slide the dishwasher carefully into the installation space. If possible, gently pull any excess lengths of the water supply line, drain hose, or power cable back as you move the dishwasher. Get a second or third person to help you do this if necessary.
Caution
Do not place the dishwasher on the water supply line, drain hose, or power cable. Also, make sure they are not folded or twisted.

7. Level the dishwasher.

1. Open the door, place the level against the top of the tub on the inside, and check if the dishwasher is level. If it is not level, rotate the leveling legs (counterclockwise to raise, and clockwise to lower) of the dishwasher until the dishwasher is level.

leveling the dishwasher

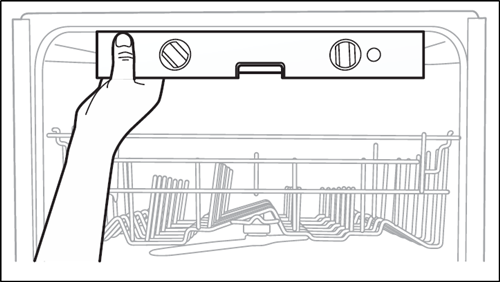
2. Use the level to check if the dishwasher is level front to back, as shown in the figure to the right. If the dishwasher is not level front to back, adjust the height of the front legs until the dishwasher is level.

3. Open the dishwasher door and check if both the tub and door clearances are correct. If not, adjust the leveling legs.

Caution
  • To prevent leaks or drainage problems, make sure the drain hose is not damaged, kinked, or twisted.
  • Be careful when cutting off the end of the drain hose as there is a risk of injury.
  • Clean around the sink's drain connection so that it does not damage the hose. Check for any foreign items in the drain hose and remove them.

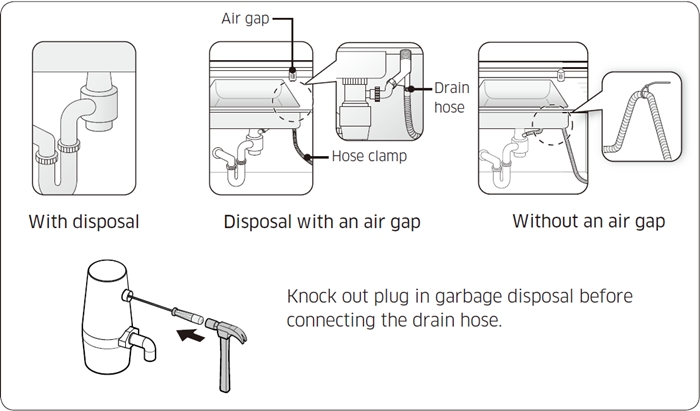
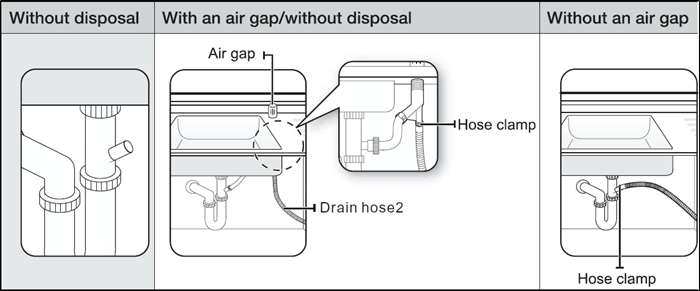
8. Connect the drain hose.

Garbage disposal
 
1. There are several ways to connect the drain hose to the drain hose connector of the sink. You must connect the drain hose in accordance with the water pipe installation regulations in your region.
 
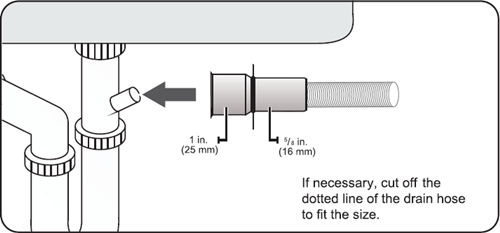
2. Check the size of the sink's drain hose connector. If needed, cut the drain hose so its end fits onto the sink connector (1" or 5/8" - as shown). If the end of the drain hose does not fit onto the drain hose connector of the sink, use an adaptor from a plumbing/hardware supply store.
 
Cut the drain hose
 
3. Slide a hose clamp over the end of the drain hose. Attach the drain hose to the sink connector, slide the hose clamp to the end of the hose, and then tighten the hose clamp.
 
Note: You must use a hose clamp to prevent leaks.
 
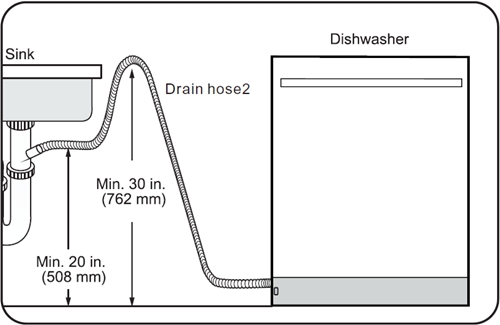
4. If there is no air gap, make sure to hang the middle of the drain hose well above the sink cabinet base to prevent backflow.
 
High loop the drain hose
 
5. When drilling a hole for the drain hose on the cabinet wall, make sure not to damage the drain hose with sharp edges of the hole. On wooden walls, use sandpaper to soften the edges. On metal walls, use insulation tape or duct tape to cover the sharp edges around the hole.
 
Warning

Electrical Shock Hazard

To avoid electrical shock, do not work on an energized circuit. Doing so could result in serious injury or death. Only qualified electricians should perform electrical work. Do not attempt any work on the dishwasher electric supply circuit until you are certain the circuit is de-energized.

Fire Hazard

To avoid a fire hazard, make sure electrical work is properly installed. Only qualified electricians should perform electrical work.

9. Connect the power cable.

Wiring the dishwasher
 
1. Before connecting the power cable to the dishwasher, make sure the circuit breaker is off.
 
2. In the junction box located at the front bottom right of the dishwasher, find the three power wires from the dishwasher including the grounding line.
 
3. Pass the power cable through the strain relief, and then into the junction box.
 
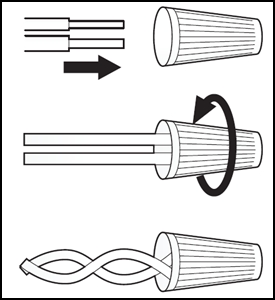
4. Connect the black wire of the dishwasher to the black wire of the power cable by inserting both into a wire nut and then rotating the wire connector as shown. Connect the white wire to the white wire and the green to the green in the same manner.
 
Wire nuts
 
5. Recheck each wire to ensure it is connected correctly and securely. Each colored wire should be connected to the corresponding wire of the same color. White should be connected to white, black to black, and green to green.
 
6. Replace the junction box cover on the dishwasher.

10. Test the installation.

Now that the drain hose, water supply hose, and power have all been connected, it's time to run a test cycle to make sure there are no issues. It's better to do this before attaching the dishwasher to your countertop or cabinet.


1. Open the door and remove all foam, paper packaging, and unnecessary parts.
 
2. Turn on the circuit breaker you turned off before you began the installation.
 
3. Open the water supply valve to supply water to the dishwasher.
 
4. Turn on the dishwasher, and then select and run a cycle.
 
Make sure the power turns on correctly and there is not any water leakage while the dishwasher is operating.
 
If the dishwasher does not turn on, turn the circuit breaker back off and review the power cord connection by checking the steps in this guide, and refer to the installation guide included with your dishwasher.
 
If there is a water leak, turn off the circuit breaker and inspect the drain hose connection and the water supply hose connection at both ends, review the installation steps in this guide, and refer to the install guide included with your dishwasher.
 
If an error has occurred, turn off the dishwasher, close the water supply valve, and check out our error code guide.
 
If no errors occur while it is operating, turn off the dishwasher, and finish the installation by securing the dishwasher to the counter.

11. Secure the dishwasher.

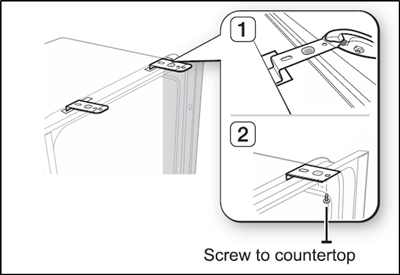
If you can drill into the countertop:

1. If the installation brackets on the front of the dishwasher are too long and stick out from under the countertop, cut them down using tin snips as shown.
 
Installing the brackets
 
2. Put a large towel into the bottom of the dishwasher to prevent wood shavings or a dropped screw from falling into the dishwasher.
 
3. Carefully drill screw holes into the countertop bottom by passing the drill bit through a screw hole in each bracket, and then drill into the countertop bottom beneath.
 
4. Make sure the hole you drill is smaller than the diameter of the screw.
 
5. Insert the provided screws into the brackets, and then tighten them to secure the dishwasher to the countertop.
 
 
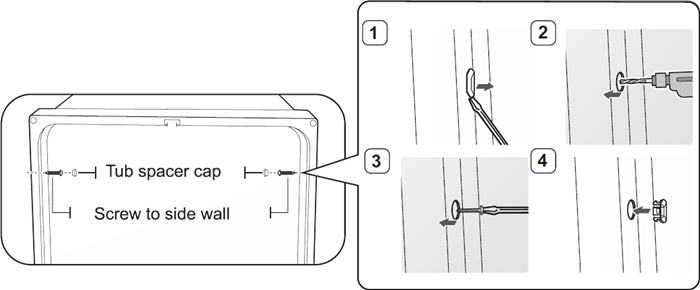
If the countertop would be damaged from drilling:
 
1. Put a large towel into the bottom of the dishwasher to prevent wood shavings or a dropped screw from falling into the dishwasher. Remove the tub spacer caps with the tip of a screwdriver. The caps are just inside the tub near the top of the tub on both sides.
 
2. Drill a hole into the sides of the kitchen cabinet on both sides by carefully passing a drill bit through the screw holes exposed by the removal of the spacer caps, and then drilling into the cabinet side beneath.
 
Tub screws and caps
3. Make sure the hole you drill is smaller than the diameter of the screw. Also, make sure the drill bit does not strike the sides of the spacer capholes. Insert the provided screws into the holes, and then tighten them to secure the dishwasher to the cabinet.
 
4. Make sure the tub is not distorted by pressure from the screws. If the tub is distorted, loosen the screws a little.
 
5. Replace the tub spacer caps.

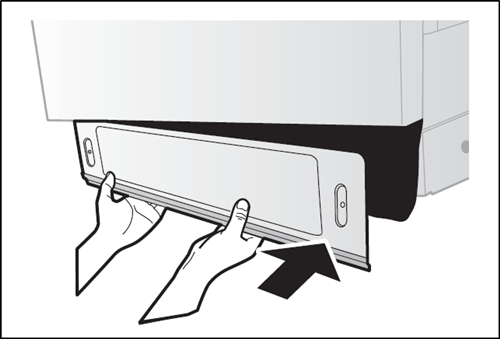
12. Install the kick plate.

Insert the rubber skirt behind the kick plate, and tighten the kick plate using the screws included with your dishwasher.
 
The dishwasher kickplate
Read less

Clean your dishwasher

Proper cleaning is an important part of dishwasher maintenance. Not only does it improve performance, it reduces unnecessary repairs over the dishwasher's lifetime. Learn more
Read more
Read less

Add your dishwasher to SmartThings

What if we told you there’s an app for controlling your dishwasher remotely and you might already have it on your smartphone? Learn more
Read more
Read less

Learn about the cycles, options, and settings

Your dishwasher has many cycles, options, and settings to ensure that your dishes come out looking their best. Depending on what you're washing and how you load it, you'll need to pick the right selections to get the best result. Learn more
Read more
Read less

Use detergent and rinse aid

To get the best performance out of your dishwasher, it’s important to use the correct detergent and rinse aid. With the proper care, your dishes will come out sparkling after every wash. Learn more
Read more
Read less

Load the dishwasher

Loading a dishwasher can be tricky, but doing it right will improve cleaning and drying performance. Let us show you the best way to load a dishwasher. Learn more
Read more
Read less

Review water supply requirements

The dishwasher's main method of cleaning your dishes is completely based on the water temperature and pressure, so if they don't meet requirements, you won't get the cleaning performance you expect. Learn more
Read more
Read less

Wash china in your dishwasher

Hosting holiday parties means taking out the fine china and setting a beautiful dinner table for your guests. It also means washing dishes after a big meal, which can be a little daunting since china is so fragile. Learn more
Read more
Read less
Was this content helpful?
We're here for you

Contact Samsung Support

Contact us online through chat and get support from an expert on your computer, mobile device or tablet. Support is also available on your mobile device through the Samsung Members App.
auto-contact_us-pc-2x auto-contact_us-pc-2x