Set up Galaxy Z Fold7, Flip7, or Flip7 FE and transfer data

Set up Galaxy Z Fold7, Flip7, or Flip7 FE and transfer data
What you need to get started
The box for the Galaxy Z Fold7, Z Flip7, and Z Flip7 FE contains various items needed to set up your phone. The following are included:
- The phone itself
- Printed materials
- USB data cable (C to C)
- Ejection pin tool
To unbox your phone, follow these steps:
- Carefully remove the packaging tape or seal to open the box.
- Remove any protective materials or inserts around the phone.
- Remove the phone from the box and place it on a flat surface.
- Check for the accessories and documentation included in the box.
Charge your phone
The Galaxy Z Fold7, Z Flip7, and Z Flip7 FE contain powerful batteries that offer all-day usage. The battery specs are below:
- Z Fold7: 4,400mAh
- Z Flip7: 4,3000mAh
- Z Flip7 FE: 4,000mAh
Additionally, the phones support Super Fast Charging technology, Fast Wireless Charging 2.0, and Wireless PowerShare.
Wired charging
To charge your phone, follow these steps:
- Make sure that the phone is powered off.
- Connect a compatible power adapter to the supplied USB Type-C cable.
- Connect one end of the charging cable to the wall adapter.
- Then, plug the other end of the USB Type-C data cable into the charging port at the bottom of the phone.
- Wait for the battery icon to appear on the screen, indicating that the phone is charging.
- Allow it to charge until it reaches full capacity.
Wireless charging
To charge your phone with a wireless charger:
- Plug the wireless charger's power adapter into a power outlet and the USB cable into the wireless charger. The indicator light on the base will flash when you first connect the cable.
- When you're ready, close your foldable phone, and then place the back of the phone on the wireless charger.
- In order for it to charge properly, the device's back should make contact with the wireless charger, and the device should be centered.
- If needed, remove your phone's case, especially if the case is thick.
- To stop charging, just remove the phone from the charger.
PowerShare
To activate Wireless PowerShare and charge another device:
- Confirm that your foldable is charged to at least 30%.
- Swipe down from the top right corner of your screen to open the Quick settings panel.
- Tap the Wireless PowerShare icon. If the icon is not there, you may need to add the PowerShare quick setting.
- Place your foldable and a compatible device back to back. The PowerShare feature will automatically turn off after 60 seconds when no other device is detected.
- To stop charging, just separate the two devices from each other.
You can also charge your foldable as it charges another device. Simply connect your phone to the charging cable that came with it while using PowerShare.
Insert the SIM card or activate the eSIM
However, an eSIM is embedded directly into the phone, which means you can use two separate SIM cards (an eSIM and a physical SIM) simultaneously.
Insert the SIM card
To insert a physical SIM card, follow these steps:
- Power off your phone and locate the SIM tray on the top of the Z Fold7 or on the side of the Z Flip7 or Z Flip7 FE.
- Close the phone, and then place it on a flat surface with the screen facing up.
- Use the SIM ejection tool to gently push the tray out of the slot.
- Place the SIM card onto the tray, making sure it aligns correctly with the metal contacts.
Note: The SIM card will only fit correctly in one direction. When correctly inserted, it will be flush with the tray. - Gently slide the tray back into the slot until it clicks into place.
- Once you turn on your phone, wait for it to recognize the SIM card.
If you encounter any issues or the phone doesn't recognize the SIM card, try removing and reinserting it. Make sure the SIM card is properly aligned and seated in the tray.
eSIM activation
During the initial setup of your new foldable phone, you will be prompted to connect to a mobile network. You can activate the eSIM after connecting your phone to a Wi-Fi network. There are several options for setting up your eSIM:
- Transfer SIM from another phone: You can move your SIM profile and phone number from your old Galaxy phone to your new one without contacting your network carrier.
- Scan QR code: Your carrier can provide you with a QR code to conveniently download and activate your eSIM profile on your new phone.
- Search for a mobile plan: Your phone will search your carrier's network for your mobile plan to automatically download and activate your eSIM.
- Set up later in Settings: You can postpone activating the eSIM during the Setup Wizard.
Check out our SIM guide to learn more about using SIM cards with your Galaxy phone.
Power on your phone for the first time
To power on your Galaxy Z Fold7, Z Flip7, or Z Flip7 FE for the first time, press and hold the Side button located on the right side of the phone until the screen turns on.
Follow the steps below to power off your phone:
- Swipe down from the top right of the screen to open the Quick settings panel.
- Tap the Power icon in the upper right of the screen (next to the Settings icon), and then tap Power off.
- Tap Power off again to confirm.
- Alternatively, you can remap the Side button to power off your phone. Just navigate to and open Settings, tap Advanced features, and then tap the Side button to change the Long press setting.
Complete the initial setup wizard
The first time you turn on your phone using the Side button, the Setup Wizard will guide you through the basics of setting up your phone. You will be prompted to go through a series of setup steps, including setting your language preferences, connecting to Wi-Fi, signing into your Samsung and Google accounts, and agreeing to terms and conditions. You will also be asked to enable features like a lock screen. The steps may vary based on your carrier.
- On the Welcome screen, select your language from the drop-down menu, and then tap Start.
- Next, agree to the terms, and then tap Agree.
- You can complete the easy setup with another phone using Smart Switch, or you can complete the setup manually.
- To transfer your existing account, copy settings, and more from your old phone with a QR code, tap Galaxy or Android device or iPhone or iPad. A QR code will appear on your new phone; next, scan the QR code on the new phone using the old phone. Follow the on-screen instructions to transfer your data.
- To set up without using another phone, tap Set up manually.
- Select your desired Wi-Fi network and enter your password if needed. Tap Connect to confirm.
- If necessary, choose how to connect to a mobile network. For this example, tap Set up later in Settings.
- If you choose to complete the setup manually, you will be prompted to restore data from a previous phone. For this example, tap Don’t copy.
- Enter your Google account information, and then tap Next.
- Enter your Google account security credentials, and then tap Next.
- Choose who will be using the phone, and then tap Next.
- Review the information on the next screen, and then tap I agree.
- You can set up a lock screen; follow the on-screen instructions or tap Skip if you do not want to set a lock screen during the setup. Tap Skip anyway if prompted.
- Review the information about Google services, and then tap Accept.
- If desired, you can back up your phone using your Google account; select the data to back up and then tap Turn on backup. If you do not want to back up data, tap Don't back up.
- Read the short tutorial on Google Gemini, tap Continue, and then tap No thanks or Turn on.
- Enter the email address and password for your Samsung account and then tap Next. Or, tap Sign in with QR code to sign into your account using the camera on your old Galaxy phone. If you need to reset your account or create a new one, tap Forgot password or don’t have an account.
- Review the terms and conditions, and then tap Agree.
- Review the Galaxy AI information, then tap More, and then tap Next.
- Review the Bixby information, and then tap Next. Review the Bixby permissions on the following screen, then tap More, and then tap Next.
- Review Samsung services, and then tap Agree.
- Review the location sharing details for emergency use, and then tap OK.
- Choose your display mode, and then tap Next.
- Tap Home.
Once you complete the setup process, you'll be able to customize your Home screen, install apps, and start using your new phone.
Customize and adjust your phone’s settings
Secure lock screen
To set or change your lock screen settings, navigate to and open Settings, then swipe to and tap Lock screen and AOD, and then tap Screen lock and biometrics. Select your desired type of lock and then follow the on-screen instructions to set it up.
Customize the display settings
To increase the display brightness on your phone, swipe down from the top right of the screen to open the Quick Settings panel. Then, drag the brightness slider towards the right or left to increase or decrease the brightness.
The following are some handy steps for customizing the display settings on your phone. By adjusting these settings, you can personalize the look and feel of your phone's display to suit your preferences. First, navigate to and open Settings, and then tap Display. The following options will be available:
- Light mode and Dark mode: Change the color scheme of the interface. Light mode provides a white or light-colored background with dark text, which is suitable for bright environments. Dark mode, on the other hand, reverses the color scheme with a black or dark-colored background and light text. Tap Dark mode settings to set a schedule for between sunset and sunrise based on your location.
- Brightness: Adjust the slider to increase or decrease the brightness. You can also enable Adaptive brightness to let the phone adjust the brightness automatically based on ambient light.
- Motion smoothness: Improves the overall screen performance by rendering frames faster for smoother animation, transitions, and enhanced user experience, especially when gaming or watching videos. Tap Adaptive for smoother animation and scrolling or tap Standard for a longer battery life. Then, tap Apply.
- Eye comfort shield: Turn this on to reduce blue light emissions from the screen. You can also automatically adjust the screen's color based on the time of day or manually choose the color temperature and set a schedule.
- Screen mode: Adjust the color profile and appearance of your display by choosing from Vivid for more saturated colors, or Natural for a more balanced tone.
- Font size and style: Make the font size for text larger or smaller or change the style of the text.
- Screen zoom: Make everything appear larger and more legible, which can be helpful for people with vision impairments or those who prefer a larger font size.
- Camera cutout: Show or hide the camera cutout area when using certain apps. This prevents unwanted cropping or obstruction caused by the camera notch or hole punch design.
- Screen timeout: Change how long the screen stays on before timing out or opt to keep the screen on while you’re looking at it. Keep in mind that this uses the front camera to detect your face.
- Easy mode: Enlarge the icons and text on the Home screen to make them more visible and accessible.
- Edge panels: When turned on, swipe in from the side of the screen to access your favorite apps, contacts, or tools.
- Navigation bar: Control the visibility and behavior of the Navigation bar that appears at the bottom of the screen.
- Accidental touch protection: Prevent unintended touches near the edges or corners of the screen, especially when holding the phone with one hand. This prevents accidental inputs.
- Touch sensitivity: Adjust the accuracy and responsiveness of the screen.
- Show charging information: View the battery level and estimated time until full, even when the screen is turned off.
- Screen saver: Display a screen saver after the screen turns off automatically when your phone is charging.
Personalize the Home screen
To personalize the Home screen, touch and hold an empty space on the Home screen. The screen will enter Edit mode, displaying multiple screens where you can perform the following:
- Add a screen: Swipe left until you see an empty Home screen, and then tap Add (the plus sign).
- Remove a screen: Swipe to a Home screen you want to remove, and then tap the Delete icon (the trash can) at the top.
- Set a screen as the main Home screen: Swipe to the Home screen you want to set as your main screen. Tap the Home icon (the house) at the top to make it your go-to screen. The bolded Home icon indicates which one is the main Home screen.
- Change the order of screens: Touch and hold the screen you want to move and then drag it to the desired position.
- Enable or disable Google Discover: If you'd like to enable or disable Google Discover, swipe right until you reach the Media page screen. Select or deselect Google Discover, and then tap the switch at the top if needed.
- Edit the Home screen settings: Tap Settings at the bottom of the screen to be taken to additional options, such as adjusting the Home screen's layout.
Configure notification settings
There are several ways to manage notifications on your phone. Here are a few methods:
- Swipe down from the top left or center of the screen to open the Notification panel, and then select your desired notification to view it.
- Swipe up or down to navigate through your notifications.
- To clear all notifications, tap Clear at the bottom of the screen.
- To disable notifications for a particular app, touch and hold the notification, then tap the Settings icon next to the notification, and then tap the switch at the top of the screen.
- To change the sound or vibration associated with a notification, touch and hold the notification, and then tap the Settings icon next to the notification. Enable or disable the sound and vibration.
- You can view advanced options by navigating to Settings, and then tapping Notifications. From here, adjust the settings according to your preferences.
Adjust sound settings
The Volume button is located on the side of your phone, near the top edge. You can press the Volume button to adjust the volume for the ringer, media, or alarm.
- Press the upper part of the Volume button to increase the volume.
- Press the lower part of the Volume button to decrease the volume.
To adjust sound settings on your phone:
- Swipe down from the top right of the screen to open the Quick settings panel, and then touch and hold the Sounds and vibration icon to access the sound settings.
- To change the ringtone for incoming calls, tap Ringtone, and then select a ringtone from the list.
- To adjust the vibration intensity, tap Vibration intensity and adjust the sliders to choose the desired level.
- Tap Sound quality and effects to further customize the sound settings.
Transfer contacts, photos, videos, and app data
Wireless transfer from an Android phone
A wireless transfer is the preferred way to copy your data to a new phone. It's fast and lets you keep the phones plugged into their chargers during the transfer.
- First, make sure the Smart Switch app is installed on both phones, and plug them into their chargers.
- When you're ready, place the phones within 4 inches of each other.
- To launch Smart Switch on both phones, open Settings and then search for and select Smart Switch.
Note: Alternatively, you can navigate to the Samsung folder on the Apps screen, and open Smart Switch from there. - On the new phone, tap Receive on this phone. Next, depending on your old device, tap Galaxy/Android or iPhone/iPad. Then, tap Wireless.
- On the old phone, tap Send from this phone, and then tap Wireless.
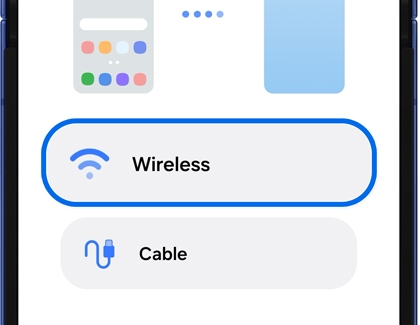
- On your new phone, tap Receive on this phone, tap Galaxy/Android or iPhone/iPad, and then tap Wireless.
- Next, complete the connection by tapping Connect on the old phone.
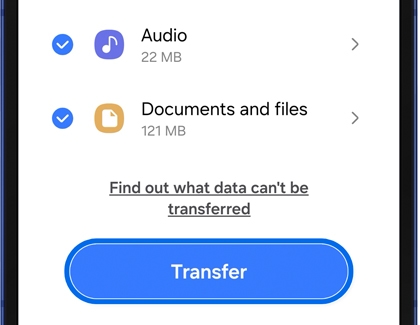
- On your new phone, choose the content you want to transfer and tap Next. Then, tap Transfer.
- Once the transfer is complete, tap Done on the old phone, and you’ll be good to go.
Import content from iCloud
Note: iTunes music and videos cannot be transferred from iCloud. Unencrypted iTunes music can be transferred to your phone by simply copying the M4A files from a PC with your iTunes library. You can also transfer your music files directly from a PC.
If you have lots of valuable data saved on your old iOS phone, you can use Smart Switch to transfer everything through iCloud.
- On the new Galaxy phone, open Settings, and then search for and select Smart Switch.
Note: Alternatively, you can navigate to the Samsung folder on the Apps screen, and open Smart Switch from there. - Tap Receive on this phone, and then tap iPhone/iPad.
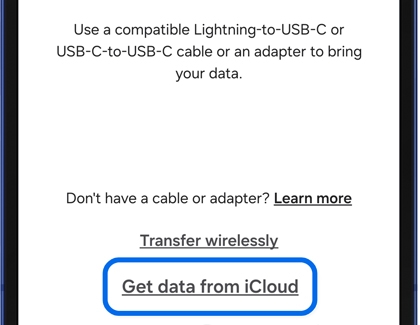
- Tap Get data from iCloud instead at the bottom of the screen.
- Enter your Apple ID and password, and then tap Sign in to iCloud.
- Enter the verification code, and then tap OK.
- Select the data you want to transfer, and then tap Transfer.
- When the transfer is finished, tap Next twice, and then tap Done.
Smart Switch
Smart Switch offers alternative methods such as using a microSD card, USB OTG flash drive, an external storage drive, a Windows phone, and even a computer to transfer content to your new phone. Be sure to check out our other Smart Switch guides for more solutions and details:
Cloud accounts
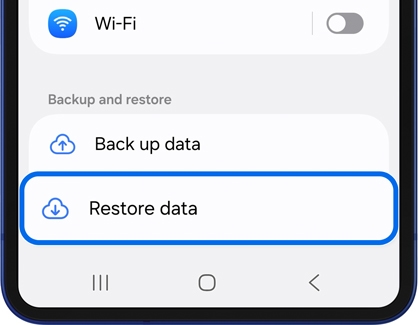
If you do not want to use Smart Switch, you can also restore data you’ve previously backed up to your Samsung Cloud account. To access the restore option, navigate to and open Settings on your new Galaxy phone, and then tap your Samsung account name at the top of the screen. Tap Samsung Cloud, and then tap Restore data.
Google Drive allows you to restore your backed up data only during the Setup Wizard when you sign in to your Google account.


Contact Samsung Support


You Are About To Be Redirected To Investor Relations Information for U.S.
Thank you for visiting Samsung U.S. Investor Relations. You will be redirected via a new browser window to the Samsung Global website for U.S. investor relations information.Redirect Notification
As of Nov. 1, 2017, the Samsung Electronics Co., Ltd. printer business and its related affiliates were transferred to HP Inc.For more information, please visit HP's website: http://www.hp.com/go/samsung
- * For Samsung Supplies information go to: www.hp.com/go/samsungsupplies
- * For S.T.A.R. Program cartridge return & recycling go to: www.hp.com/go/suppliesrecycling
- * For Samsung printer support or service go to: www.hp.com/support/samsung
Select CONTINUE to visit HP's website.