Set up and transfer data to your Samsung Galaxy A37 5G

Set up and transfer data to your Samsung Galaxy A37 5G
Unbox your Galaxy A series phone

The box for your Galaxy A series contains various items needed to set up and utilize your new device, including:
- The phone itself
- Printed materials
- 25W USB 3A data cable (C to C)
- Ejection pin tool
Unbox your Galaxy A series
- Carefully cut or tear away the packaging tape or seal to open the box.
- Remove any protective materials or inserts around the phone.
- Remove the phone from the box and place it on a flat surface.
- Check for any accessories or documentation included in the box, such as the USB Type-C charging cable, ejection pin tool, and the in-box guide.
Charge your Galaxy A series phone

Samsung Galaxy A series is equipped with a powerful battery that offers long-lasting usage. With a capacity of 5000mAh, the battery ensures that you can stay connected without worrying about running out of power.
- Power adapter sold separately. 25W Super Fast Charging speed depends on battery level and other factors; use only Samsung approved chargers and cables; do not use any worn or damaged chargers or cables.
- Wireless charging and PowerShare are not supported.
Fast Charging specs
Additionally, the Galaxy A series supports up to 45W Ultra Fast Charging technology depending on the model. Compare the fast charging option for each Galaxy A model:
Galaxy A17:
- Wired Super Fast Charging up to 25W
Galaxy A37:
- Wired Ultra Fast Charging up to 45W
Galaxy A57:
- Wired Ultra Fast Charging up to 45W
Charge your Galaxy A series phone
- Make sure that the phone is powered off.
- Connect a compatible power adapter to the supplied USB Type-C cable.
- Connect one end of the charging cable to the wall adapter.
- Then, plug the other end of the USB Type-C data cable into the charging port at the bottom of the phone.
- Wait for the battery icon to appear on the screen, indicating that the phone is charging. Allow it to charge until it reaches full capacity.
If the battery is completely depleted, it may take several minutes for the charging indicator to appear. Allow enough time for the battery to start receiving power.
Insert the SIM card into your Galaxy A series phone

Galaxy A series supports dual SIM functionality, including a physical SIM and an eSIM.
- Physical SIM: Insert a compatible SIM card into the SIM card slot. Your current phone's SIM card can be used if it's compatible with your network.
- eSIM: Embedded directly into the device, the eSIM eliminates the need for a physical card, allowing you to use two separate SIM cards at the same time.
Insert a physical SIM card
- Power off your phone and locate the SIM tray on the side of the device.
- Use the SIM ejection tool to gently push the tray out of the slot.
- Place the SIM card onto the tray, making sure it aligns correctly with the metal contacts.
- Gently slide the tray back into the slot until it clicks into place.
- Once you turn on your device, wait for it to recognize the SIM card.
If you encounter any issues or the device doesn't recognize the SIM card, try removing and reinserting it. Make sure the SIM card is properly aligned and seated in the tray.
Activate the eSIM
During the initial setup of your new Galaxy phone, you will be prompted to connect to a mobile network. You can activate the eSIM after connecting your phone to a Wi-Fi network. There are several options for setting up your eSIM:
- Transfer SIM from another device: You can move your SIM profile and phone number from your old Galaxy phone to your new one without contacting your network carrier.
- Scan QR code: Your carrier can provide you with a QR code to conveniently download and activate your eSIM profile on your new device.
- Skip: You can postpone eSIM activation during the Setup Wizard.


Additional resources
Power on your Galaxy A series phone
Power on
Press and hold the Power button located on the right side of the phone until the screen turns on.

Power off
Press and hold the Power button located on the right side of the phone until the "Power off" menu appears on the screen. Then, tap Power off to turn off your phone.

Set up your Galaxy A series phone
Complete the Setup Wizard
The first time you turn on your device, the Setup Wizard will guide you through the basics of setting up your device. You will be prompted to go through a series of setup steps including setting your language preferences, connecting to Wi-Fi, signing into your Samsung and Google accounts, and agreeing to terms and conditions. You will also be asked to enable features like a lock screen.
- On the Welcome screen, select your language from the drop-down menu, and then tap Start.
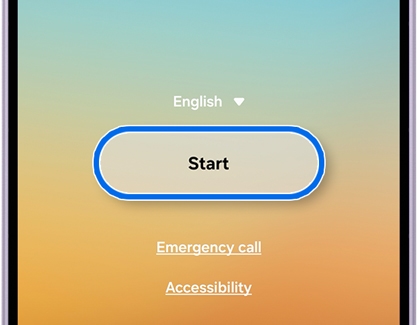
- Next, review the terms, and then tap Agree if you accept to proceed.
- You can complete the Easy setup with another device using Smart Switch or you can complete the setup manually.
Transfer an existing account: To transfer your existing account, copy settings, and more from your old phone with a QR code, tap Galaxy or Android device or iPhone or iPad. A QR code will appear on your new phone; next, scan the QR code on the new device using the old device. Follow the on-screen instructions on your devices to transfer your data.
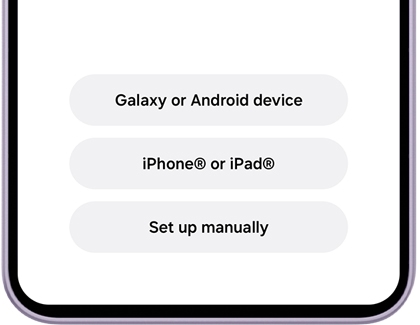
Manual set up: To set up without using another device, tap Set up manually.
- Select your desired Wi-Fi network, and enter your password, if needed. Tap Connect to confirm, and then tap Next.
- If you haven't inserted your SIM card, you can choose how to connect to your mobile network. Or, tap Set up later in Settings.
- Follow the remaining on-screen instructions to finalize the setup process.
Note: The steps may vary slightly depending on whether you chose Easy Setup with Smart Switch or manual setup.


Once you complete the setup process, you'll be able to customize your Home screen, install apps, and start using your new phone.
Trouble during Setup Wizard
If you encounter issues during the setup process, try the following solutions:
- Ensure your Wi-Fi network is working properly.
- Verify that you are entering the correct password.
- Restart your router and try reconnecting.
- Check if your device is within range of the Wi-Fi signal.
- Insert the SIM card properly into the designated slot.
- Ensure the SIM card is activated and compatible with your device.
- If using an eSIM, follow the on-screen instructions to activate it.
- Restart your device to ensure proper connectivity.
Samsung account or Google account
- Retrieve your user ID if you've forgotten it.
- Reset your password if you're unable to log in.
- Create a new account if necessary.
- Ensure your internet connection is stable during the login process.
- Ensure both devices are close to each other for a stable connection.
- Make sure Smart Switch is installed on both devices.
- If using a QR code, ensure the camera on your old device is working properly.
- Restart both devices and try the transfer process again.
Activate voicemail on your Galaxy A series phone
Set up voicemail
To set up your voicemail for the first time, open the Phone app, and then touch and hold the number 1. Follow the tutorial to create a password, record a greeting, and your name.

Set up visual voicemail
Customize settings on your Galaxy A series phone
Now that your Galaxy A device is set up, you're ready to start exploring and customizing your new device.
Find out how to:
- Adjust your display
- Change the wallpaper
- Look after your battery
- Download your apps
- Set up a digital assistant
- Start using the camera
- Create a Secure Folder
- Customize the sound setting
- Configure notification settings
- Manage files and storage space
- Sync data using Samsung Cloud
- Use security and privacy features
- Locate your phone when misplaced
For more detailed guidance to help you make the most of your device, visit the official Samsung Support Center.
