Send and receive messages on your Samsung smartwatch

With Samsung's Bluetooth and LTE smartwatches, it is never been easier to talk while you walk. You can create new messages, or view incoming messages and send replies using the preinstalled Messages app, without even taking out your Galaxy phone. You can also send replies using Quick messages, or when you decline incoming calls. However, your watch must be connected to a Galaxy phone unless the watch is an LTE model with active network services.
Note: Information provided applies to devices sold in Canada. Available screens and settings may vary by wireless service provider, software version, and model. Third-party messaging apps like Google Hangout, WhatsApp, or Facebook Messenger cannot be installed on the smartwatch.
If you want to take a break from your jog and send a Quick message to a friend, you can do that easily on your watch using the Messages app. Make sure your watch is connected to your phone or to a mobile network.
Note: This function is only available when connected to a Galaxy phone. It is not available on non-Samsung phones or iOS devices.
Navigate to and tap Messages. To compose a new message, select either the Message icon or the Contact icon.
Note: The message icon may not appear if you have never sent a message on the smartwatch before.
Enter or choose your recipient. If you want to send a reply to an existing conversation, select the message from the log instead. There are many methods to choose from when it comes to creating or replying to a text.
Just swipe down to see the following options:
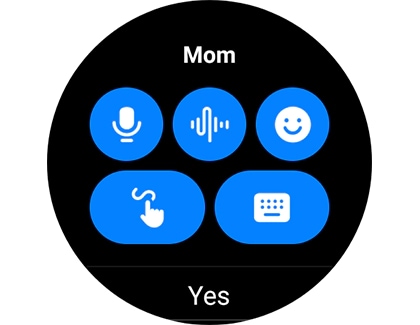
- Microphone: Speak into your watch and have it converted to text.
- Voice recording: Record your voice as an audio file and send it to a recipient. This option is only available on the Galaxy Watch4 series.
- Emoji: Select an emoji as your response.
- Write: Write letters on the watch face. Written letters will be converted into text.
- Keyboard: Type out your response using the watch's T9 keyboard.
- Quick response: Select a Quick message to send as your response.
- Reply on phone: Send the conversation to the Messages app on your connected phone and then reply using your phone's keyboard. You can be required to unlock your phone first if you have a Lock screen.
- Edit responses: Create or edit Quick messages by writing letters on the watch face. Just like with text input, written letters will be converted into text.
Note: On the Galaxy Watch4 series, Quick messages can only be edited through the Galaxy Wearable app.
- Doodle: Write letters on the watch face. Written letters will be sent as an image. This option is not available on the Galaxy Watch4 series.
When replying to a group message, replies will be sent back to the entire group. To reply to an individual recipient, tap the More options icon (the three vertical dots) located to the right of the screen, and then tap Recipients. Select the desired recipient, and then tap the Messages icon.
Note: If app notifications are turned on for third-party messaging apps, like Google Hangouts, you will be able to reply to messages you receive by tapping the message from the Notification screen on the watch. However, third-party messages you reply to will not appear in the Messages log on the watch.
Note: These steps only apply to the Galaxy Watch4 series. For other watch models, you will need to edit or add Quick responses from the watch itself. Please see the next section for more details.
To add or edit Quick messages on your Galaxy Watch4 or Galaxy Watch4 Classic, you will need to use the Galaxy Wearable app.
To add Quick responses, open the Galaxy Wearable app, and then tap Watch settings. Tap General, tap Quick responses, and then swipe to and tap + Add response to create a new response.
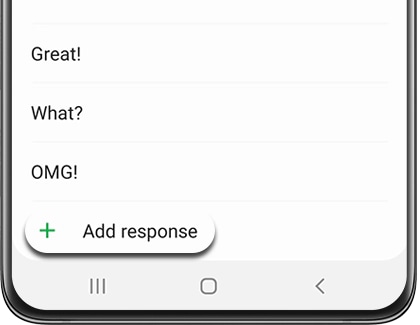
Enter your desired text, and then tap Save. To edit a response, select the response and then enter your desired text. Tap Save.
Note: You cannot edit Quick messages directly on the Galaxy Watch4 and Galaxy Watch4 Classic. They can only be edited in the Galaxy Wearable app on the connected phone. Please see the previous section for more information.
Are you always getting texts or calls while you are out walking your dog? Let your contacts know that you will get back to them soon using Quick messages on your watch.
On your watch, either create a new message or tap an existing message. Then, swipe up to and select a Quick message to send. To create or edit a Quick message instead, tap Edit responses from the bottom of the screen.
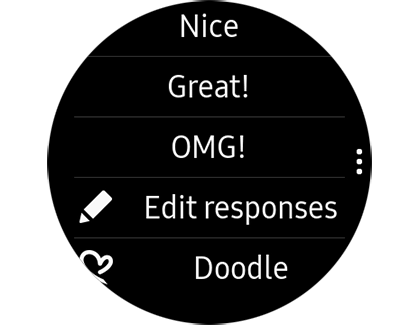
- To create a new Quick message, tap Create, enter a message, and then tap Done.
- To create a new Quick message, tap Create, enter a message, and then tap Done.
You can also send Quick responses on your Galaxy Fit and Galaxy Fit2. If you would like to customize a response, you can add them from the Galaxy Wearable app on your phone.
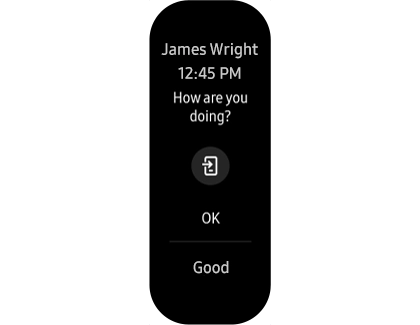
On your watch, swipe right on the Notification panel and then tap a message to view it. Swipe up or down and then tap a Quick response. Tap the arrow to send it.
To add a Quick response, navigate to and open the Galaxy Wearable app on your phone, and then tap Quick responses. Tap the plus icon, enter your response, and then tap Save to add it.
To delete a Quick response, tap the More options icon (the three vertical dots) on the app’s home screen, tap Edit, and then tap the response you would like to remove. Tap Delete.
Note: Up to 30 characters can be entered when adding a Quick response.
Sometimes, you receive a phone call at the worst possible time and cannot pick up. You can let them know you are busy by using your watch. Just swipe up from the bottom of the watch screen to reject the call with a decline message. Several replies, such as "I'm working out," will appear. Select the desired decline message to send.
If you want to edit, rearrange, or remove call decline messages, open the Galaxy Wearable app on your phone, and then tap Apps. Depending on your watch model, tap Manage apps or App settings.
Next, tap the Settings icon next to Phone, and then tap the desired decline message to edit.
Note: On the Galaxy Watch4 series, simply tap Phone, and then tap the desired message.
You can also tap Edit or the Edit icon at the top of the screen to rearrange the list; drag the declined message up or down the list using the arrows.
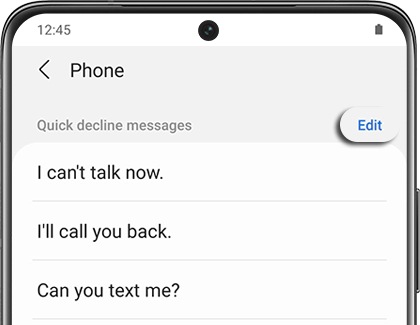
To remove a message, touch and hold it while you are still on the edit screen, and then tap Delete.
Note: This function is only available when connected to a Galaxy phone. It is not available on non-Samsung phones or iOS devices.
Need to get rid of unwanted messages? No problem. You can delete a single message or multiple with ease directly from your smartwatch.
Open the Messages app on your watch. Swipe to the message you want to delete, and then tap the message and hold it. To select multiple messages, just swipe to and tap the additional message(s), and then tap Delete.
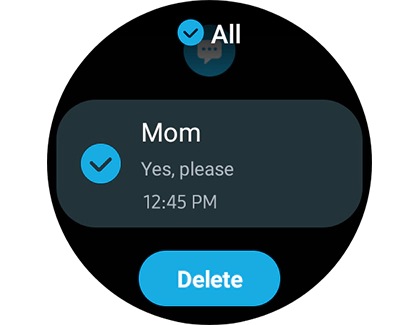
Tap the check mark to confirm the deletion.
Note: Messages deleted on the smartwatch will also be deleted from the Messages app on the connected phone.
Note: When you block message notifications using the watch, or if you turn off app notifications for Messages, you will no longer receive Message notifications on your watch. However, you will be able to open the Messages app on your watch and continue to use it as you normally do. You cannot view or manage phone numbers you block on the watch.
Annoyed by the message notifications you receive on your smartwatch? You can easily block them using the watch or the Galaxy Wearable app. You can also block messages from certain phone numbers.
-[ Block Messages notifications ]-
When you receive a message notification on your watch, swipe right from the Watch face to view it. Tap the message notification. The next step will vary depending on what model watch you have:
- Galaxy Watch4 series: Swipe down to the bottom of the screen, and then tap Block notifications.
- Previous watch models: Tap the More options icon (the three vertical dots), and then tap Block notifications.

Note: Alternatively, you can manage apps notifications for individual apps, like Messages, via the Galaxy Wearable app on your phone to block Messages notifications.
-[ Block Messages ]-
If you prefer to block a specific phone number, open the Messages app on your phone. Tap the More options icon (the three vertical dots), tap Settings, and then tap Block numbers and messages. Tap Block numbers.
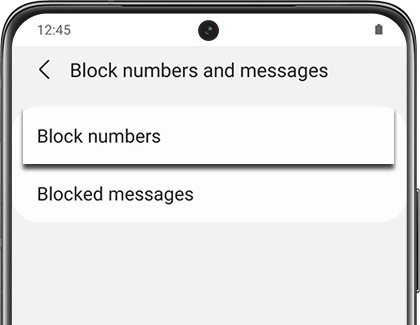
Enter the phone number, and then tap the green plus icon. Or, select the desired number from your Inbox or Contacts list.
You will still receive messages from the number you block, but they will not appear in the Messages log. To view them, open the Messages app on your phone, navigate to Block numbers and messages, and then tap Blocked messages. Please be aware that incoming calls will also be blocked for the same phone number(s) you added to the "Blocked numbers" list.
Note: To remove phone numbers from the block list, tap Block numbers, and then tap the minus icon to delete it from the list.
To use the feature with your smartwatch, review the following list first to make sure your Galaxy device is compatible.
- Galaxy S: Galaxy S21 5G series, Galaxy S20 5G series, Galaxy S10 series, and Galaxy S9 series.
- Galaxy Note: Galaxy Note20 5G series, Galaxy Note10 series, and Galaxy Note9 series.
- Galaxy Tabs: Galaxy Tab A (2020), Galaxy Tab S7, Galaxy Tab S6, Galaxy Tab S6 lite, Galaxy Tab S5e, and Galaxy Tab S4.
- Galaxy Z: Galaxy Fold, Galaxy Z Flip, and Galaxy Z Fold2.
- Galaxy A: Galaxy A20, Galaxy A50, Galaxy A32 5G, Galaxy A42 5G, and Galaxy A52 5G.
Note: The "Call & text on other devices" feature may not work with some carriers phones, and does not work with Galaxy Watch Active2 (LTE), Galaxy Watch3 (LTE), and Galaxy Watch4 (LTE) devices that have active mobile service.
With the "Call & text on other devices" feature and a compatible smartwatch, you can send and receive messages remotely over a Wi-Fi or mobile network with your Samsung account, even if the Bluetooth connection between your Galaxy phone and the smartwatch disconnects.
To use this feature, turn on Remote connection in the Galaxy Wearable app while the watch is connected to your phone through Bluetooth.
Then, navigate to and open Settings on your phone, and then search for and select Call & text on other devices.

Tap the switch located at the top of the screen to turn on the feature. The connection will automatically occur with your Samsung account, and the smart watch will appear in the list of "Registered devices".
If you are connecting your Galaxy watch to an iOS phone or a non-Samsung Android phone, the Messages app will not appear on the watch. However, your watch will still notify you when a message is received on your phone, and you will be able to reply with Android phones.
To do this, tap the notification and then swipe to the bottom of the message. If your watch is paired to an Android device, you can reply using voice input, handwriting input, stickers, the keyboard, or a Quick message. You will also be able to see information about the message, such as the time you received it.
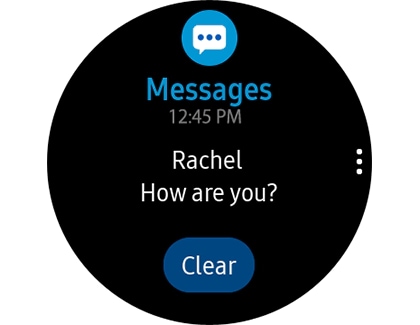
If more than two notifications are received on your phone, just rotate the bezel or swipe left or right on the watch’s screen to view them. An orange dot will also appear on the screen when there are unread notifications, so you will know when there is a new message waiting.
If you are having trouble seeing messages on your watch, you may need to turn on the "Show previews" setting on your iPhone. Navigate to Settings, then tap Notifications, and then tap Galaxy Watch. Tap Show previews, and then tap Always.
Thank you for your feedback!
Please answer all questions.
RC01_Static Content : Hide call number function