SmartThings Wi-Fi advanced network settings

You can customize several advanced router settings for your SmartThings Wi-Fi hub. With these settings, you can change your network mode, add a DNS (Domain Name System) for parental and security control, and set up port forwarding for games.
Note: The provided information refers to devices sold in Canada. The available screens and settings may differ for devices sold in other countries. You can visit the SmartThings website to check device compatibility and gather more information.
Maybe you want to create a separate network for all your smart devices. You can do that by switching your network mode to Router Only.
Note: First, make sure the HomePass by Plume Wi-Fi app is installed and set up on your phone.
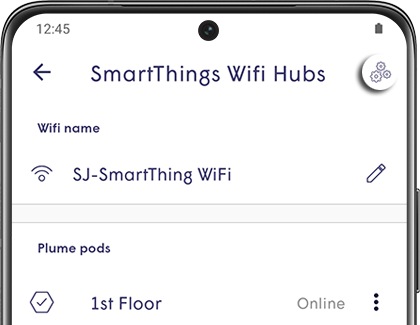
In the SmartThings app, tap the Devices tab (at the bottom of the screen), and then tap the Home icon. Select your desired Location, and then swipe through the rooms to find your SmartThings Wifi hub. Select it, and then tap Advanced settings in Plume - the HomePass by Plume app will open.
Tap the Menu icon in the top left corner, and then tap SmartThings Wifi Hubs. Next, tap the Advanced settings icon in the top right corner; it looks like three gears.
From here, you can adjust the following settings:
- Reservations & Port Forwarding: IP Reservations let you keep the same IP address for a selected device. Plus, with port forwarding, apps like games can reserve ports through the firewall to communicate with the internet. You need to set up a reservation before you can forward a port. From the Advanced settings page, tap Create New IP Reservation, and then tap New Device to add a device manually or select a connected device. If needed, enter your IP Address and MAC Address info. Then, tap Add port assignment to forward a port. Enter Assignment name, select an External and Internal port, and then tap Done.
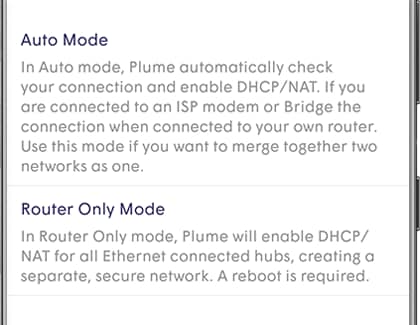
- Networking Mode: In Auto Mode, the HomePass app automatically checks your connection and turns on DHCP/NAT. You can use this mode if you want to merge two networks. In Router Only Mode, HomePass turns on DHCP/NAT for all Ethernet-connected hubs, creating a separate, secure network. A reboot wil be required. From the Advanced settings page, tap Router Only Mode, and then tap Restart to reboot the network.
- LAN IP Subnet: A LAN IP Subnet refers to a group of devices on the same local network, or a portion of one network. To configure your LAN IP subnet address, tap LAN IP Subnet, and then enter your desired number. Tap Save, and then tap Update.
Note: Some of these options will not be available unless the Network Mode is set to Router Only Mode.
Note: While built-in parental control options are available for HomePass members, you can use a custom DNS (Domain NameSystem) to restrict access to certain sites. DNS configuration in the HomePass app allows you to create a custom DNS so you can use a public DNS that is not monitored by your internet service provider, or a DNS with built-in parental and security controls like OpenDNS.
If you are unable to connect to SmartThings Wi-Fi, you should check your network setup. There are two types:
- PPPoE (Point-to-Point Protocol over Ethernet), which is used on Ethernet connections.
- A Static IP address, which may be used in some homes, hotels, and workplaces.
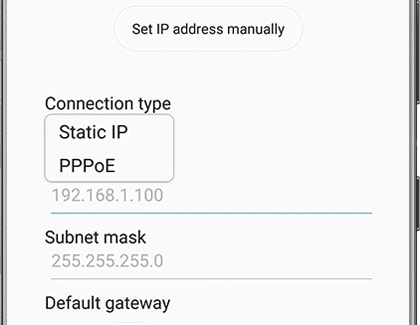
Note: Whichever network type you have, you should learn how to set up SmartThings Wi-Fi manually.
Thank you for your feedback!
Please answer all questions.
RC01_Static Content : Hide call number function