Installing the Wall Mount of your Samsung Soundbar
Last Update date : Jun 22. 2026
Vamp up the look of your home and wall mount your Samsung soundbar. Follow the guide below to find how to install your soundbar wall mount components.
 Please Note: The information on this page is for Australian products only. Models, sequences or settings will vary depending on location and/or where the product had been purchased. To be redirected to your local support page please click here.

Installation Precautions
- Install on a vertical wall only.
- Do not install in a place with high temperature or humidity.
- Verify whether the wall is strong enough to support the product’s weight. If not, reinforce the wall or choose another installation point.
- Purchase and use the fixing screws or anchors appropriate for the kind of wall you have (plaster board, iron board, wood, etc.). If possible, fix the support screws into wall studs.
- Purchase wall mounting screws according to the type and thickness of the wall you want to mount the Soundbar on.
- Diameter: M5
- Length: 35mm or longer recommended.
- Diameter: M5
- Connect cables from the unit to external devices before you install it on the wall.
- Make sure the unit is turned off and unplugged before you install it. Otherwise, it may cause an electric shock.
Wallmount Components

Mounting your Soundbar
1
Place the Wall Mount Guide against the wall surface.
![]()
- The Wall Mount Guide must be level.
- If your TV is mounted on the wall, install the Soundbar at least 5 cm below the TV.

2
Align the Paper Template's Centre Line with the centre of your TV (if you are mounting the Soundbar below your TV) and then fix the Wall Mount Guide to the wall using tape.
![]()
- If you are not mounting below a TV, place the Centre Line in the centre of the installation area.

3
Push a pen tip or sharpened pencil tip through the centre of the A-TYPE images on each end of the Guide to mark the holes for the supporting screws and then remove the Wall Mount Guide.
![]()

4
Using an appropriately sized drill bit, drill a hole in the wall at each marking.
- If the markings do not correspond to the positions of studs, make sure you insert appropriate anchors or mollies into the holes before you insert the support screws. If you use anchors or mollies, make sure the holes you drill are large enough for the anchors or mollies you use.
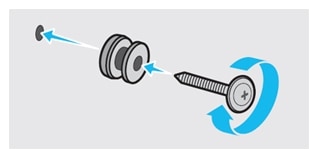
5
Push a screw (not supplied) through each Holder-Screw and then screw each screw firmly into a support screw hole.
![]()
6
Use the two Screws to attach both Bracket-Wall Mounts to the Soundbar's bottom. For a proper fit, make sure to align the bumps on the Soundbar to the holes on the brackets.
![]()
![]()

- When assembling, make sure the hanger part of the Bracket-Wall Mounts are located behind the rear of the Soundbar.

7
Install the Soundbar with the attached Bracket-Wall Mounts by hanging the Bracket-Wall Mounts on the Holder-Screws on the wall.
![]()

8
Slide the Soundbar down as shown below so that the Bracket-Wall Mounts rest securely on the Holder screws
![]()

Detaching the Soundbar from the Wall
1
To separate the Soundbar from the wall mount, push it in the direction of arrow, tilt it up slightly and then pull it away from the wall as shown.
![]()

- Do not hang onto the installed unit and avoid striking or dropping the unit.
- Secure the unit firmly to the wall so that it does not fall off. If the unit falls off, it may cause an injury or damage the product.
- When the unit is installed on a wall, please make sure that children do not pull any of the connecting cables as this may cause it to fall.
- For the optimal performance of a wall mount installation, install the speaker system at least 2 inches (5 cm) below the TV, if the TV is mounted on the wall.
- For your safety, if you do not mount the unit on the wall, install it on a secure, flat surface where it is unlikely to fall.
For further assistance, please contact our Chat Support. To find your Samsung product's User Manual, head to Manuals & Downloads.
 This product should be mounted to a wall or other suitable surface to avoid serious injury. Find out more here.

Thank you for your feedback!
Please answer all questions.
Contact Info
Contact us
For support buying a product, help with an order or technical product support
WhatsApp
![]()
![]()
It's now even easier to get in contact with Samsung Customer Care, now on WhatsApp.
Troubleshoot and book a repair
Support for your mobile devices, home appliances, TV and computing products