Set up your Samsung tablet

Using a new tablet

You just got a new Samsung Galaxy tablet, but where do you begin? Start by transferring data from your old tablet or even a phone using Smart Switch. Choose a wired or wireless transfer, or use an external storage device like a microSD card to move all your data. If you have an iOS device, use iCloud with Smart Switch to transfer your data. Smart Switch also offers security options for transferring, so everything will remain safe when you move to your new tablet.

Turning the tablet on for the first time

The steps for setting up a tablet can vary depending on whether it has an LTE connection or is Wi-Fi only. You can refer to your carrier for specific setup instructions if these steps don't totally match up, or for help with sim card setup.

  1. If have an LTE or 5G capable tablet, you may need to insert your physical SIM card first. If you'll be using one, now is also a great time to insert a MicroSD card. If your carrier supports eSIM, you'll be prompted to set it up as part of the initial setup, or you can set up your eSIM later.

  2. Charge the tablet. Plug the included USB-C cable in the charger, and then plug the charger into an outlet. Plug the other end into the tablet's USB-C port. Make sure you are using the correct charger and cable.

  3. Press and hold the Side button until the tablet turns on. Once it fully boots you will be greeted by the Welcome screen where you can select the primary language. Tap Start to continue.

  4. Take the time to review the Terms and Conditions, Privacy Policy, and the sending of diagnostic data if you'd like, and then tap Agree to All > Agree to continue.

  5. If you'd like to transfer settings, accounts, apps, and other data from another device, tap either Galaxy or Android device, or iPhone® or iPad®, depending on what you'll be transferring from. You can follow the on-screen instructions to transfer your data, or refer to our complete guide to Smart Switch.

  6. Choose a Wi-Fi network. You will need to at least connect to Wi-Fi to get the most out of your tablet. The tablet will scan for nearby networks, so select your network. If your network is hidden, tap Add network and enter it manually. Enter the password to connect.

  7. The steps may branch from here if you have an LTE or 5G tablet. If you are using an eSIM, follow the on-screen instructions. If you need to activate your eSIM or physical SIM, you should check with the carrier to ensure it is activated correctly. If you won't be using it connected to a carrier, tap Skip.

  8. After your tablet is connected, it will take a few minutes to configure the settings that you just finished setting. You'll have another opportunity to transfer apps and data from a previous device. Continue to the Ways to transfer your content section. If you do not want to transfer any data from a previous device, tap Don't copy. From here you will be prompted to sign into or create a Google Account. A Google account will get you access to the Play store, and many other features that will help you use your tablet.

  9. You'll next be prompted to add a screen lock to your device. A lock screen will keep unauthorized users from accessing your data. Choose your lock type, and follow the instructions to add it to your tablet. If you choose a biometric lock, like fingerprints or face recognition, you'll be prompted to add a standard lock as well.

  10. Now you can sign in to, or create a Samsung account. With a Samsung account you'll be able download apps, sync with other Galaxy devices, and even locate your tablet if it goes missing.

  11. Finally you'll need to choose whether you'd like to use Light mode or Dark mode. Tap either option to see how it will appear, and then tap Next.

  12. You've finished setting up your tablet! 

Ways to transfer your content

Before anything else, choose which transfer method you'd like to use with Smart Switch. The following information will let you know about wireless or wired transfers, transfers via iCloud, or transfers using an external storage device.

  • Wireless transfer: A wireless transfer is a quick way to move content from one device to another. You can keep your devices plugged in as well, so there’s no need to worry about your battery draining during the transfer. Make sure you have Smart Switch installed on both devices before you begin.

  • Transfer with a USB cable: For a more secure and reliable transfer, you can connect your devices using a USB cable. However, you will not be able to plug in a charger, so make sure everything is fully charged before starting.

  • Transfer via iCloud: If you are transferring from an iPhone, you can access your stored iCloud data with Smart Switch. Check your iPhone first to make sure all of your important data has been saved to iCloud, just in case there is something missing.

  • Transfer with an external device: Using an external storage device is another option for transferring your content. You can use a microSD card or USB OTG flash drive to back up your data on one device and then move it to another device. You will need to insert the microSD card or flash drive into your old device to create a backup of your data before transferring it.

Content that can and cannot be transferred with Smart Switch

Although Smart Switch allows you to transfer a wide variety of content, like contacts, call history, call logs, photos, videos, and documents, there are some things that cannot be transferred using the app. You can learn more about the file types that must be transferred separately if there are other kinds of data you need to move.

Note: Content that is synced with an external service, like a calendar synced with Office or Google, cannot be transferred with Smart Switch, but you will be able to sync them when you have added the account to the new device.


Data transferrable from Android:

  • Personal content: Contacts, S Planner, Messages, Memo, Call logs, Clock, and Internet.

  • App data: Images, Music (DRM free content only), Videos (DRM free content only), Documents, Story Album, and Applications.

  • Settings, etc: Email, Wallpaper, Lock screen, Radio, and Preferences.


Data transferrable from iOS via iCloud:

  • Personal content: Contacts, Schedule, Notes, Call history, and Bookmarks.

  • App data: Photos, Videos (DRM free content only), Documents, Recommended apps, and Voice Memos.

  • Settings, etc: Wi-Fi, and Alarms.


Data transferrable from a USB cable:

  • Personal content: Contacts, Schedule, Messages, Notes, Call history, and Bookmarks.

  • App data: Photos, Music (DRM free content only), Videos (DRM free content only), Documents, Recommended apps, and Voice Memos.

  • Settings, etc: Wi-Fi, and Alarms.

Smart Switch settings

You may be concerned about keeping your content safe while it’s being transferred. Thankfully, Smart Switch has a few security options you can use to protect your data. You can enable these options to set authentication and password requirements for transferring data.

Navigate to and open Smart Switch, and then tap More options (the three vertical dots). Tap Settings, and then tap your desired security option.

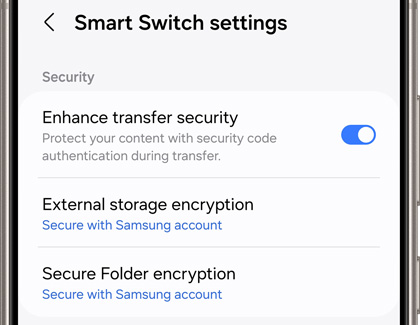
  • Enhance transfer security: To protect your data, an authentication code must be entered when transferring files.

  • External storage encryption: Select your preferred option when restoring backup files from microSD cards and USB storage devices.

  • Secure Folder encryption: Select your preferred option when restoring backup files from Secure Folder.

A list of Smart Switch settings on a Galaxy phone

You can also tap About Smart Switch to review the app version, Terms of Service, and open source license information. Regularly updating Smart Switch to the latest version will ensure that the app is getting the most recent security patches.

Troubleshoot with Smart Switch

If you’re using Smart Switch and your transfer stops or gets interrupted, there are a few things you can do to fix it. Clearing the app’s cache, checking the system requirements, and freeing up space on your device can help to solve issues with Smart Switch.

Do more with your tablet

Sync gallery with OneDrive: Set your Gallery to automatically sync with OneDrive, and files can be accessed anytime.

Connect with Samsung Health: Sync your tablet to Samsung Health-compatible devices to help you stay on track with your fitness needs.

Adjust display settings: Adjust everything from the size of the font, the color settings, white balance, and the size of everything on the screen.

Multitask on your tablet: With split screen view, you can open two apps on your tablet and use them simultaneously.

Change the wallpaper: You can customize the Galaxy themes, Samsung wallpapers, and icons on your device to fit your tastes.

Take a screenshot: The method for capturing a screenshot will vary for each device, but is an easy and convenient process for saving images.

Using Bixby on Galaxy Tab A9+

Bixby: Use Bixby as your virtual assistant to make it easier to use your tablet and focus on what matters most.

Using Galaxy Tab A9+ as a second screen

Second screen: If you have a Windows 10 or later PC you can utilize the tablet as a screen as second screen to increase productivity 

Using Dex mode on Galaxy Tab A9+

Dex: You can use your tablet just like a PC with DeX mode to optimized things you do without connecting to a monitor or TV.

samsung logo action minus
Contact us
We're here for you.
Was this content helpful?
We're here for you

Contact Samsung Support

Contact us online through chat and get support from an expert on your computer, mobile device or tablet. Support is also available on your mobile device through the Samsung Members App.
Table of contents