How to manage your Samsung smart home when moving
The thing about smart homes is that, just like homes, sometimes it's time to pack up and move on. Or, perhaps you're moving into something shiny and new! Either way, sometimes home appliances and other SmartThings devices may stay behind for a new owner. Fortunately, the process of changing ownership is simple and easy, even if the previous or current owner is unreachable.
Moving out, selling, or letting go of devices
Goodbye old devices! Whether it's letting go of a washer, refrigerator, dishwasher, or any kind of SmartThings capable device, putting the past behind you is easy. Simply remove the device from your SmartThings account and it's a done deal.
You can remove the device at any time, even if you're not with it, like if you've already moved and forgot to do it before you left. That's no problem.
Note: If your device has a screen, like the Family Hub refrigerator, you will also want to perform a factory reset before you leave. See the reset section at the end of this article.
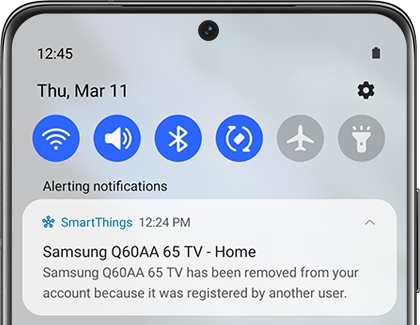
If you haven't removed the device yet by the time the next owner tries to set it up, then the worst that might happen is that you get this notification informing you that the new user has taken control of the device. No action from you is needed at all; you're done, and will never be bothered about it again.
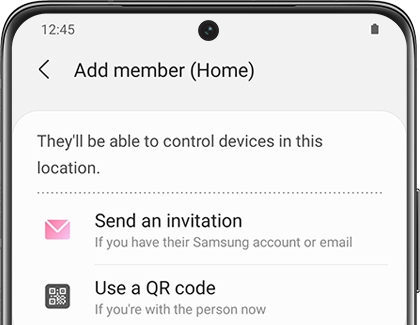
However, if you still own the device and you're just sharing it, you'll want to invite the user into your SmartThings home. You can send an invite to a user to join your home at any time by hitting + in the Members section.
Use this if for instance you have a house sitter while you're away on vacation, or when giving multiple family members access to the smart home. The manager of the SmartThings home can remove users at any time from the Members section, or users can voluntarily leave, as well.
Note: Granting a user permission to access your SmartThings home shares the name and Samsung account of all users with access, and grants control of and access to usage history of all devices in the home. It's a little bit like inviting someone into your real home.
Moving in, buying, or taking control of devices
Welcome to your new smart home! Your new SmartThings capable appliances and devices are ready and available to set up at any time. If you've got concerns that they might still be registered to their previous owner, don't: simply being physically with the appliance allows you to take ownership at any time.
First thing's first: Go ahead and get the SmartThings app and get it set up on your phone or mobile device. Feel free to take your time and get acquainted, and perhaps check out the tip videos.
When you're ready to add your device, no special procedure is needed, just take care to follow all on screen instructions during setup.
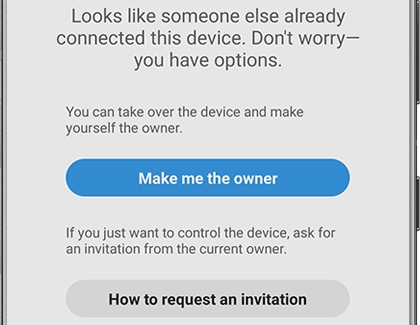
If the previous owner did not remove the device from their account, you will get a prompt like this during setup.
Is this device yours now? If the previous user should no longer be involved, select Make me the owner. The device will be removed from the previous owner's account, and added to yours instead. Easy.
If it's still the previous user's device and you're asking for permission to join their entire SmartThings home (not just this device), select How to request an invitation. This will stop setup and show you what the manager of the SmartThings home needs to do in order to send you an invitation. Contact them and have them follow the instructions. (This is also described in the "Moving out" section.)
That's it! On screen directions should steer your setup path specific to your situation and the appliance or device you're connecting. But if you have trouble and cannot connect to SmartThings, see our guide for troubleshooting.
Note: If you're not planning on using SmartThings, but you want to reset the appliance so the previous owner no longer has access to it, see the network reset instructions in the next section.
Manage smart devices in businesses or rental properties
In rental multi-family apartments, there's a regular change of ownership that may occur without a change in Wi-Fi network name and password. To ensure resident privacy, Wi-Fi and other connectivity settings should be reset at each change of resident. See the next section for instructions on how to reset the appliances' network settings.
Clear Wi-Fi settings with a network reset
If you're moving out, don't worry: thanks to the security provided by SmartThings, your information is kept private from those who are not members of your SmartThings home. Additionally, unless you leave your Wi-Fi network behind with the same name and password, all the appliances will be disconnected and unable to get back online without being set up under a new owner. However, if privacy is of utmost concern to you and you want the added peace of mind, we recommend you completely wipe the appliance and do a network reset on it before you leave it behind.
If you're moving in, the easiest way to take control and remove the previous user's access is to add it to SmartThings yourself, as described in the previous section. You can also change the Wi-Fi network and password so it's not the same as what the previous owner was using, which will disconnect all the smart devices that were using the old network. But if you don't like either of those options, any privacy concerns you have should be addressed by performing a network reset.
Find your device type to see the instructions for that appliance category.
Air Purifier: Simultaneously touch and hold POWER and WIND FREE (or LOCK) until the operation completes (about 10 seconds).
Cooktop (without knobs): Turn off Child Lock. On the Timer control, press and hold the minus button (-) for 3 seconds. Then press and hold On/Off for 3 seconds, until the software version is displayed. (The panel has an On/Off button for each cooking element, it is normally the front-right element's button you will need to press, but if the software version does not display, then try the steps again using a different element until you find the one that works.) Once the software version displays, press and hold Smart Connect for 3 seconds. When CL displays, the reset is complete.
Cooktop (with knobs): Within 5 seconds of restoring power to the cooktop, press the Smart Connect button 3 times. The Wi-Fi LED will blink to indicate it has been reset. (The Smart Connect button can be found behind one of the knobs. See your user manual for details specific to your model.)
Dishwasher: Hold the Smart Control button until AP displays (about 3 seconds), and then the Hi-Temp Wash button until the dishwasher chimes (about 7 seconds). Then, turn the dishwasher off.
Dryer: Hold the Smart Control button until AP displays (about 3 seconds), and then the Temp button until OK displays (about 7 seconds). The display will then revert to AP. Then, turn the dryer off.
Microwave: Simultaneously press and hold Start and 0 until the display changes (about 3 seconds). The display will scroll through the software version. When the display finishes scrolling, touch and hold Smart Control until CLr displays (about 3 seconds).
Oven (with touchscreen):
Method 1: Within 5 seconds of plugging in the oven, simultaneously press SETTINGS and LIGHT. Follow the on screen instructions to start the reset and delete all data.
Method 2: Simultaneously press MENU and the BACK button on the left side. On the screen, select Factory Reset, and then Reset Data.
Oven (without touchscreen): Simultaneously press and hold the correct two buttons (depending on your model) until the operation completes. Then, when the number starting with N appears, press the button until CLr appears (about 3 seconds). Resetting will take time, so please wait.
NV51K66: Keep Warm + 3
NQ70M65, NQ70M66: Bread Proof + 3
NV73J97: Menu + Child Lock
NV75N76: Back + Lamp
Range (with number pad): Simultaneously touch and hold Keep Warm and 3 until the display changes (about 3 seconds). The display will scroll through the software version. When the display finishes scrolling, touch and hold Smart Control until CLr displays (about 3 seconds).
Range (without number pad): Simultaneously touch and hold Timer and down arrow until the display changes (about 3 seconds). The display will scroll through the software version. When the display finishes scrolling, touch and hold Smart Control until CLr displays (about 3 seconds).
Refrigerator (Family Hub): Navigate to Settings > About Family Hub > Factory Data Reset, and select Reset.
Refrigerator (not Family Hub): Touch and hold the LOCK button until A and r appear on the refrigerator (about 12 seconds).
Robot Vacuum: Press the Start/stop button twice until Init appears, then press it again to start initialization. If 0000 appears, keep pressing Start/stop until C000 appears. After a while, turn the emergency switch off and back on again.
Washing machine: Touch and hold Smart Control until AP displays (about 3 seconds). Then, touch and hold Temp until OK appears. The display will revert to AP. Then, turn off the washer.
Other answers that might help
-
Mobile 8 AM - 12 AM EST 7 days a week
-
Home Electronics & Appliance 8 AM - 12 AM EST 7 days a week
-
IT/Computing 8 AM - 9 PM EST 7 days a week
-
Text Support 24 hours a day 7 Days a Week
Contact Samsung Support
